Custom Models
DeepFellow allows you to install, configure, and use custom models in different DeepFellow Infra services. This guide is divided into sections describing how to use custom model with each service.
All custom models are installed using Infra Web Panel.
You can install any model available in Ollama library and many from HuggingFace.
Choosing Services
Available LLM services – ollama, llamacpp, and vllm differ in their level of hardware integration, including dependencies on specific CPU instruction sets.
To minimize hardware compatibility issues, consider the following services:
- ollama – Recommended for most users. Automatically adapts to your hardware configuration with minimal setup required. Support GGUF, Safetensors, adapters and can create quantized model from safetensor.
- llamacpp – Supports models outside the ollama repository and the GGUF model format. May require extra configuration due to a higher chance of hardware compatibility issues.
- vllm – Offers the highest performance but carries the highest risk of hardware-related complications. Recommended for experienced users who are confident in troubleshooting and system configuration.
Recommendation: If you're not sure which service to choose, start with ollama.
Simple Installation
As an example, if you want to add qwen3-embedding:0.6b to your 'ollama' service, use DeepFellow Web Panel.
In services view, locate "ollama" service and click "Models".
Click "Add custom model".
In the pop-up window enter Model ID: qwen3-embedding:0.6b, enter Size: 639MB, and choose embedding model type from the drop-down.
Optionally, enter model alias and its idle timeout (i.e., how long should this model last when it isn't used, e.g. "5m" for five minutes).
Finally click "Add custom model", and then "Install".
After a while, your model will appear in the models list with green label "Installed".
Verify
To use qwen3-embedding:0.6b – call POST v1/embeddings endpoint, since it's an embedding model.
curl -X 'POST' \
  'https://deepfellow-server-host/v1/embeddings' \
  -H 'Authorization: Bearer DEEPFELLOW-PROJECT-API-KEY' \
  -H 'Content-Type: application/json' \
  -d '{
  "encoding_format": "float",
  "input": "Hello, how are you?",
  "model": "qwen3-embedding:0.6b" # here you can pass model alias instead
}'
import requests
response = requests.post(
'https://deepfellow-server-host/v1/embeddings',
json={
"encoding_format": "float",
"input": "Hello, how are you?",
"model": "qwen3-embedding:0.6b" # here you can pass model alias instead
},
headers={
"Content-Type": "application/json",
"Authorization": "Bearer DEEPFELLOW-PROJECT-API-KEY"
}
)
data = response.json()
print(data)const response = await fetch('https://deepfellow-server-host/v1/embeddings', {
method: 'POST',
headers: {
'Content-Type': 'application/json',
Authorization: 'Bearer DEEPFELLOW-PROJECT-API-KEY'
},
body: JSON.stringify({
encoding_format: 'float',
input: 'Hello, how are you?',
model: 'qwen3-embedding:0.6b' // here you can pass model alias instead
})
});
const data = await response.json();
console.log(data);Response:
{
  "object": "list",
  "data": [
    {
      "object": "embedding",
      "embedding": [
        -0.001106513,
        -0.0033979767,
        -0.004260577,
        ...
        -0.008845862,
        0.004314483
      ],
      "index": 0
    }
  ],
  "model": "qwen3-embedding:0.6b",
  "usage": {
    "prompt_tokens": 6,
    "total_tokens": 6
  }
}
Advanced Installation
Model Sources
To create more advanced solutions, use Modelfile field. Learn how to use it in Ollama import.

As an example, fill Modelfile value with the following schemes:
Ollama Repository
FROM gemma3:1b-
local models (GGUF)
The base path for local files is
{STORAGE}/services/ollama/main, where{STORAGE}is$HOME/.deepfellow/infra/storageor thestoragedirectory in your repository files. Place the GGUF file anywhere under that base path. In Modelfile, setFROMorADAPTERto a path starting with./relative to the base path. DeepFellow resolves the final path by joining the base path and the relative path.FROM ./gguf/Bielik-4.5B-v3.0-Instruct.Q8_0.ggufPlace the file at:
{STORAGE}/services/ollama/main/gguf/Bielik-4.5B-v3.0-Instruct.Q8_0.gguf -
local models (safetensor)
The same base path applies. Place all safetensor files in a directory anywhere under
{STORAGE}/services/ollama/main. In Modelfile, setFROMorADAPTERto a./-prefixed path pointing to that directory.FROM ./safetensor/my-modelPlace the files at:
{STORAGE}/services/ollama/main/safetensor/my-model/
Hugging Face URL
Disclaimer: some models need Hugging Face API keys in DeepFellow Infra and require accepting their Terms of Service.
-
GGUF file
FROM https://huggingface.co/speakleash/Bielik-7B-Instruct-v0.1-GGUF/resolve/main/bielik-7b-instruct-v0.1.Q4_K_M.gguf -
Safetensor repository
FROM https://huggingface.co/google/gemma-3-1b-itor
FROM https://huggingface.co/google/gemma-3-1b-it/tree/main
With Modelfile you can also set up adapters, parameters, and messages. You can find more in Ollama docs:
Quantization
You can also setup quantization for Safetensor models. Quantization allows you to run models faster and with less memory consumption but at reduced accuracy. It's especially useful, if you need to use less efficient hardware.
Possible quantization types are:
- q3_K_S
- q3_K_M
- q3_K_L
- q4_0
- q4_K_S
- q4_K_M
- q4_1
- q5_0
- q5_1
- q5_K_S
- q5_K_M
- q6_K
- q8_0
Not all models support all types of quantization.
To learn about quantization types in more detail, visit Hugging Face documentation.
Uninstall
To uninstall model, go to the 'ollama' service model view, find model ID qwen3-embedding:0.6b, click "Uninstall" and finally click "Remove custom model".
LLamaCpp Models
You can install any model available in HuggingFace in GGUF format.
Use llamacpp service.
Install
As an example, if you want to add ggml-org/gemma-3-4b-it-GGUF to your 'llamacpp' service:
gemma-3-4b-it.Enter Model URL:
https://huggingface.co/ggml-org/gemma-3-4b-it-GGUF/resolve/main/gemma-3-4b-it-Q4_K_M.gguf?download=true.
2.49GB,After a while your model will appear in the models list with green label "Installed".
Verify
To use gemma-3-4b-it – call POST v1/chat/completions endpoint, since it's a chat model.
curl -X 'POST' \
  'https://deepfellow-server-host/v1/chat/completions' \
  -H 'Authorization: Bearer DEEPFELLOW-PROJECT-API-KEY' \
  -H 'Content-Type: application/json' \
  -d '{
  "max_completion_tokens": 50,
  "messages": [
    {
      "content": "You are a helpful assistant.",
      "role": "system"
    },
    {
      "content": "hello!",
      "role": "user"
    }
  ],
  "model": "gemma-3-4b-it" # here you can pass model alias instead
}'
import requests
response = requests.post(
'https://deepfellow-server-host/v1/chat/completions',
json={
"max_completion_tokens": 50,
"messages": [
{
"content": "You are a helpful assistant.",
"role": "system"
},
{
"content": "hello!",
"role": "user"
}
],
"model": "gemma-3-4b-it" # here you can pass model alias instead
},
headers={
"Content-Type": "application/json",
"Authorization": "Bearer DEEPFELLOW-PROJECT-API-KEY"
}
)
data = response.json()
print(data)const response = await fetch('https://deepfellow-server-host/v1/chat/completions', {
method: 'POST',
headers: {
'Content-Type': 'application/json',
Authorization: 'Bearer DEEPFELLOW-PROJECT-API-KEY'
},
body: JSON.stringify({
max_completion_tokens: 50,
messages: [
{
content: 'You are a helpful assistant.',
role: 'system'
},
{
content: 'hello!',
role: 'user'
}
],
model: 'gemma-3-4b-it' // here you can pass model alias instead
})
});
const data = await response.json();
console.log(data);Response:
{
    "choices": [
        {
            "finish_reason": "stop",
            "index": 0,
            "message": {
                "role": "assistant",
                "content": "Hello there! How can I help you today? 😊 \n\nDo you have a question, need some information, or just want to chat? Let me know!"
            }
        }
    ],
    "created": 1760625765,
    "model": "gemma-3-4b-it",
    "system_fingerprint": "b6620-b887d2f3",
    "object": "chat.completion",
    "usage": {
        "completion_tokens": 34,
        "prompt_tokens": 18,
        "total_tokens": 52
    },
    "id": "chatcmpl-W7PglxNtJVdM3yAgUO3fvnR1uAyS8WU7",
    "timings": {
        "cache_n": 0,
        "prompt_n": 18,
        "prompt_ms": 26.931,
        "prompt_per_token_ms": 1.4961666666666666,
        "prompt_per_second": 668.3747354350005,
        "predicted_n": 34,
        "predicted_ms": 197.006,
        "predicted_per_token_ms": 5.794294117647059,
        "predicted_per_second": 172.583576134737
    }
}
Uninstall
To uninstall model, go to the 'llamacpp' service model view, find model ID gemma-3-4b-it, click "Uninstall" and finally click "Remove custom model".
vLLM Models
You can install any model available in HuggingFace supported by vLLM.
Use vllm service.
Install
As an example, if you want to add Qwen3-1.7B to your 'llamacpp' service:
Qwen3-1.7B.Qwen/Qwen3-1.7B.4GB.After a while your model will appear in the models list with green label "Installed".
Verify
To use Qwen/Qwen3-1.7B – call POST v1/chat/completions endpoint, since it's a chat model.
curl -X 'POST' \
  'https://deepfellow-server-host/v1/chat/completions' \
  -H 'Authorization: Bearer DEEPFELLOW-PROJECT-API-KEY' \
  -H 'Content-Type: application/json' \
  -d '{
  "max_completion_tokens": 50,
  "messages": [
    {
      "content": "You are a helpful assistant.",
      "role": "system"
    },
    {
      "content": "hello!",
      "role": "user"
    }
  ],
  "model": "Qwen/Qwen3-1.7B" # here you can pass model alias instead
}'
import requests
response = requests.post(
'https://deepfellow-server-host/v1/chat/completions',
json={
"max_completion_tokens": 50,
"messages": [
{
"content": "You are a helpful assistant.",
"role": "system"
},
{
"content": "hello!",
"role": "user"
}
],
"model": "Qwen/Qwen3-1.7B" # here you can pass model alias instead
},
headers={
"Content-Type": "application/json",
"Authorization": "Bearer DEEPFELLOW-PROJECT-API-KEY"
}
)
data = response.json()
print(data)const response = await fetch('https://deepfellow-server-host/v1/chat/completions', {
method: 'POST',
headers: {
'Content-Type': 'application/json',
Authorization: 'Bearer DEEPFELLOW-PROJECT-API-KEY'
},
body: JSON.stringify({
max_completion_tokens: 50,
messages: [
{
content: 'You are a helpful assistant.',
role: 'system'
},
{
content: 'hello!',
role: 'user'
}
],
model: 'Qwen/Qwen3-1.7B' // here you can pass model alias instead
})
});
const data = await response.json();
console.log(data);Response:
{
    "choices": [
        {
            "finish_reason": "stop",
            "index": 0,
            "message": {
                "role": "assistant",
                "content": "Hello! How can I help you?"
            }
        }
    ],
    "created": 1760629812,
    "model": "Qwen/Qwen3-1.7B",
    "system_fingerprint": "b6620-b887d2f3",
    "object": "chat.completion",
    "usage": {
        "completion_tokens": 34,
        "prompt_tokens": 18,
        "total_tokens": 52
    },
    "id": "chatcmpl-uZSktK05yOus1NDtftpT8wFkuV9jHNrN",
    "timings": {
        "cache_n": 17,
        "prompt_n": 1,
        "prompt_ms": 7.488,
        "prompt_per_token_ms": 7.488,
        "prompt_per_second": 133.54700854700855,
        "predicted_n": 34,
        "predicted_ms": 191.626,
        "predicted_per_token_ms": 5.636058823529412,
        "predicted_per_second": 177.42895014246503
    }
}
Uninstall
To uninstall model, go to the 'vllm' service model view, find model ID Qwen/Qwen3-1.7B, click "Uninstall" and finally click "Remove custom model".
Stable-Diffusion Models
You can install any image generation model compatible with stable diffusion (e.g., from Civitai, HuggingFace).
Use stable-diffusion service.
Install
As an example, if you want to add SDVN6-RealXL to your 'llamacpp' service:
SDVN6-RealXL.Stable-diffusion.Enter Model File URL (Download link):
https://civitai.com/api/download/models/134461?type=Model&format=SafeTensor&size=full&fp=fp16.
sdvn6Realxl_detailface.safetensors4GB.After a while your model will appear in the models list with green label "Installed".
Verify
See Image Generation guide to learn how to use stable-diffusion models.
Uninstall
To uninstall model, go to the 'stable-diffusion' service model view, find model ID stable-diffusion, click "Uninstall" and finally click "Remove custom model".
Docker Image Service
You can connect any containerized model, application, or microservice – literally anything that provides Web API.
Install
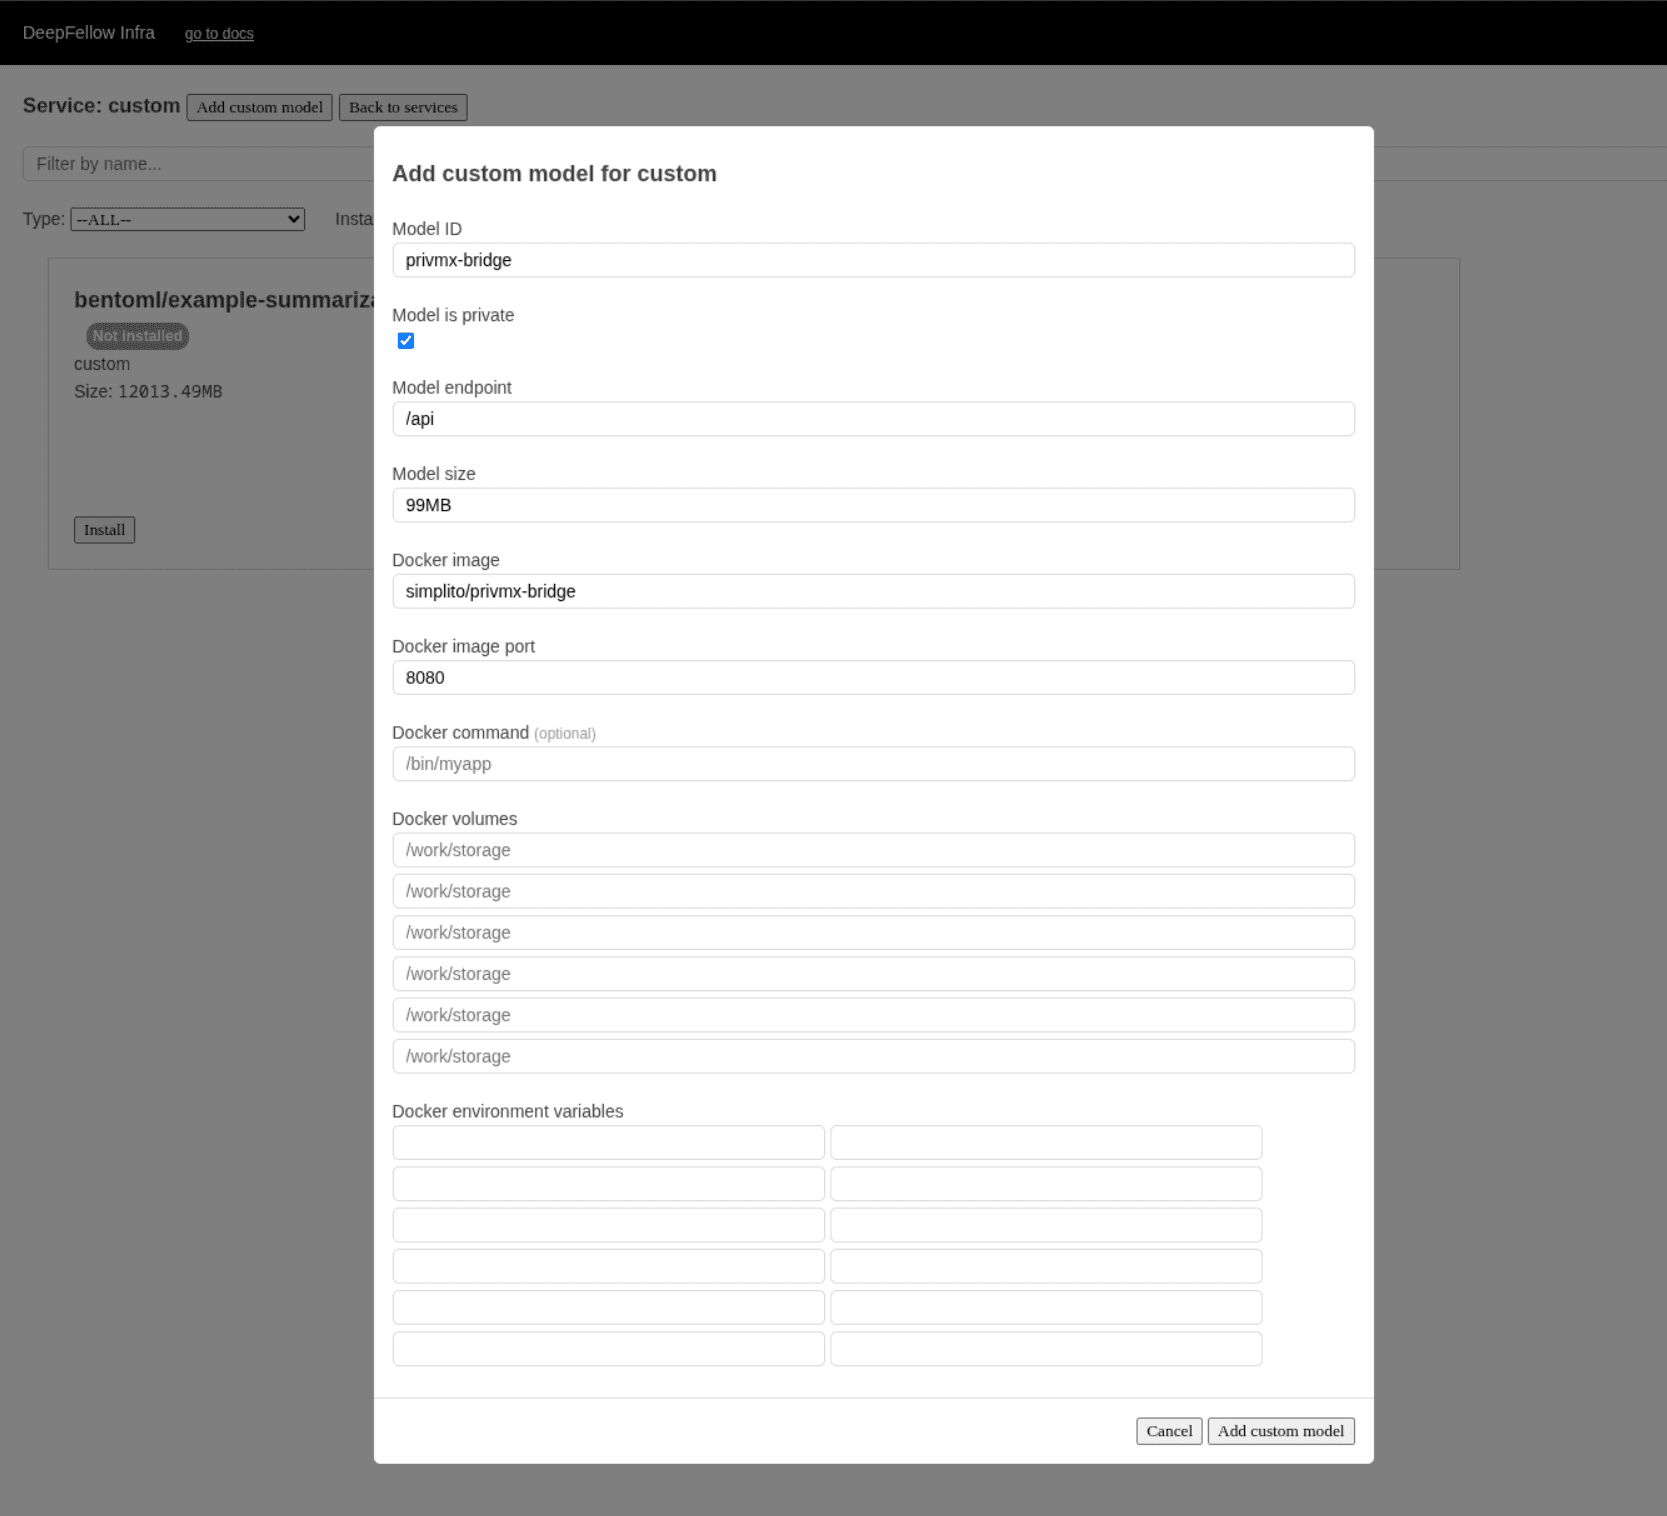
For example, if you want to add your custom application with ID my-app and providing /api endpoint:
my-app.Check "Model is private" box, if you want to use our anonymization plugin to filter your traffic to/from the app.
/api.In Docker image enter ID of the image, e.g. company/my-app (you can find this ID in
registry, e.g., DockerHub).
8080.Optionally, configure Docker command, Docker volumes, and Docker environment variables.
After a while your model will appear in the models list with green label "Installed".
Verify
Use /custom/{path} endpoint to communicate to your image. For example, if you put /abc in the model endpoint configuration, use /custom/abc:
curl -X 'GET' \
  'https://deepfellow-server-host/custom/api' \
  -H 'Authorization: Bearer DEEPFELLOW-PROJECT-API-KEY' \
  -H 'Content-Type: application/json'
import requests
response = requests.post(
'https://deepfellow-server-host/custom/api',
headers={
"Content-Type": "application/json",
"Authorization": "Bearer DEEPFELLOW-PROJECT-API-KEY"
}
)
data = response.json()
print(data)const response = await fetch('https://deepfellow-server-host/custom/api', {
method: 'POST',
headers: {
'Content-Type': 'application/json',
Authorization: 'Bearer DEEPFELLOW-PROJECT-API-KEY'
}
});
const data = await response.json();
console.log(data);Uninstall
To uninstall model, go to the custom service model view, find model ID my-app, click "Uninstall" and finally click "Remove custom model".
OpenAI Models
DeepFellow allows you to add your custom models stored at OpenAI, e.g. your fine-tuned models.
To create your own optimized OpenAI model read supervised fine-tuning guide in OpenAI documentation.
Install
Go to your OpenAI Finetuning Dashboard: 
Copy the value at "Output model" field, e.g. ft:gpt-3.5-turbo-0125:personal::95X23ObX.
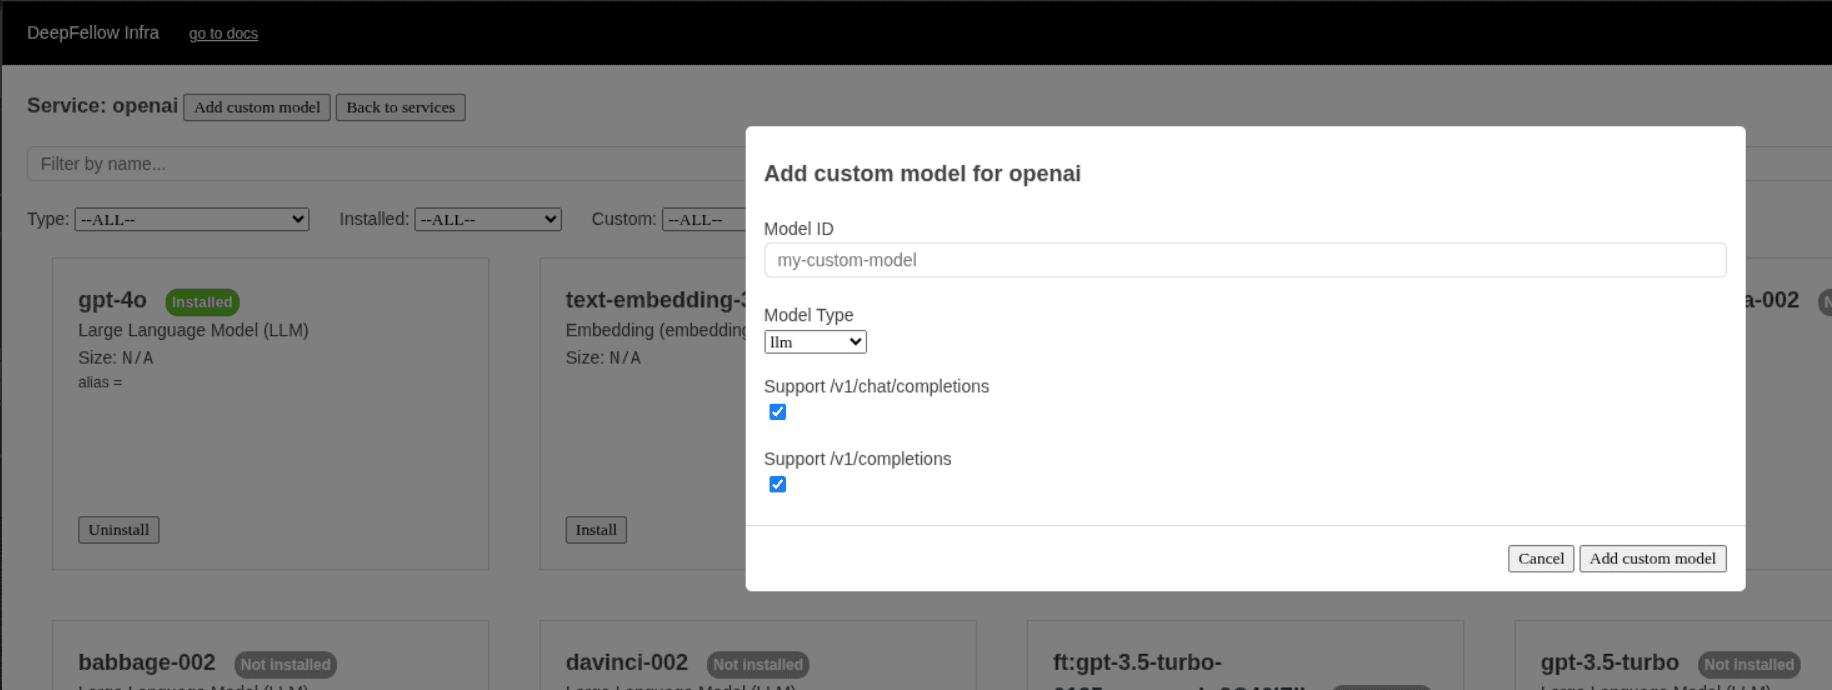
In the pop-up window enter the copied value to Model ID field:
ft:gpt-3.5-turbo-0125:personal::95X23ObX.
llm).Check boxes relevant to the supported endpoints by the added model.
After a while your model will appear in the models list with green label "Installed".
Verify
The example model's ID is ft:gpt-3.5-turbo-0125:personal::95X23ObX, its type is llm and it supports /v1/chat/completions. To verify it, do the following:
curl -X 'POST' \
  'https://deepfellow-server-host/v1/chat/completions' \
  -H 'Authorization: Bearer DEEPFELLOW-PROJECT-API-KEY' \
  -H 'Content-Type: application/json' \
  -d '{
  "max_completion_tokens": 50,
  "messages": [
    {
      "content": "You are a helpful assistant.",
      "role": "system"
    },
    {
      "content": "hello!",
      "role": "user"
    }
  ],
  "model": "ft:gpt-3.5-turbo-0125:personal::95X23ObX" # here you can pass model alias instead
}'
import requests
response = requests.post(
'https://deepfellow-server-host/v1/chat/completions',
json={
"max_completion_tokens": 50,
"messages": [
{
"content": "You are a helpful assistant.",
"role": "system"
},
{
"content": "hello!",
"role": "user"
}
],
"model": "ft:gpt-3.5-turbo-0125:personal::95X23ObX" # here you can pass model alias instead
},
headers={
"Content-Type": "application/json",
"Authorization": "Bearer DEEPFELLOW-PROJECT-API-KEY"
}
)
data = response.json()
print(data)const response = await fetch('https://deepfellow-server-host/v1/chat/completions', {
method: 'POST',
headers: {
'Content-Type': 'application/json',
Authorization: 'Bearer DEEPFELLOW-PROJECT-API-KEY'
},
body: JSON.stringify({
max_completion_tokens: 50,
messages: [
{
content: 'You are a helpful assistant.',
role: 'system'
},
{
content: 'hello!',
role: 'user'
}
],
model: 'ft:gpt-3.5-turbo-0125:personal::95X23ObX' // here you can pass model alias instead
})
});
const data = await response.json();
console.log(data);Response:
{
    "id": "chatcmpl-CRg4goc3tD0uFr3lPdZi2ttaGBA8c",
    "object": "chat.completion",
    "created": 1760712626,
    "model": "ft:gpt-3.5-turbo-0125:personal::95X23ObX",
    "choices": [
        {
            "index": 0,
            "message": {
                "role": "assistant",
                "content": "Hello! How can I assist you today?",
                "refusal": null,
                "annotations": []
            },
            "logprobs": null,
            "finish_reason": "stop"
        }
    ],
    "usage": {
        "prompt_tokens": 19,
        "completion_tokens": 9,
        "total_tokens": 28,
        "prompt_tokens_details": {
            "cached_tokens": 0,
            "audio_tokens": 0
        },
        "completion_tokens_details": {
            "reasoning_tokens": 0,
            "audio_tokens": 0,
            "accepted_prediction_tokens": 0,
            "rejected_prediction_tokens": 0
        }
    },
    "service_tier": "default",
    "system_fingerprint": null
}
Uninstall
To uninstall model, go to the 'openai' service model view, find your model ID, click "Uninstall" and finally click "Remove custom model".
Google AI Models
DeepFellow Infra offers a variety of models to install in 'google' service view in Infra Web Panel. However, if you need to access a model that is not listed there, you can add it easily.
Install
llm).Check boxes relevant to the supported endpoints by the added model.
After a while your model will appear in the models list with green label "Installed".
Verify
Assuming your model is compatible with /v1/chat/completions, verify it by doing the following:
curl -X 'POST' \
  'https://deepfellow-server-host/v1/chat/completions' \
  -H 'Authorization: Bearer DEEPFELLOW-PROJECT-API-KEY' \
  -H 'Content-Type: application/json' \
  -d '{
  "max_completion_tokens": 50,
  "messages": [
    {
      "content": "You are a helpful assistant.",
      "role": "system"
    },
    {
      "content": "hello!",
      "role": "user"
    }
  ],
  "model": "MODEL-ID" # here you can pass model alias instead
}'
import requests
response = requests.post(
'https://deepfellow-server-host/v1/chat/completions',
json={
"max_completion_tokens": 50,
"messages": [
{
"content": "You are a helpful assistant.",
"role": "system"
},
{
"content": "hello!",
"role": "user"
}
],
"model": "MODEL-ID" # here you can pass model alias instead
},
headers={
"Content-Type": "application/json",
"Authorization": "Bearer DEEPFELLOW-PROJECT-API-KEY"
}
)
data = response.json()
print(data)const response = await fetch('https://deepfellow-server-host/v1/chat/completions', {
method: 'POST',
headers: {
'Content-Type': 'application/json',
Authorization: 'Bearer DEEPFELLOW-PROJECT-API-KEY'
},
body: JSON.stringify({
max_completion_tokens: 50,
messages: [
{
content: 'You are a helpful assistant.',
role: 'system'
},
{
content: 'hello!',
role: 'user'
}
],
model: 'MODEL-ID' // here you can pass model alias instead
})
});
const data = await response.json();
console.log(data);You will get a similar response:
{
    "id": "chatcmpl-CRg4goc3tD0uFr3lPdZi2ttaGBA8c",
    "object": "chat.completion",
    "created": 1760712628,
    "model": "MODEL-ID",
    "choices": [
        {
            "index": 0,
            "message": {
                "role": "assistant",
                "content": "Hello! How can I assist you today?",
                "refusal": null,
                "annotations": []
            },
            "logprobs": null,
            "finish_reason": "stop"
        }
    ],
    "usage": {
        "prompt_tokens": 19,
        "completion_tokens": 9,
        "total_tokens": 28,
        "prompt_tokens_details": {
            "cached_tokens": 0,
            "audio_tokens": 0
        },
        "completion_tokens_details": {
            "reasoning_tokens": 0,
            "audio_tokens": 0,
            "accepted_prediction_tokens": 0,
            "rejected_prediction_tokens": 0
        }
    },
    "service_tier": "default",
    "system_fingerprint": null
}
Uninstall
To uninstall model, go to the 'google' service model view, find your model ID, click "Uninstall" and finally click "Remove custom model".
We use cookies on our website. We use them to ensure proper functioning of the site and, if you agree, for purposes such as analytics, marketing, and targeting ads.