DeepFellow Server Web Panel
Sign-in
Type the following in your terminal:
deepfellow server infoYou will get the similar output to this:
$ deepfellow server info
💡      Information about DeepFellow Server:
        SERVER_PORT: 8000
        SERVER_URL: http://localhost:8000
        SERVER_IMAGE: hub.simplito.com/deepfellow/deepfellow-server:v0.34.0
        INFRA_DOCKER_SUBNET: deepfellow-infra-net
        METRICS_USERNAME: deepfellow-metrics
        METRICS_PASSWORD: *****
        LOG_LEVEL: INFO
        PLUGINS_SETUP: {}
        MONGO_URL: mongo:27017
        MONGO_USER: deepfellow-user
        MONGO_PASSWORD: *****
        MONGO_DB: deepfellow
        MONGO_INITDB_ROOT_USERNAME: root
        MONGO_INITDB_ROOT_PASSWORD: example-root-password
        MONGO_PORT: 27017
        INFRA__URL: http://infra:8086
        INFRA__API_KEY: *****
        VECTOR_DATABASE__PROVIDER__ACTIVE: 1
        VECTOR_DATABASE__PROVIDER__TYPE: milvus
        VECTOR_DATABASE__PROVIDER__URL: http://milvus:19530
        VECTOR_DATABASE__PROVIDER__USER: deepfellow-user
        VECTOR_DATABASE__PROVIDER__PASSWORD: *****
        VECTOR_DATABASE__EMBEDDING__ACTIVE: 1
        VECTOR_DATABASE__EMBEDDING__ENDPOINT: http://infra:8086
        VECTOR_DATABASE__EMBEDDING__MODEL: text-embedding-3-small
        VECTOR_DATABASE__EMBEDDING__SIZE: 1536
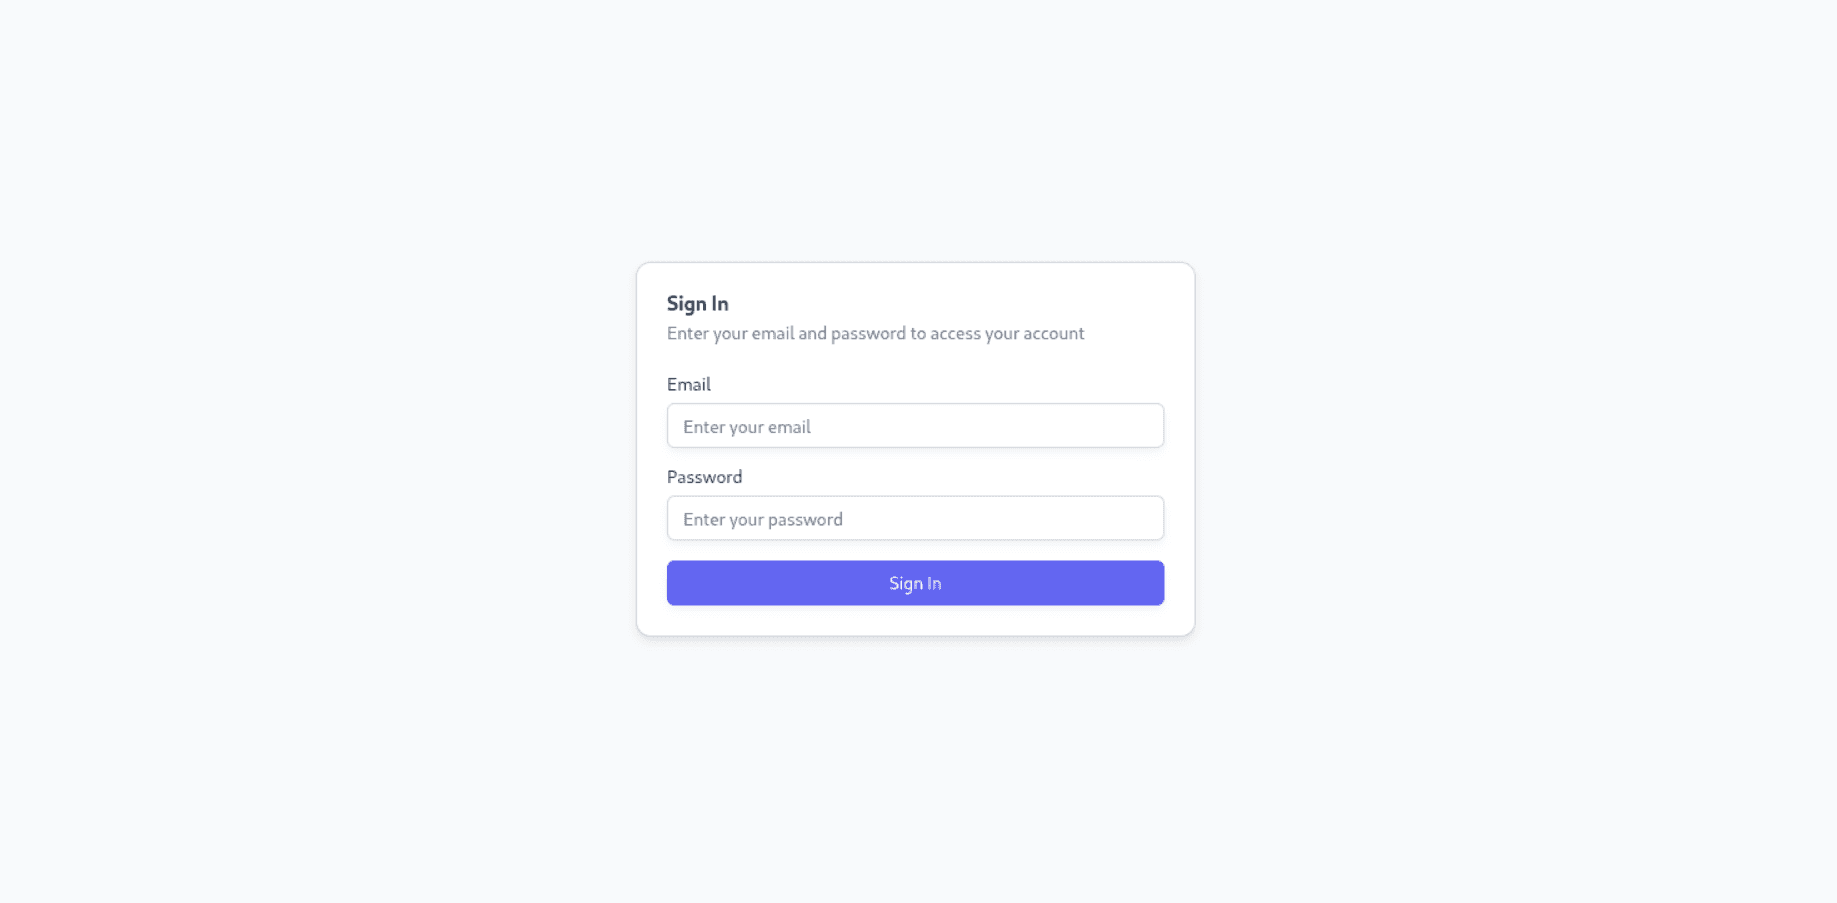
Head to http://localhost:8000 to access the Web Panel's sign-in screen:
Enter the administrator credentials you have set during Installation to access the Administrator view:
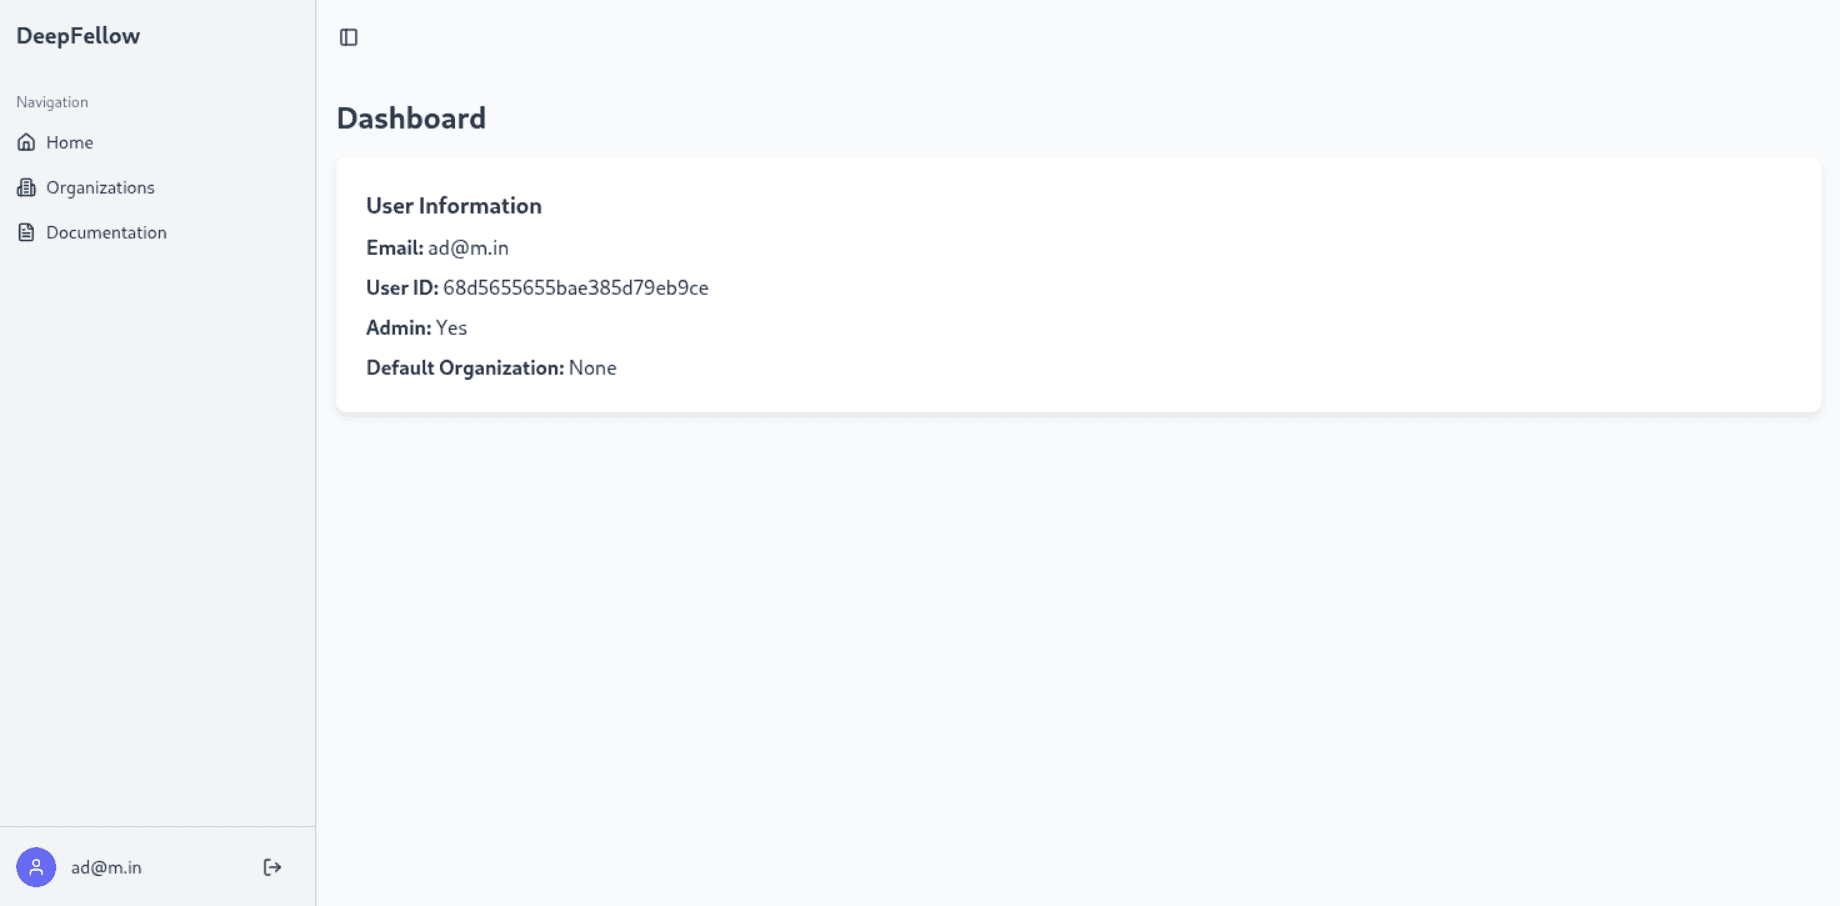
The Dashboard gives an overview of your account and the connected DeepFellow Infra instance:
- User Information – your email, user ID, admin status, default organization, and a "Change password" button.
- Models – models available from the connected DeepFellow Infra, grouped by type (Custom, Embedding, LLM, MCP, STT, Txt2img). A green "DF Infra connected" indicator confirms the connection is active.
- Plugins – installed server plugins with their version and status (enabled/disabled).
Resetting a Forgotten Password
To reset a forgotten password, click Forgot password? on the sign-in screen. Enter your account's email address and submit the form. If the system recognizes the address, it sends an email with a password reset link.
Click the link to open the password reset screen and enter a new password.
Organizations and Projects
Organization is the main unit in DeepFellow Server. Each organization can contain multiple projects, which are another level of the server's hierarchy. Each organization can be managed by the Server's Administration Web API using Organization API Keys. Organizations can have multiple Organization API Keys.
Operations inside a specific project are done using API Keys. Each project can have multiple API Keys.
Managing Organizations
Go to the organizations view using the sidebar menu:
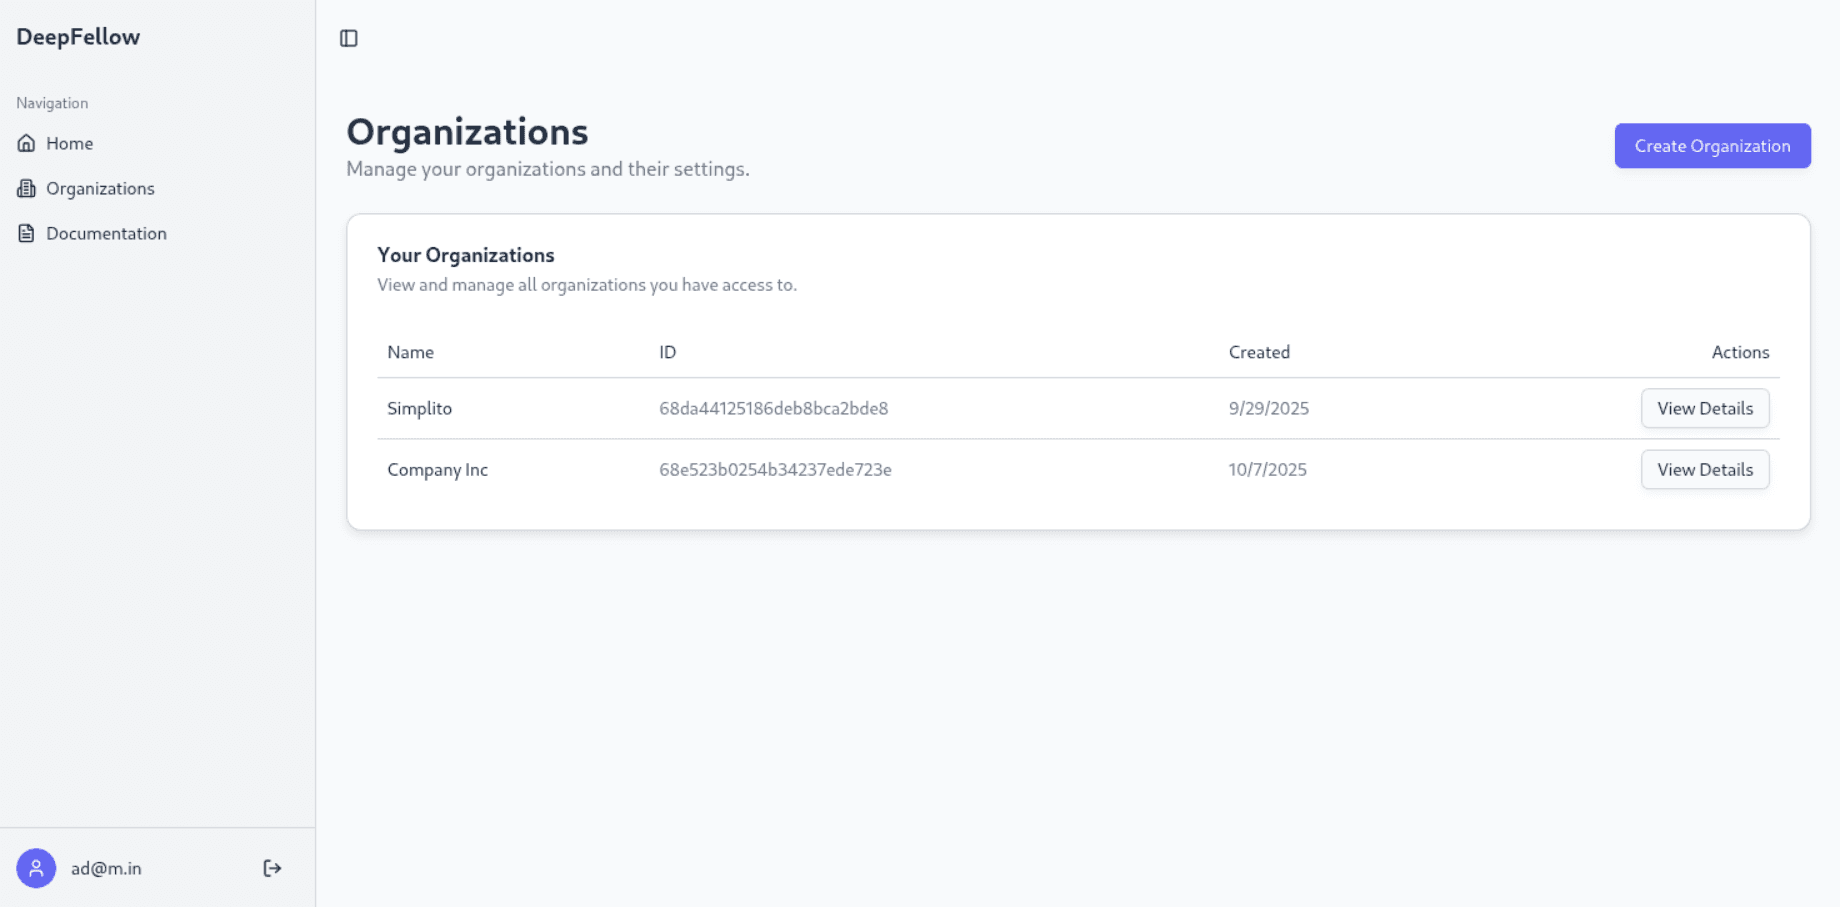
Creating an Organization
In the organizations menu, click the "Create Organization" button. Enter the name and click "Create" – your new organization will be added to the list.
You can also create organizations programmatically.
Organization Details
Click the "View Details" button on the organizations list, to see the list of projects under the chosen organization.
Go to Managing Projects to read about managing your projects.
Go to Organization API Keys to read about managing Organization API Keys.
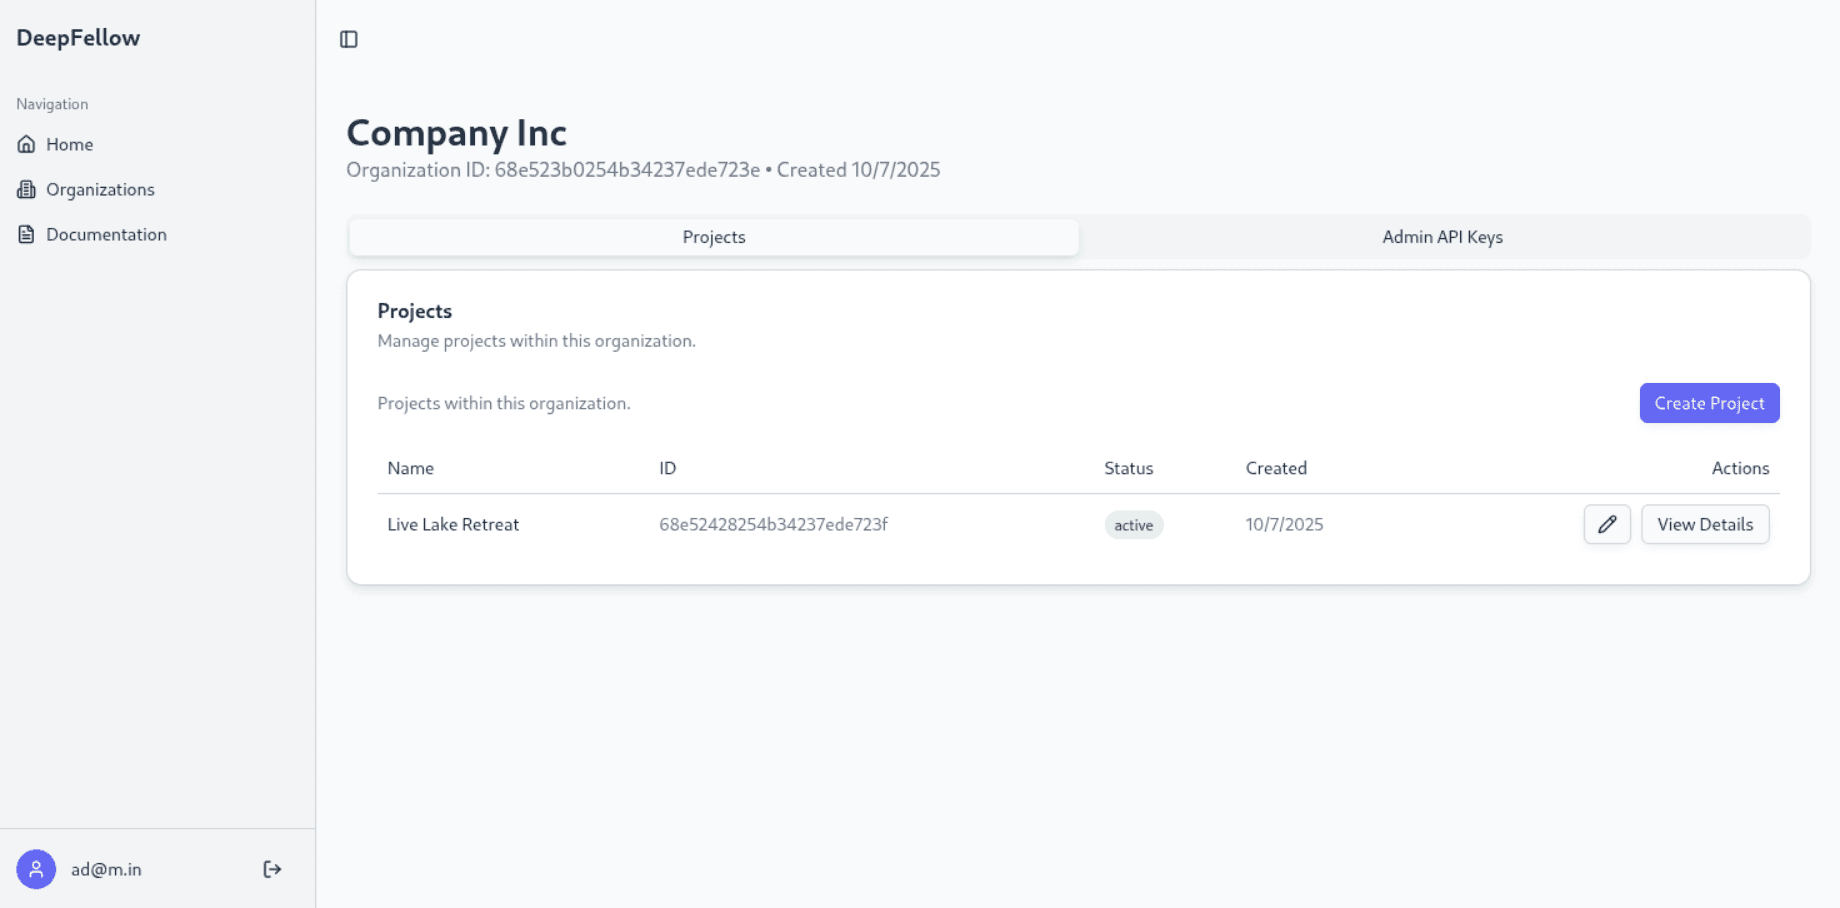
Organization API Keys
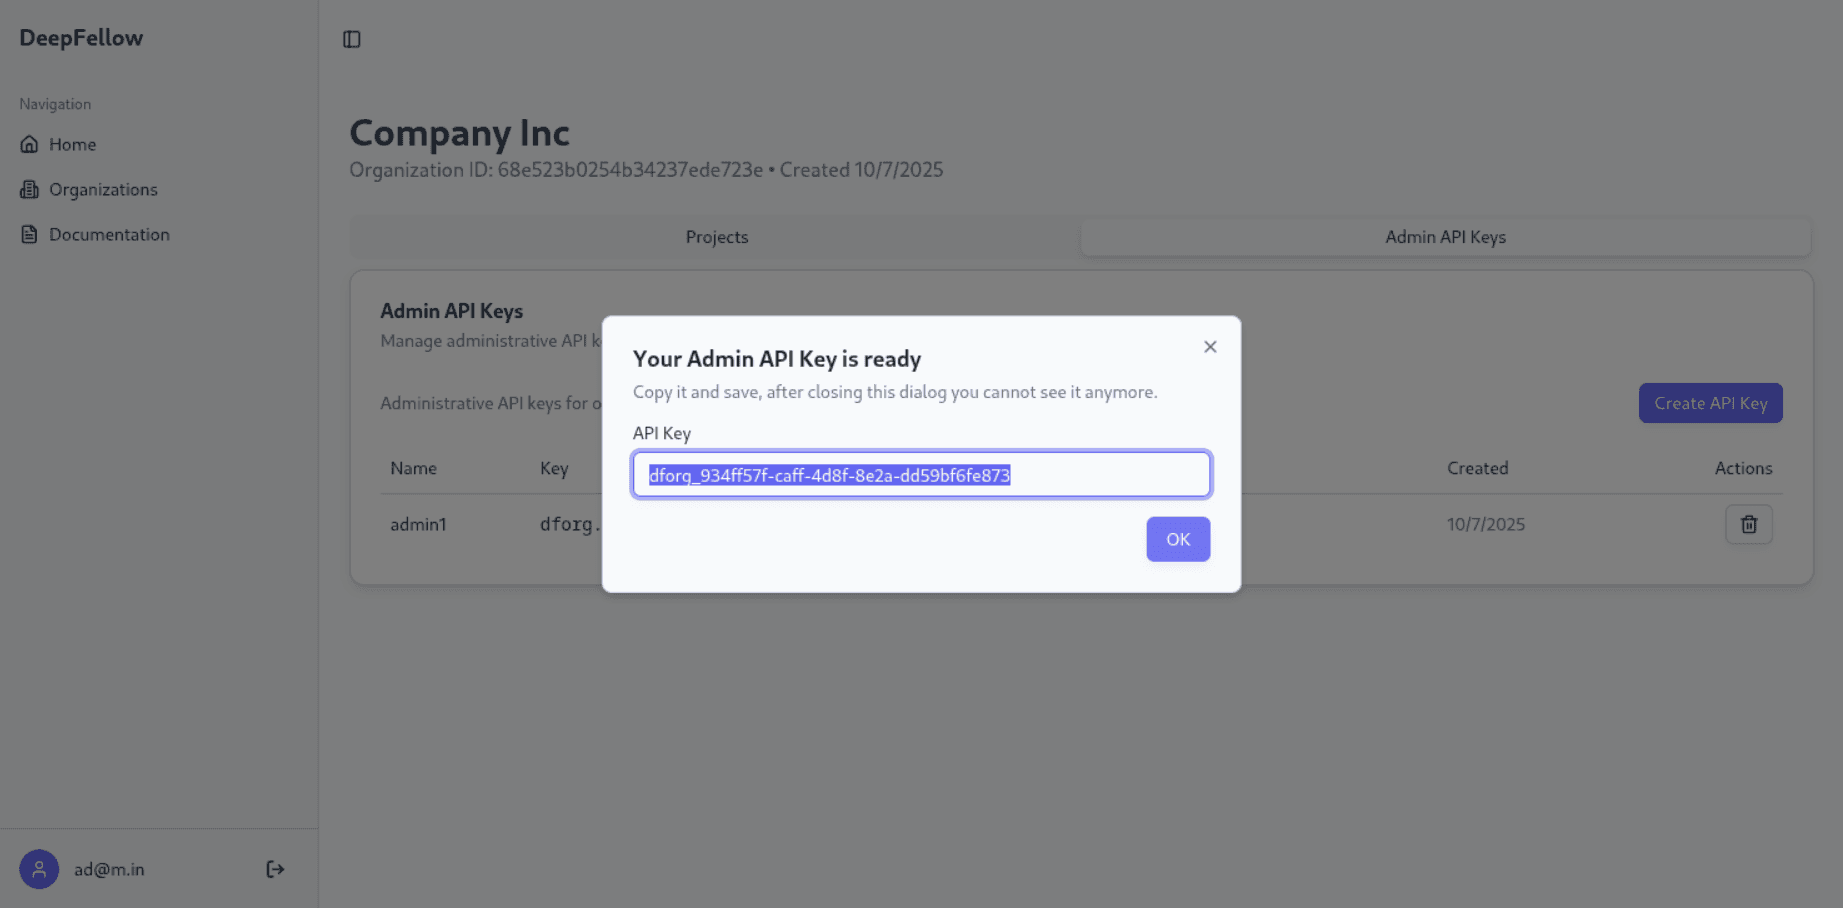
To manage Organization API Keys, go to "Organization API Keys" tab from inside an organization's page. Here, you can create or delete Organization API Keys.
To create one, click "Create API Key". In the pop-up, enter a name for the key and click "Create". The next pop-up will show the key value – copy and save it, you can't access it again.
To delete an API Key, click the trashcan icon and confirm by clicking "Delete". This action is irreversible.
You can also create Organization API Keys programmatically.
Organization Users
Open the "USERS" tab from inside an organization's page to see every user that belongs to the organization. The tab has two buttons: "Invite" and "Invitation history".
Inviting users requires a configured SMTP server. See Configure Email for Invitations to set it up.
Inviting Users
Only an organization admin or owner will send invitations.
Click "Invite", enter the email address of the person you want to add, and confirm. DeepFellow Server creates an invitation and emails a link to that address.
What the invited person receives depends on whether the email already belongs to a DeepFellow account:
- If the email belongs to an existing account, the email contains an invitation link. See Accepting an Invitation.
- If the email has no account yet, the email contains a registration link. See Registering Through an Invitation. Whether an admin or the organization owner is allowed to invite a person without an account is controlled by the
DF_ONLY_ADMIN_CAN_CREATE_ACCOUNTS_BY_INVITATIONvariable, described in Configure Email for Invitations.
You can also create invitations programmatically.
Invitation History
Click "Invitation history" to review the invitations sent for the organization. For each invitation the list shows:
- the invited email address
- who sent the invitation
- whether the invitation was used
- whether the invitation has expired
Configure Email for Invitations
DeepFellow Server sends invitations over email. To enable this, configure an SMTP server with the smtp.* settings. Until you set them, DeepFellow Server will not send invitation emails. For each setting, its .env variable, and its default value, read Configuration.
The smtp.* settings are dynamic, so the change applies immediately, without a restart:
deepfellow server config set \
  smtp.host=smtp.example.com \
  smtp.port=587 \
  smtp.auth=true \
  smtp.user=invitations@example.com \
  smtp.password=SMTP_PASSWORD \
  smtp.email_from=invitations@example.com \
  smtp.use_tls=true
A separate setting controls who is allowed to invite a person who does not yet have a DeepFellow account, so that the invitation creates the account. With only_admin_can_create_accounts_by_invitation set to true, its default, only an admin sends account-creating invitations. Set it to false to let the organization owner send them as well:
deepfellow server config set only_admin_can_create_accounts_by_invitation=falseWhen the server does not allow the inviter to create an account this way, it raises a "User not found" error.
Inviting a person who already has an account is always allowed for both admins and organization owners.
Managing Projects
Creating Projects
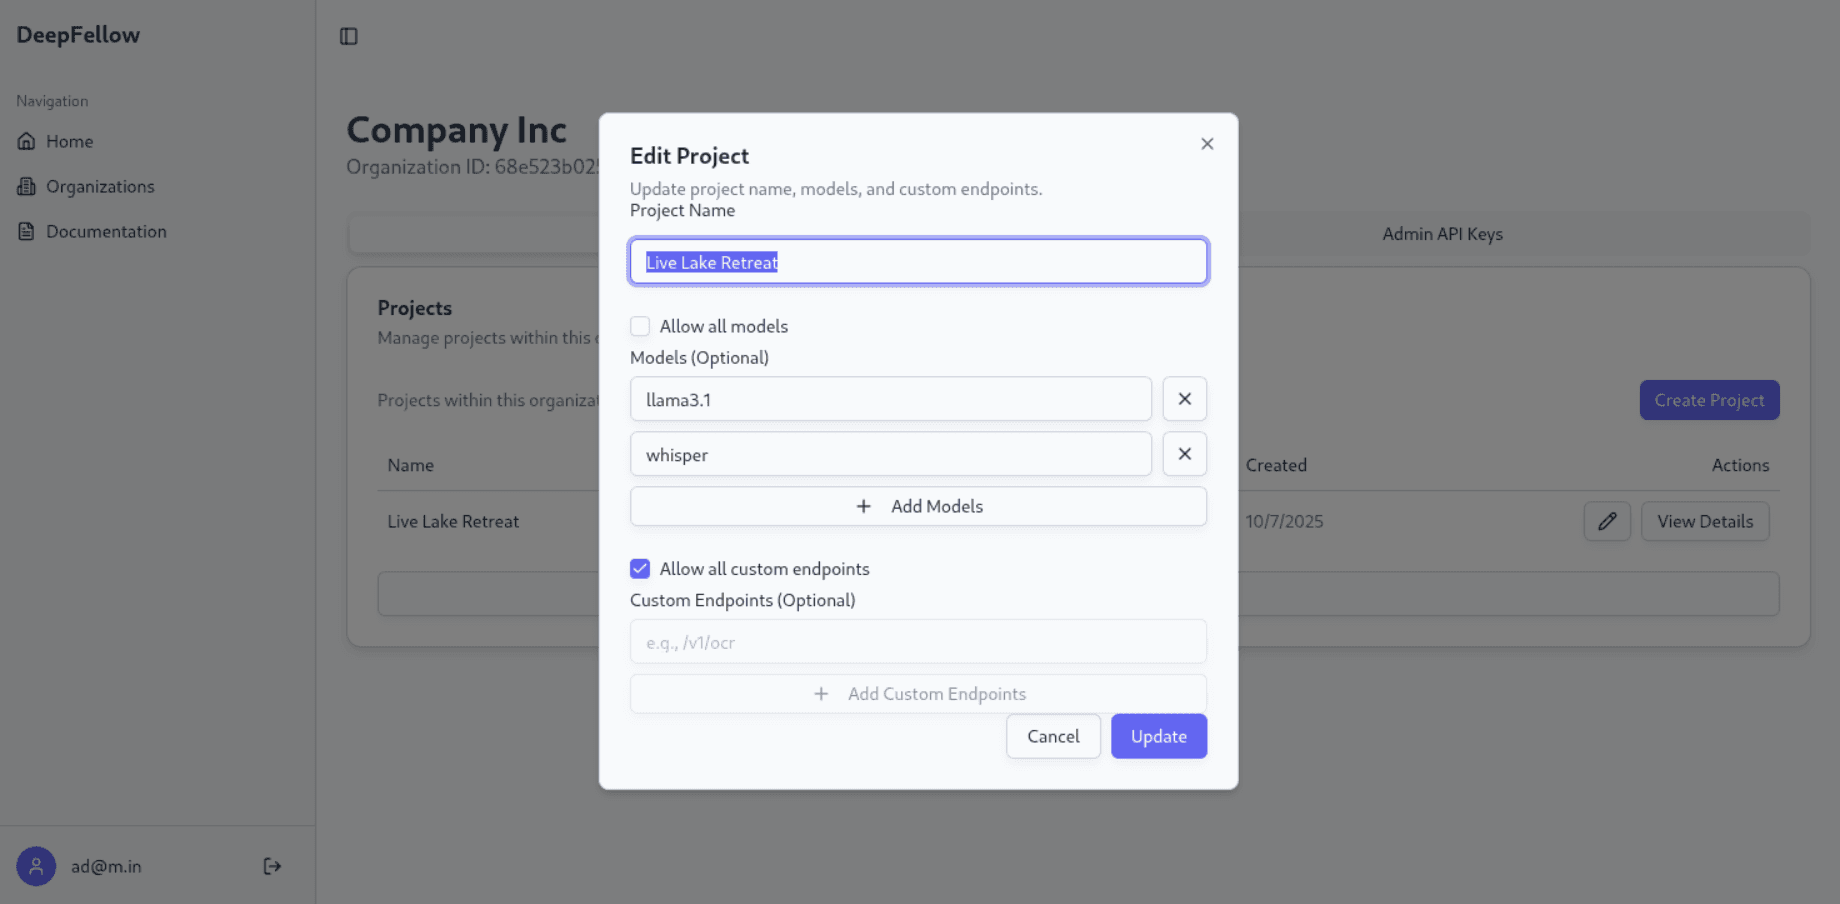
To create a project, go to the projects tab in organizations view, click the "Create project" button and enter a project name.
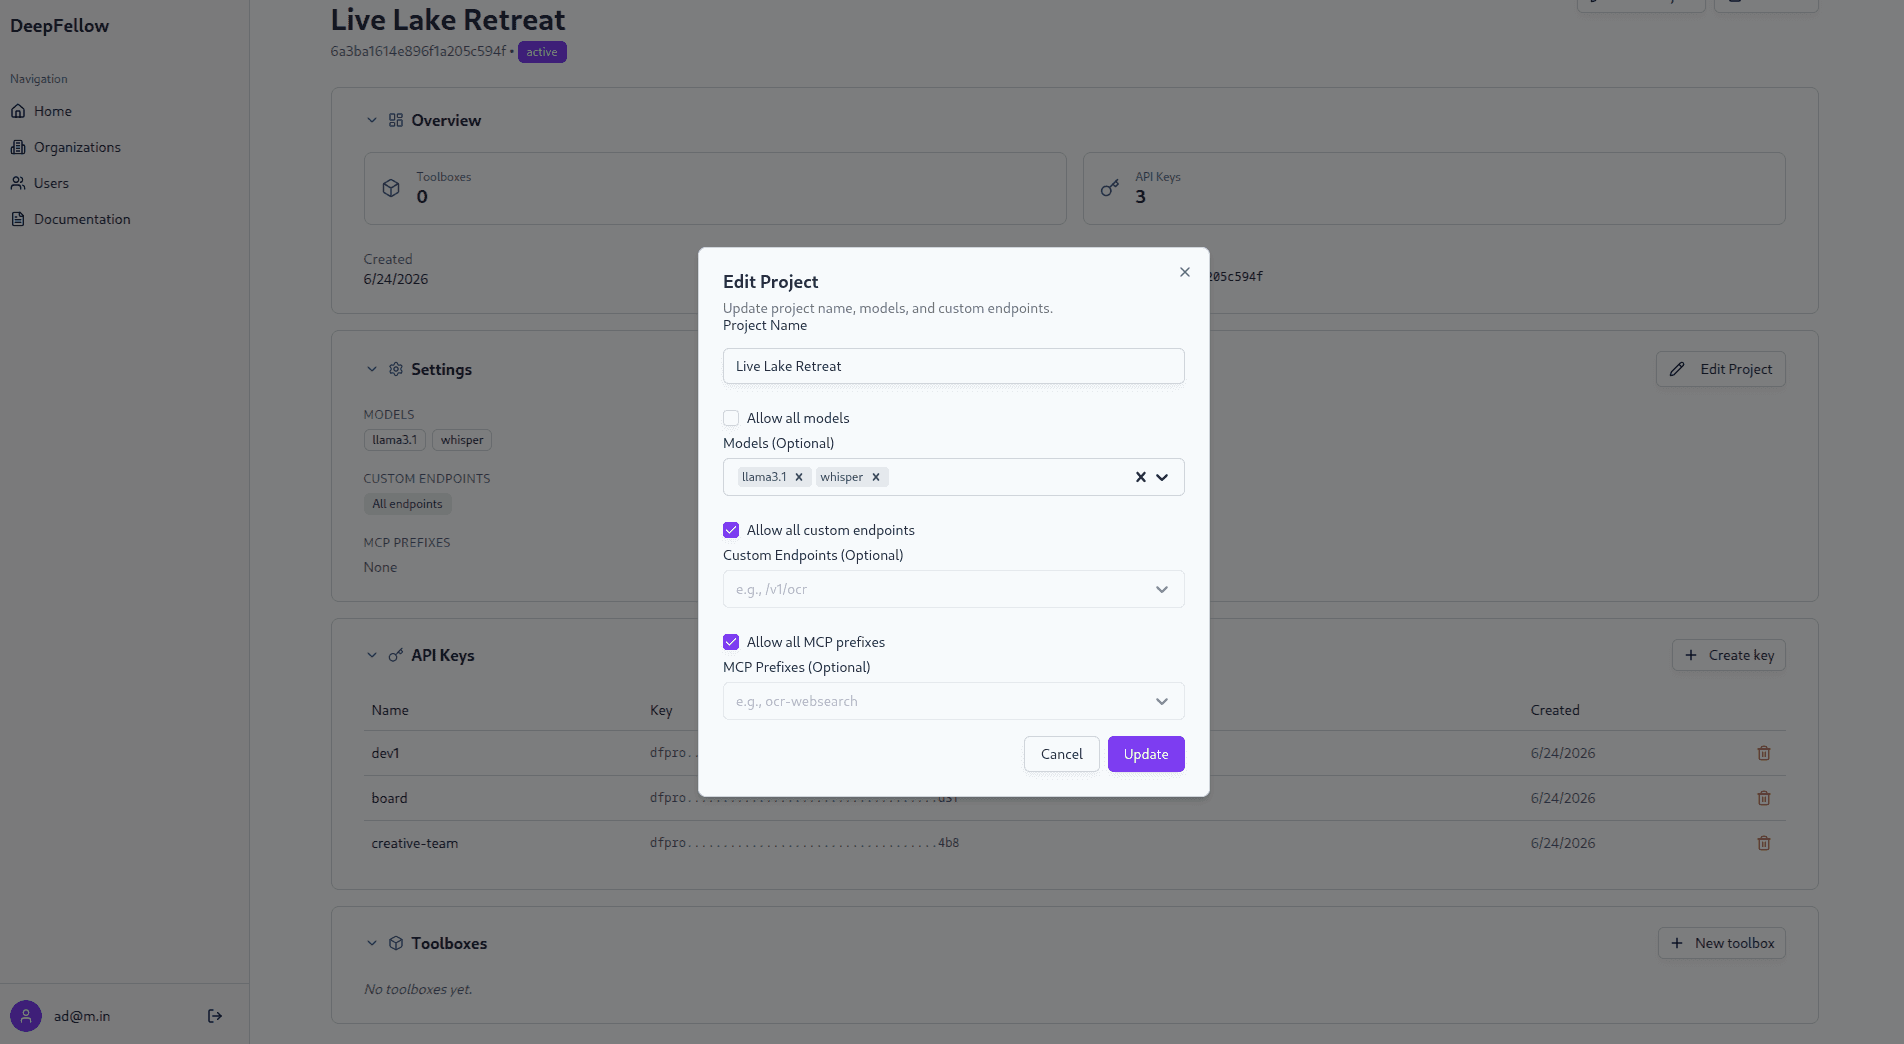
Check "Allow all models" if you do not want to restrict the allowed models in your project. Otherwise, add the allowed models in the "Models (Optional)" field. Type a model name and select it, or pick one from the suggestions. Each added model appears as a tag. To remove a model, click the "x" on its tag.
Check "Allow all custom endpoints" if you do not want to restrict the allowed custom endpoints in your project. Otherwise, add the allowed endpoints in the "Custom Endpoints (Optional)" field the same way.
Check "Allow all MCP prefixes" if you do not want to restrict which DeepFellow Infra MCP servers your project's tools will reach. Otherwise, add the allowed prefixes in the "MCP Prefixes (Optional)" field the same way. The Infra MCP and Web Search tools require the matching prefix to be allowed here.
Click the "Create" button to finish. Your new project will appear on the list. You can edit project details by clicking the pencil icon.
You can also create projects programmatically.
Project Details
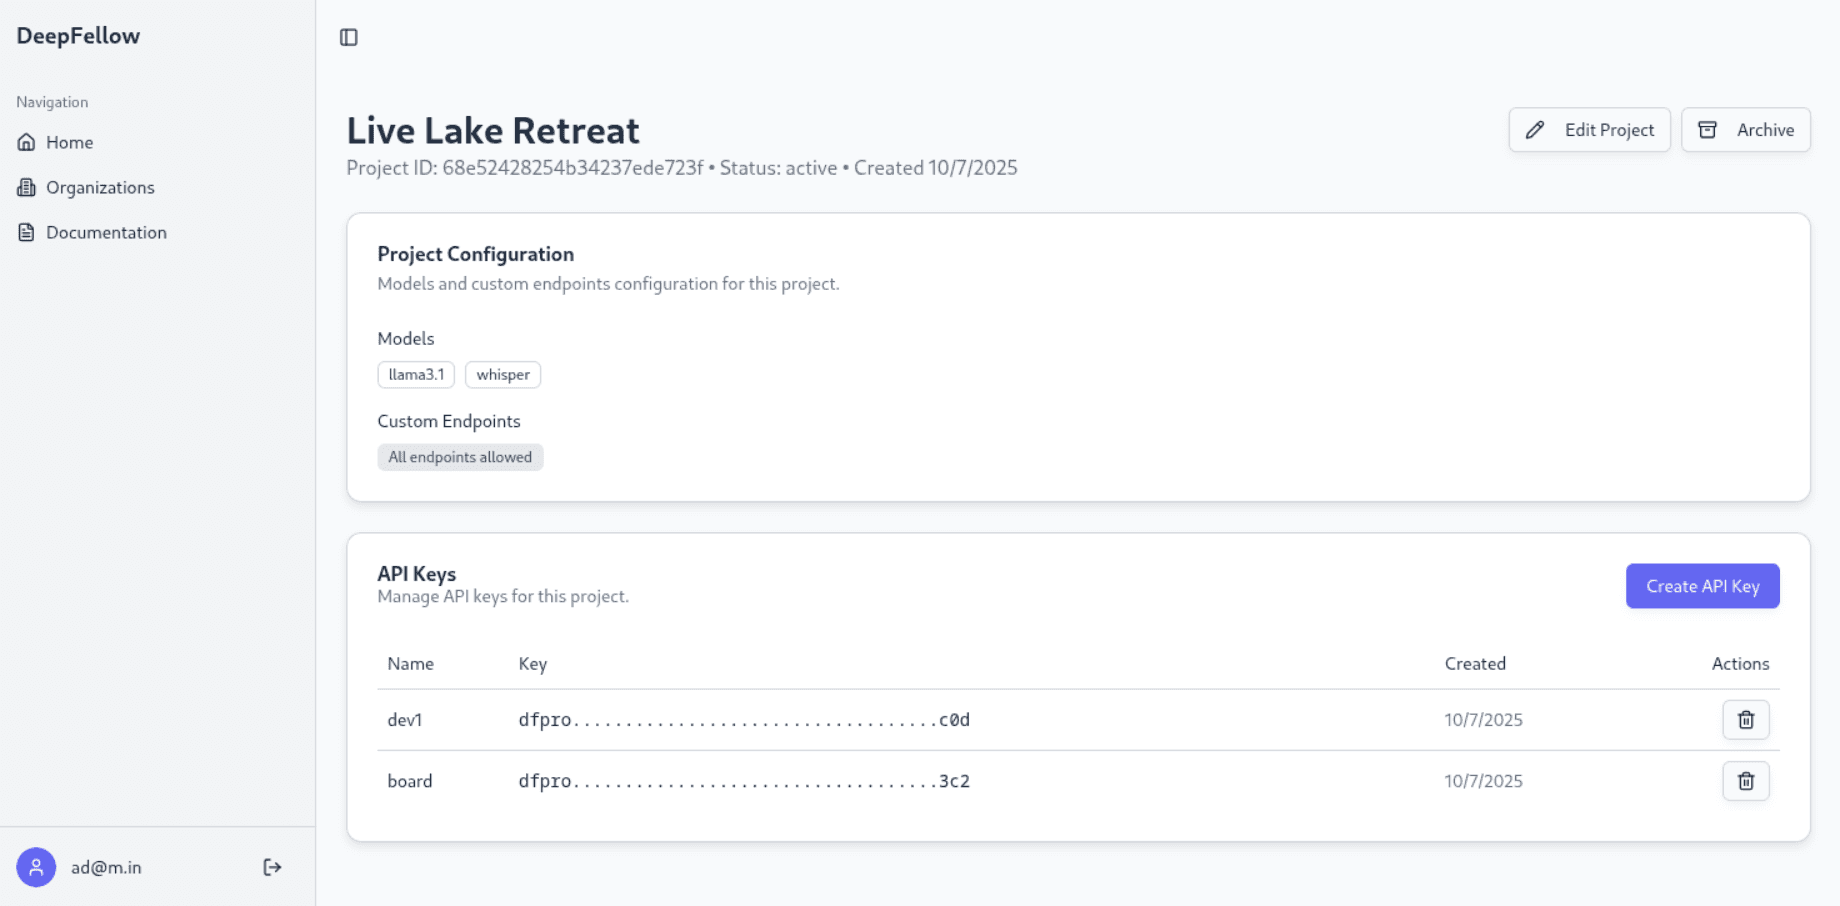
You can review project details by clicking "View Details". You can archive project details by clicking "Archive" button. You can edit project details by clicking "Edit Project" button.
A project's page groups its configuration into collapsible sections: "Overview", "Settings", "API Keys", and "Toolboxes". Click a section header to show or hide it. Go to Managing Toolboxes and Tools to read about managing toolboxes from the Web Panel.
Project API Keys
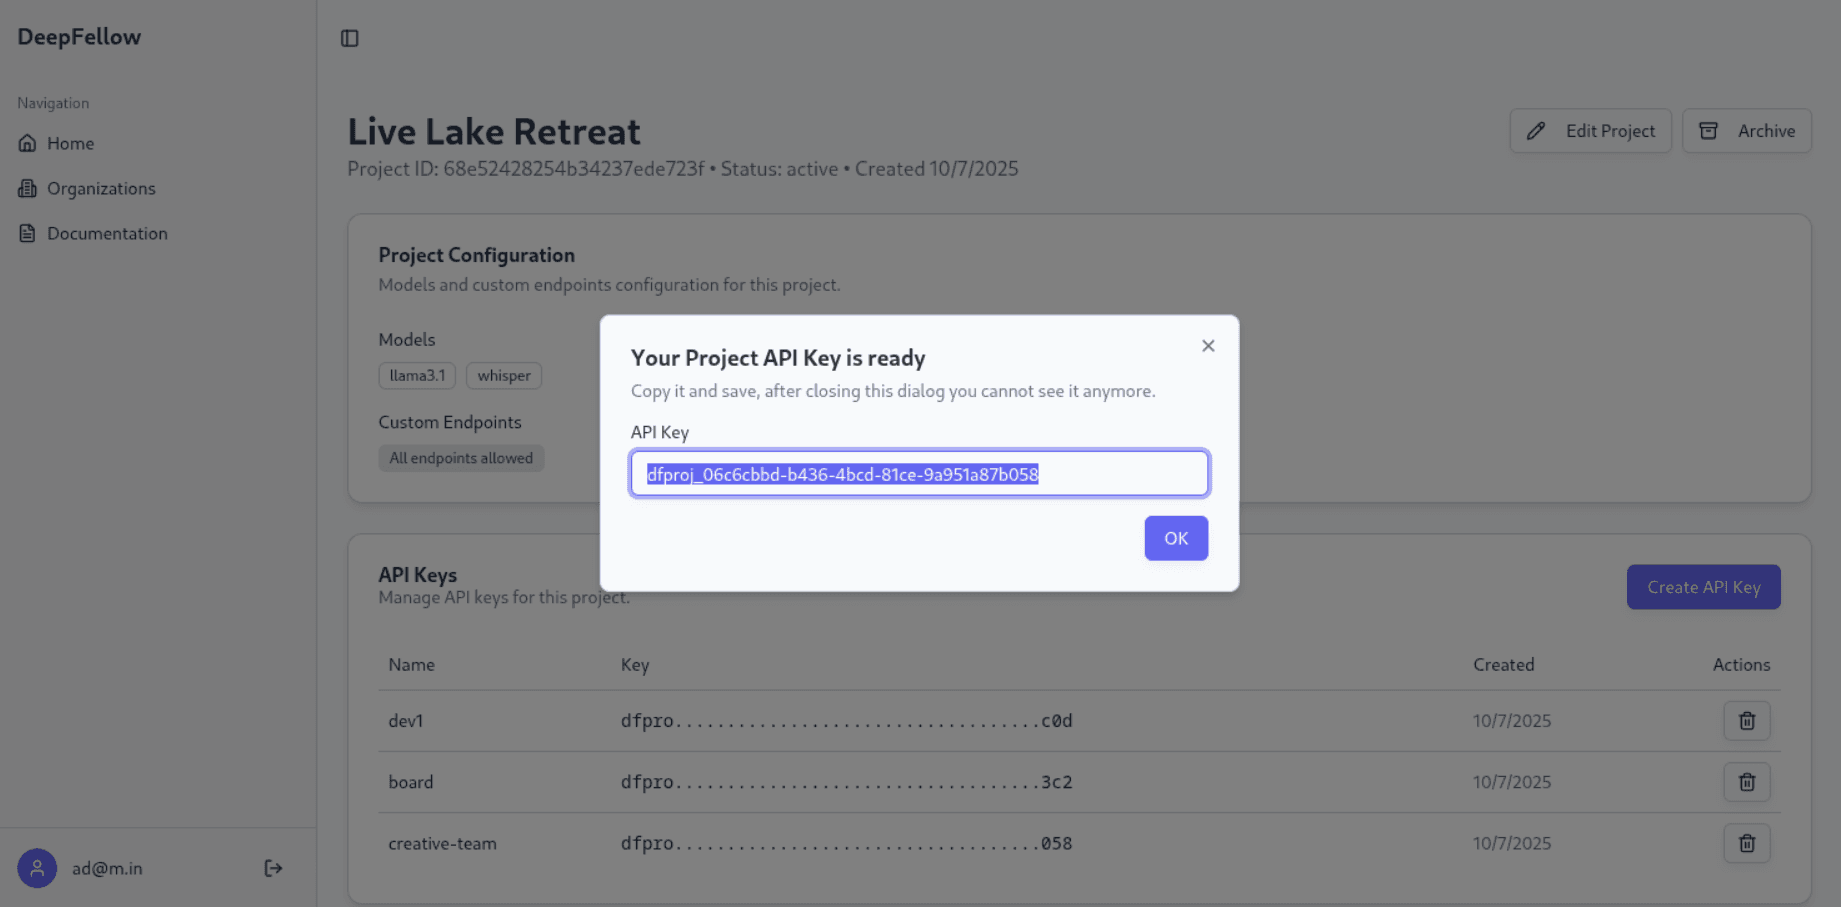
You can create a Project API Key by clicking the "Create API Key" button in a project's page.
To create one, click "Create API Key". In the pop-up, enter a name for the key and click "Create". The next pop-up will show the key value – copy and save it, you can't access it again.
To delete a Project API Key, click the trashcan icon and confirm by clicking "Delete". This action is irreversible.
You can also create Project API Keys programmatically.
Managing Users
The Users section lets the administrator view, create, block, and update all user accounts on the server.
Go to the Users view using the sidebar menu:
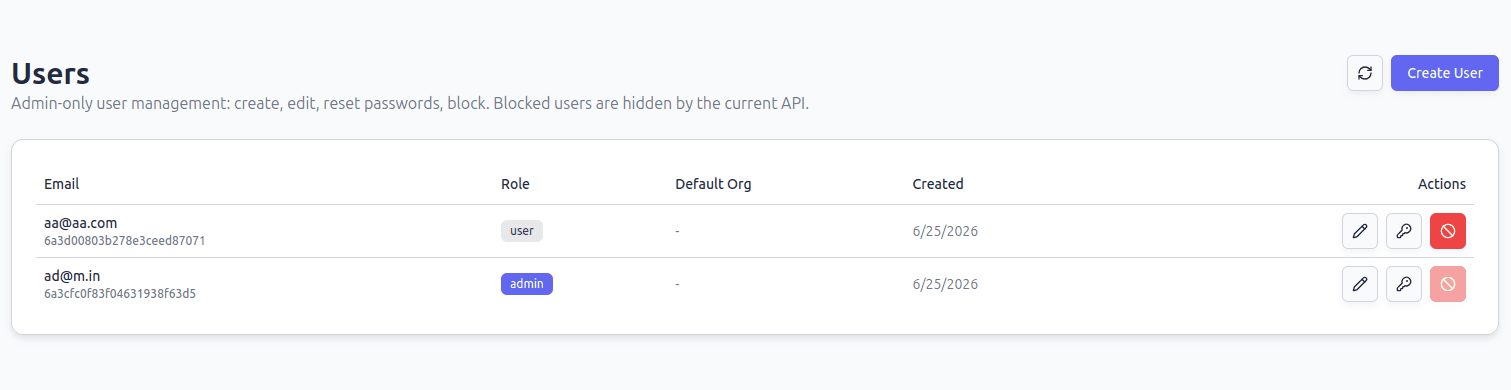
The list shows only active (non-blocked) users. Blocked users do not appear.
Creating a User
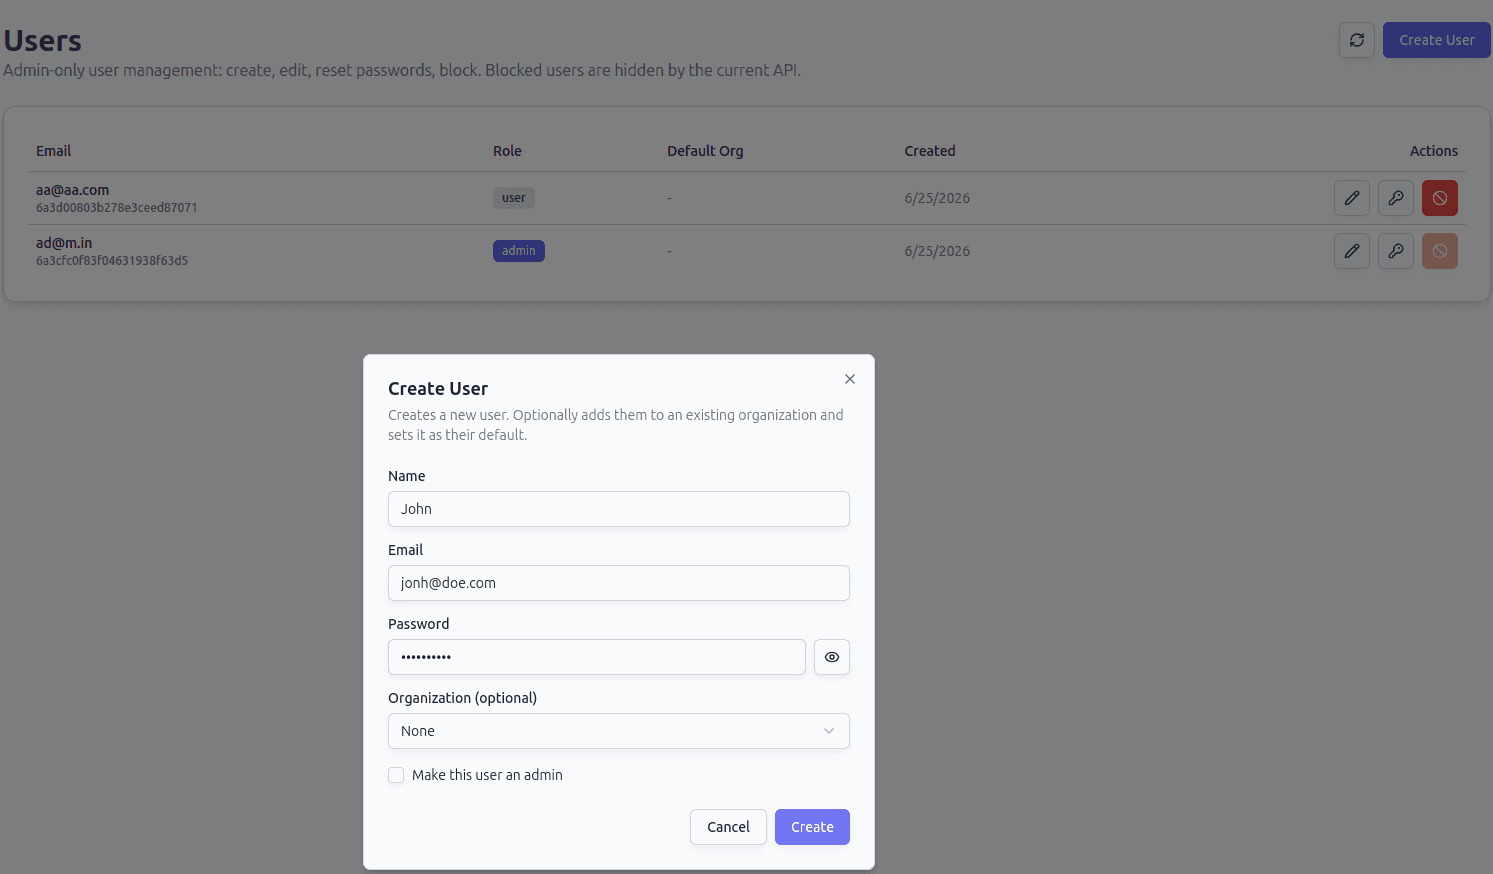
To create a new user, click "Create User". In the form, enter the user's name, email address, and password.
Optionally, select an existing organization from the dropdown to add the user to it and set it as the user's default organization.
Click "Create" to finish. The new user will appear in the list.
Changing a User's Password
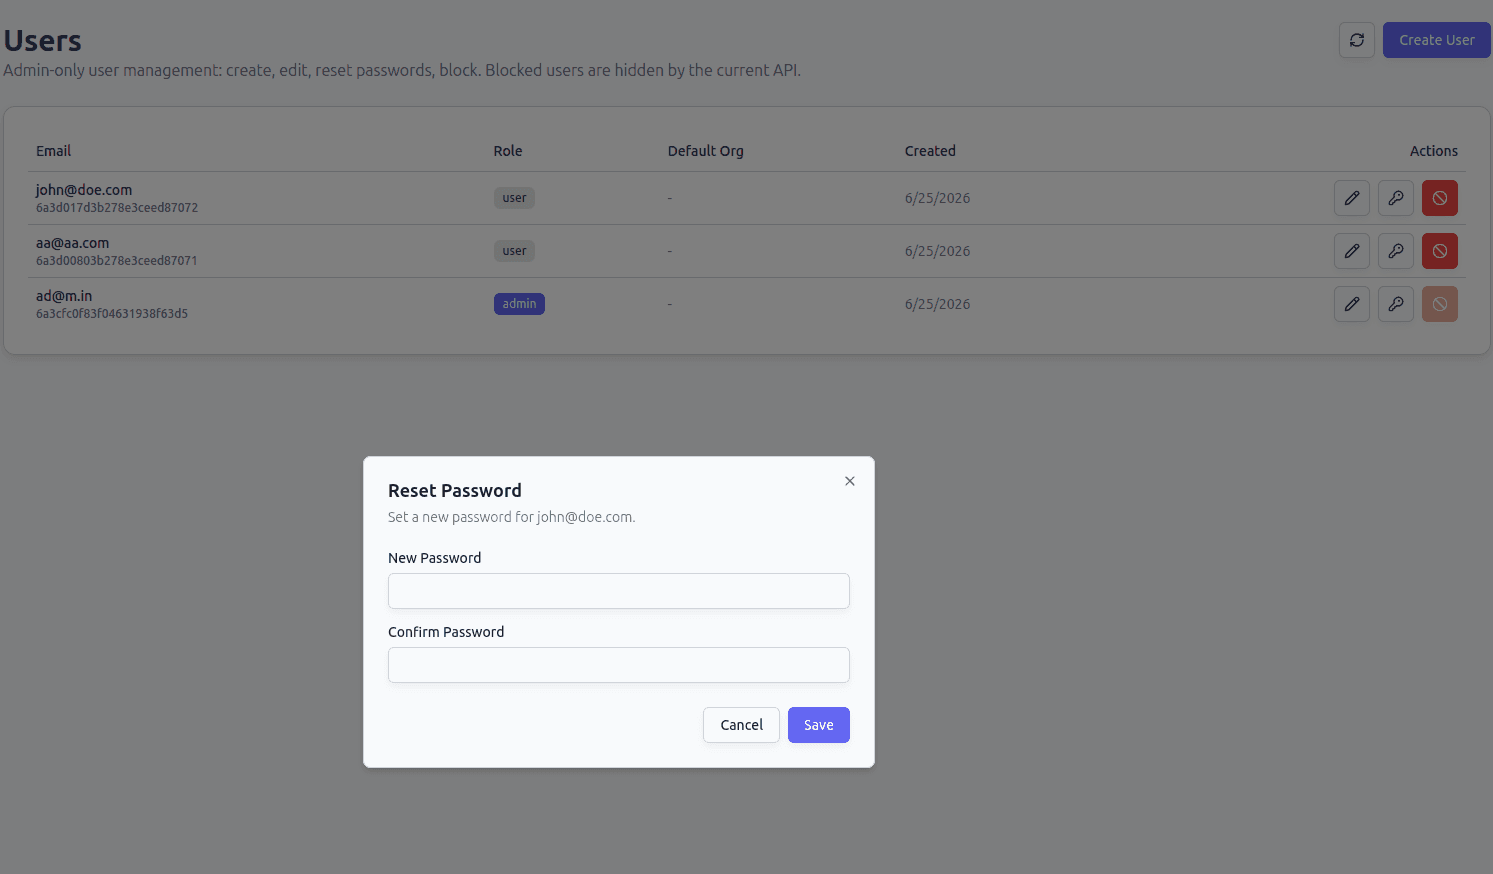
To change a user's password, click the key icon next to the user and enter the new password.
Blocking a User
To block a user, click the block icon next to the user. A confirmation dialog will appear — click "Block" to confirm.
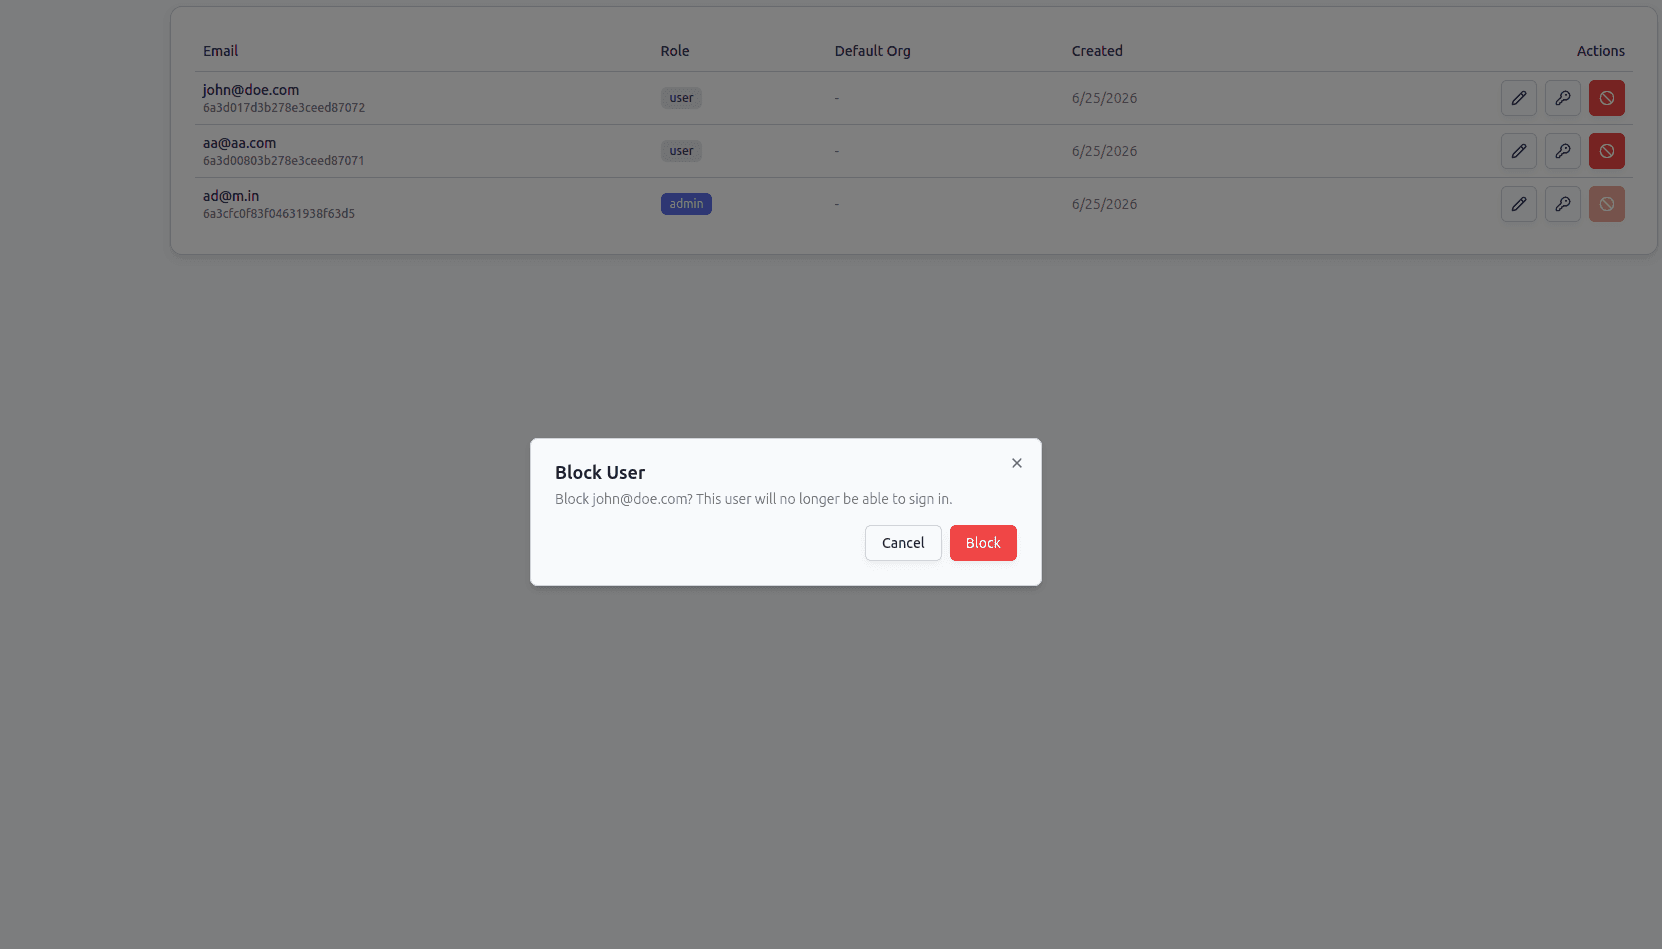
Blocked users lose access to the server immediately. They are removed from the users list and can no longer authenticate.
The Web Panel does not provide a way to unblock a user. To reactivate a blocked user, call the admin API's edit-user endpoint (POST /admin/user/{user_id}) with "status": "active".
Blocking a user is immediate. The user will lose access as soon as you confirm.
Server Configuration
The Server Configuration card on the Dashboard lets an administrator view and change server settings while the server keeps running. Changes apply immediately and persist to config.json. They do not require a restart.
To open the card, sign in as a user with is_admin set and go to the Dashboard.
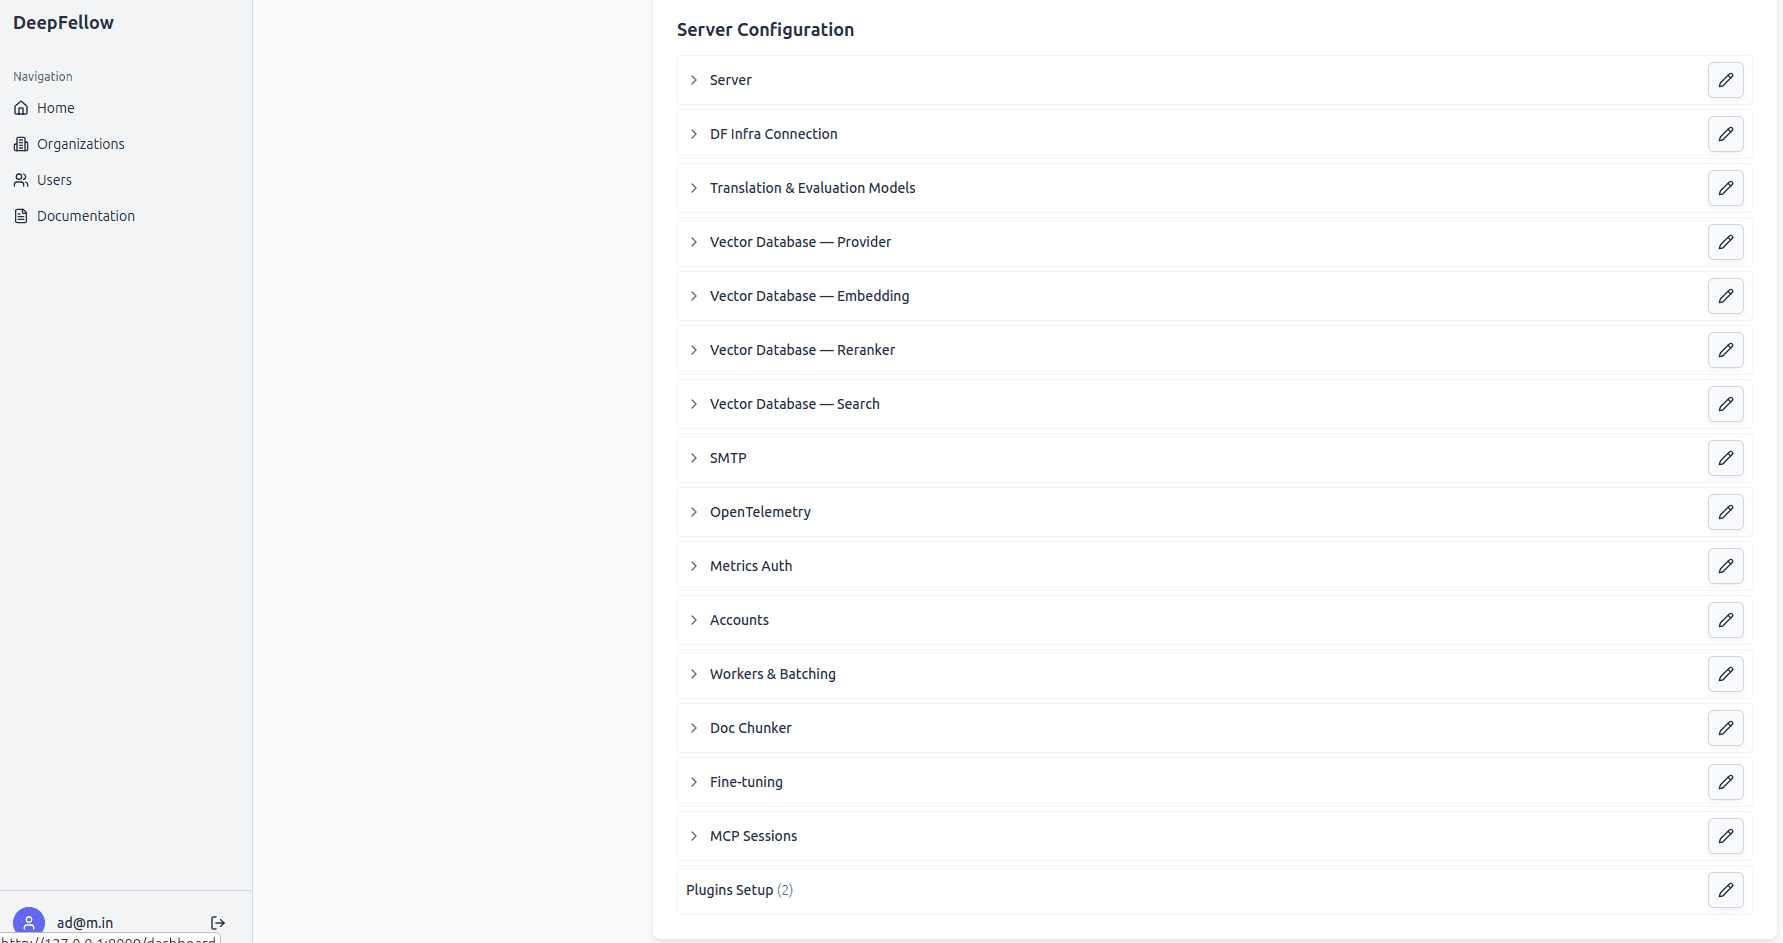
The settings group into sections:
- Server – the public server URL.
- DF Infra Connection – the DeepFellow Infra endpoint and API key.
- Translation & Evaluation Models – the chat translation model and the evaluation model.
- Vector Database – the provider connection, embedding, reranker, and search settings, split into separate sections.
- SMTP – the mail server used for invitation emails. See Configure Email for Invitations.
- OpenTelemetry – the OTLP endpoint, tracing, logging, and log level.
- Metrics Auth – the username and password that protect the
/metricsendpoint. - Accounts – whether only an admin sends account-creating invitations.
- Workers & Batching – embedding, reranker, and lemmatizer worker counts, the embedding batch size, and the lemmatizer endpoint prefix.
- Doc Chunker – whether to use the doc-chunker service, and its endpoint prefix.
- Fine-tuning – the polling interval and the maximum allowed worker sync failures.
- MCP Sessions – the session TTL and sweep interval for pooled MCP connections.
- Plugins Setup – the raw JSON object passed to plugins. See Plugins.
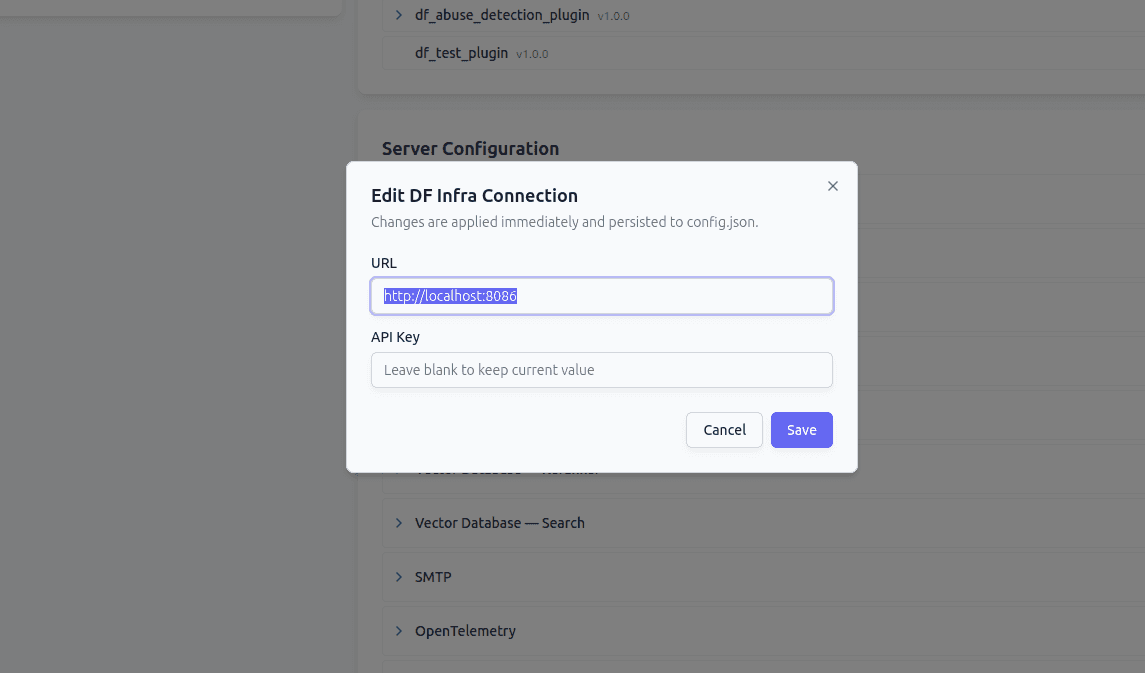
To edit a section, click its pencil icon, change the fields in the dialog, and click Save. A secret field, such as an API key or a password, always shows blank. Leave it blank to keep the current value, or type a new one to replace it.
Bootstrap Settings vs. Dynamic Settings
DeepFellow Server splits its configuration into two kinds:
- Bootstrap settings – the Mongo connection, file storage paths, and the plugin discovery path. The server reads these from
.envat startup only. Changing one requires a restart. Set them withdeepfellow server env set, as described in Environment Variables (CLI). - Dynamic settings – everything else: the Infra connection, the vector database, OpenTelemetry, SMTP, workers, fine-tuning, MCP sessions, and plugin setup. These live in
config.jsonand change at runtime through the Server Configuration card or the/admin/configAPI, without a restart.
On first boot, if config.json does not exist yet, the server seeds it from any matching .env values, then stops reading .env for these settings. Use the Server Configuration card or the /admin/config API for all further changes.
Configuration lists which kind each setting belongs to, along with its .env variable, its config.json field, and its default value.
After this first boot, deepfellow server env set still updates .env, but the dynamic settings above no longer read from it. Use the Server Configuration card, deepfellow server config set, or /admin/config instead.
Environment Variables (CLI)
Display the environment variables of DeepFellow Server by running the deepfellow server env info command on your Server host. The command prints each variable with its DF_ prefix, which is the exact name Docker and your shell require. This reads the local .env file directly, so it works even before the server has started. For what each variable means and what it defaults to, read Configuration.
$ deepfellow server env info
⚠️      config.json exists on this install — some of these values may be stale if they were migrated to dynamic configuration. Run `deepfellow server info` for the Server's current runtime configuration.
💡      Information about DeepFellow Server:
        DF_SERVER_PORT: 8000
        DF_SERVER_URL: http://localhost:8000
        DF_SERVER_IMAGE: hub.simplito.com/deepfellow/deepfellow-server:v0.34.0
        DF_MONGO_URL: mongo:27017
        DF_MONGO_USER: 0zuZ1X8j
        DF_MONGO_PASSWORD: *****
        DF_MONGO_DB: deepfellow
        DF_MONGO_PORT: 27017
        DF_LOG_LEVEL: INFO
        DF_PLUGINS_SETUP: {}
        DF_INFRA__URL: http://infra:8086
        DF_INFRA__API_KEY: *****
DeepFellow Server prints this warning whenever config.json already exists on the install, since it means at least the dynamic fields above may no longer match what the server is actually running.
deepfellow server info instead calls GET /admin/config on a running server and shows only its current dynamic settings, without the DF_ prefix. Sign in first with deepfellow server login as a user with is_admin set:
$ deepfellow server info
💡      Information about DeepFellow Server:
        SERVER_URL: http://localhost:8000
        INFRA__URL: http://infra:8086
        INFRA__API_KEY: *****
        CHAT_TRANSLATION_MODEL: gemma3:1b
        EVALUATE_MODEL: gemma3:1b
        METRICS_USERNAME: ZKP3YbOW
        METRICS_PASSWORD: *****
        LOG_LEVEL: INFO
        PLUGINS_SETUP: {}
        VECTOR_DATABASE__PROVIDER__ACTIVE: 1
        VECTOR_DATABASE__PROVIDER__TYPE: qdrant
        VECTOR_DATABASE__PROVIDER__URL: http://qdrant:6333
        VECTOR_DATABASE__PROVIDER__USER: RVGtQRkH
        VECTOR_DATABASE__PROVIDER__PASSWORD: *****
        VECTOR_DATABASE__EMBEDDING__MODEL: mxbai-embed-large
        VECTOR_DATABASE__EMBEDDING__SIZE: 1024
        OTEL_EXPORTER_OTLP_ENDPOINT: http://otel-collector:4317
        OTEL_TRACING_ENABLED: true
deepfellow server info only returns dynamic settings. Bootstrap settings, the Mongo connection, file storage paths, and the plugin discovery path, never appear here since they aren't part of config.json. Run deepfellow server env info to see those. See Bootstrap Settings vs. Dynamic Settings.
Set env values with the command:
deepfellow server env set ENV_NAME ENV_VALUEFor example, to set the MongoDB connection URL, a bootstrap setting, type:
deepfellow server env set DF_MONGO_URL mongo:27017Setting an env value updates the .env file, but the running stack keeps using the old value until it restarts. After it updates the file, the command asks whether to restart the stack now:
💡      Updated /home/johndoe/.deepfellow/server/.env.
❓      Restart the server now to apply the change? [y/n] (y):
Answer y (the default) to stop and restart the server stack so the new value takes effect immediately. Answer n to leave the stack running with the old value until your next restart. This prompt appears only when a server stack is running.
deepfellow server env set refuses to write a variable that has migrated to dynamic configuration once the server is already running, since the write would have no effect. It points you to the equivalent server config set command instead:
$ deepfellow server env set DF_INFRA__API_KEY f2742d3e-5189-47b6-8e7e-63c493c798b5
💀      DF_INFRA__API_KEY is dynamic configuration stored in config.json. Writing it to .env has no effect once the server is running. Use `deepfellow server config set infra.api_key=<value>` instead.
Use deepfellow server config set for a dynamic setting instead, or the Server Configuration card, as described in Server Configuration.
The dotted path in that message names the field, but config set takes the top-level section with a JSON object as its value, not the path itself. For DF_INFRA__API_KEY, run:
deepfellow server config set infra='{"api_key": "f2742d3e-5189-47b6-8e7e-63c493c798b5"}'If the server isn't running, env set can't check whether the variable is dynamic through the admin API. If config.json already exists on the install, it warns you instead of refusing, and still writes to .env:
$ deepfellow server env set DF_INFRA__API_KEY f2742d3e-5189-47b6-8e7e-63c493c798b5
⚠️      The server isn't running, so I can't check whether this variable is dynamic configuration stored in config.json. config.json already exists on this install, though — if it was migrated there, this write will have no effect once the server starts. Start the server and use `deepfellow server config set` if unsure.
💡      Updated /home/johndoe/.deepfellow/server/.env.
To unset this variable, type:
deepfellow server env set DF_MONGO_URLDynamic Configuration (CLI)
Read and change the server's dynamic settings from the command line with deepfellow server config. Both subcommands talk to the running server over the /admin/config API, so the change applies immediately and never needs a restart. Sign in first with deepfellow server login as a user with is_admin set.
deepfellow server config get prints the whole dynamic configuration as JSON, in the same nesting the API returns. Secret fields, such as infra.api_key and smtp.password, come back masked:
$ deepfellow server config get
💡      {
          "server_url": "http://localhost:8000",
          "infra": {
            "url": "http://infra:8086",
            "api_key": "••••••••"
          },
          "chat_translation_model": "gemma3:1b",
          "otel_tracing_enabled": false,
          "log_level": "INFO",
          "plugins_setup": {},
          "smtp": {
            "host": "smtp.example.com",
            "port": 587,
            "user": "deepfellow@example.com",
            "password": "••••••••"
          }
        }
Add --secret to print the real values of the masked fields instead:
deepfellow server config get --secretdeepfellow server config set updates one or more fields and prints the configuration that resulted from the change:
deepfellow server config set FIELD=VALUE [FIELD=VALUE ...]For example, to turn on OpenTelemetry tracing and raise the log level in one call, type:
$ deepfellow server config set otel_tracing_enabled=true log_level=DEBUG
✅      Server config updated.
💡      {
          "server_url": "http://localhost:8000",
          ...
          "otel_tracing_enabled": true,
          "log_level": "DEBUG"
        }
Each FIELD is a top-level field name exactly as deepfellow server config get prints it. Each VALUE is JSON-decoded when it is valid JSON, so otel_tracing_enabled=true becomes the boolean true and embedding_worker_count=10 becomes the integer 10. Anything that isn't valid JSON stays a plain string, which is why log_level=DEBUG works without quotes.
Setting a Nested Field
A dotted path is not a valid FIELD. To change a field inside a nested section, such as infra, smtp, vector_database, or graphiti, pass a JSON object as the value of the top-level section:
# Wrong: a dotted path is rejected as an unknown field
deepfellow server config set infra.api_key=f2742d3e-5189-47b6-8e7e-63c493c798b5

# Right: a JSON object on the top-level section
deepfellow server config set infra='{"api_key": "f2742d3e-5189-47b6-8e7e-63c493c798b5"}'
The server merges nested objects field by field, so the sibling fields of the section keep their current values. In the example above, infra.url stays as it was.
plugins_setup is the one exception to the merge. It is a caller-defined map, so the value you pass replaces it whole, and any key you leave out is deleted. Send the complete object every time, including the keys you want to keep. See Plugins.
The update is validated before anything is written. An unknown or misspelled field, including a misspelled field inside a nested section, is rejected and nothing changes:
$ deepfellow server config set otel_tracing_enable=true
💀      Unable to update server config. Unknown or non-dynamic config field(s): ['otel_tracing_enable']
The same holds for a change the server accepts but cannot apply, such as a vector database URL it fails to connect to. The server rolls back to the previous configuration and leaves config.json untouched, so a corrected retry applies cleanly.
For the full flag list, see deepfellow server config.
deepfellow server config only reaches dynamic settings. To change a bootstrap setting, the Mongo connection, the file storage paths, or the plugin discovery path, use deepfellow server env set and restart the stack, as described in Environment Variables (CLI).
Reading and Changing Configuration via the API
Call GET /admin/config and PUT /admin/config to read and change dynamic settings programmatically. Both endpoints require an admin token (dfuser_, from a user with is_admin set). See Logging In.
curl -X 'GET' \
    'https://deepfellow-server-host/admin/config' \
    -H 'Authorization: Bearer DEEPFELLOW-ADMIN-API-KEY'
import requests
response = requests.get(
"https://deepfellow-server-host/admin/config",
headers={"Authorization": "Bearer DEEPFELLOW-ADMIN-API-KEY"},
)
data = response.json()
print(data)const response = await fetch('https://deepfellow-server-host/admin/config', {
headers: {
Authorization: 'Bearer DEEPFELLOW-ADMIN-API-KEY'
}
});
const data = await response.json();
console.log(data);Response:
{
    "server_url": "http://localhost:8000",
    "infra": {
        "url": "http://infra:8086",
        "api_key": "••••••••"
    },
    "chat_translation_model": "gemma3:1b",
    "otel_tracing_enabled": true,
    "log_level": "INFO"
}
A secret field, such as infra.api_key, vector_database.provider.password, smtp.password, or metrics_password, reports "••••••••" when set and "" when unset. The response never returns the plaintext value.
To read the plaintext value of a secret field, call GET /admin/config/reveal/<var>PATH</var>, where PATH is the field's dotted path from the GET /admin/config response, for example smtp.password. DeepFellow Server rejects a path that does not name one of the known secret fields with 404 Not Found.
PUT /admin/config merges your patch into the existing settings. Send only the fields you want to change; the server keeps every field you omit:
curl -X 'PUT' \
    'https://deepfellow-server-host/admin/config' \
    -H 'Authorization: Bearer DEEPFELLOW-ADMIN-API-KEY' \
    -H 'Content-Type: application/json' \
    -d '{
        "log_level": "DEBUG",
        "infra": {
            "url": "http://infra:8086"
        }
    }'
A secret field accepts three states in a PUT request:
- Omit the field to leave it unchanged.
- Send back the masked value
"••••••••"to leave it unchanged. This lets you round-trip aGETresponse into aPUTrequest without erasing a secret you did not mean to touch. - Send a new value to replace it.
plugins_setup is the one exception to the merge rule. A PUT replaces it entirely, so you can remove a key by omitting it from the object you send.
The server validates the merged configuration before applying it and rejects the request with 400 Bad Request when the patch names an unknown field, including a typo inside a nested object such as vector_database.provider.pasword, or when a field fails validation, such as a non-numeric embedding_worker_count.
If a change requires a side effect the server cannot complete, such as connecting to a new vector database, the server rolls back the in-memory configuration and returns 500 Internal Server Error. config.json stays unchanged in this case, so a retry starts from the same known-good state.
See the API Reference for the full request and response schema of GET/PUT /admin/config.
Accepting an Invitation
When you invite a person who already has a DeepFellow account, they receive an email with an invitation link. The link carries the organization invitation token.
Registering Through an Invitation
When you invite a person who does not have a DeepFellow account yet, they receive an email with a registration link that opens a registration form. The form asks for a username and a password.
After a successful registration the invited user is added to the organization as a "user".
If the invited email already belongs to an existing account by the time the link is opened, the registration link behaves like a regular invitation link. See Accepting an Invitation.
Managing Toolboxes and Tools
A toolbox is a set of tools the model calls through the Model Context Protocol (MCP). To learn what toolboxes and tools are, read Using Tools. To manage toolboxes and tools from the Web Panel, you must have access to manage the project.
The Infra MCP and Web Search tools call MCP servers hosted on DeepFellow Infra. For these tools to work, the project must allow the matching MCP prefixes. Open the project's "Settings", click "Edit Project", and check "Allow all MCP prefixes", or list the specific prefixes in "MCP Prefixes (Optional)".
Open a project's page to find its "Toolboxes" section. The section is collapsible, so click its header to show or hide it.
You can also manage toolboxes and tools programmatically.
Creating a Toolbox
To create a toolbox, click "New toolbox" in the "Toolboxes" section. Enter a name and click "Create". The new toolbox appears in the list.
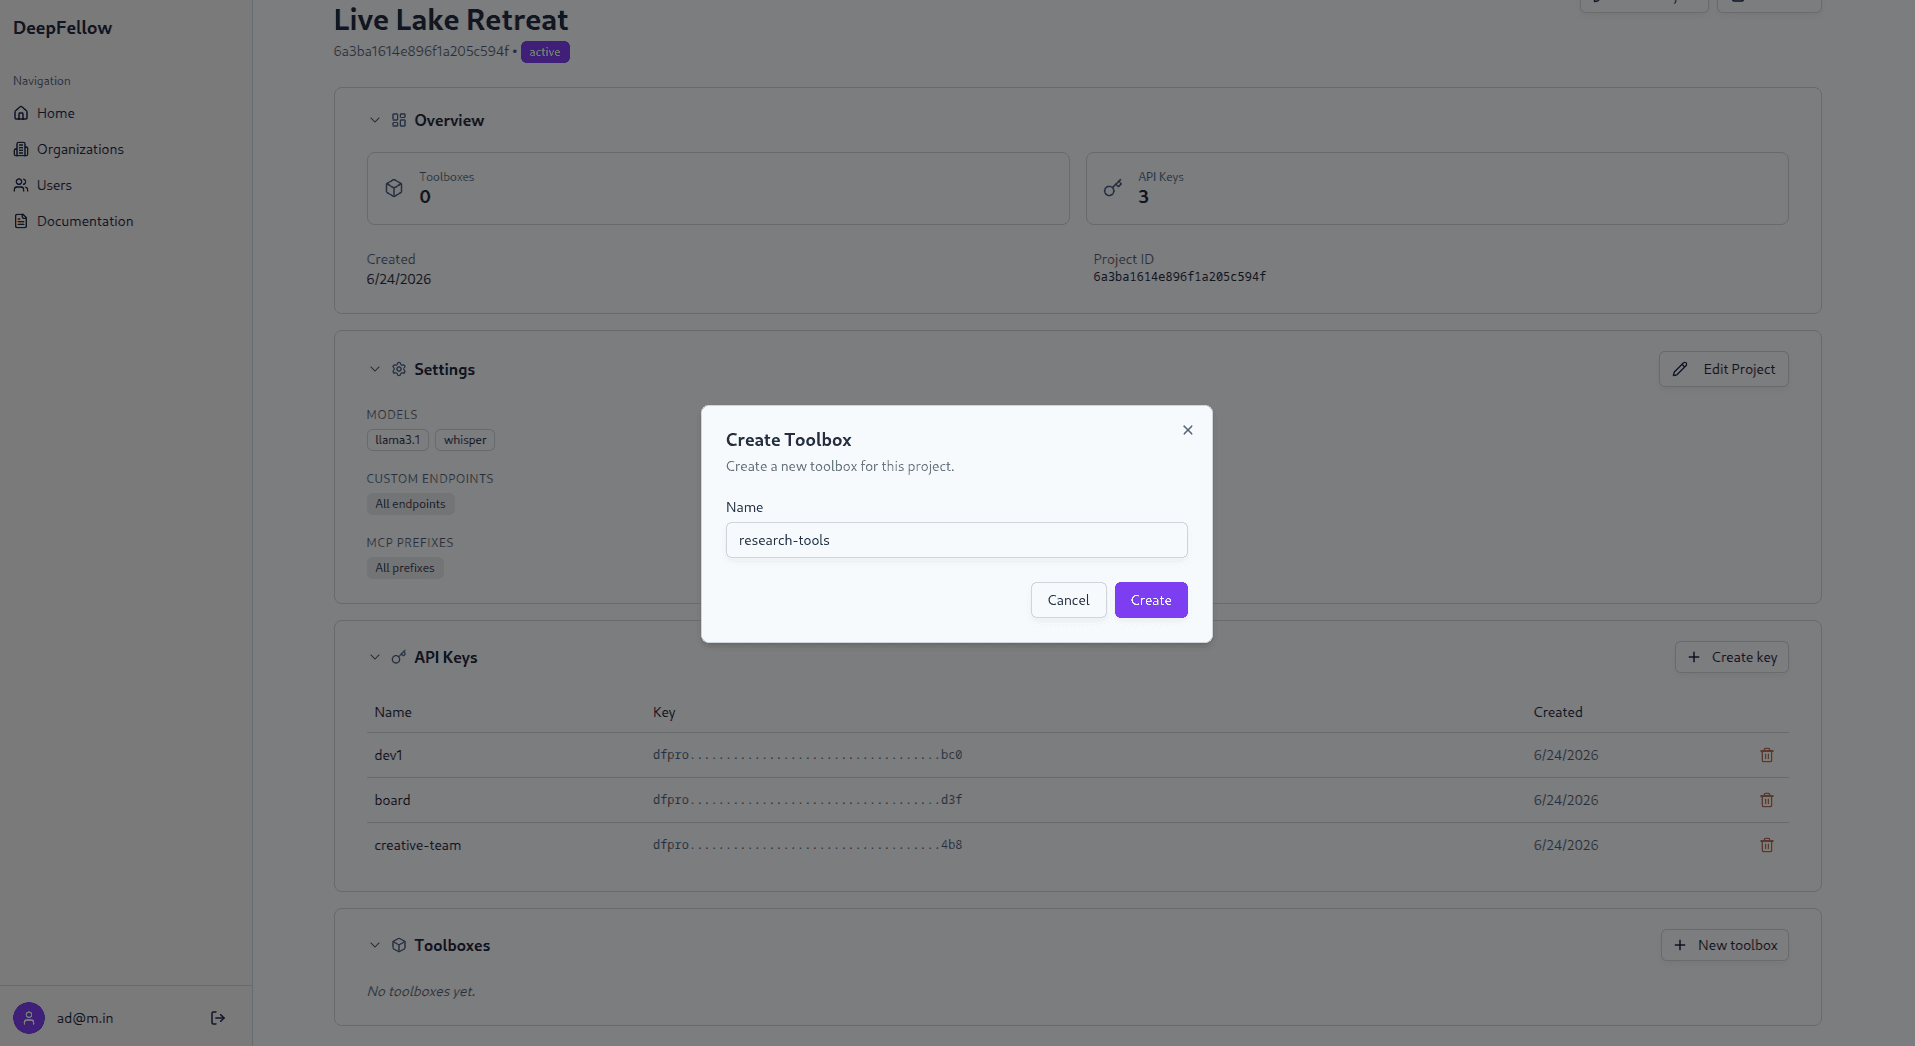
Each toolbox row provides the following actions:
- + Tool opens the dialog to add a tool.
- Share opens the "Share MCP server" dialog for the toolbox.
- Pencil opens the dialog to edit the toolbox name.
- Trash deletes the toolbox. Deleting a toolbox also deletes the tools inside it.
- Arrow expands the toolbox to show its tools. Toolboxes are collapsed by default.
The "Share MCP server" dialog shows the toolbox's "Server URL" and a ready-to-paste "Config" snippet for MCP clients such as Cursor or Windsurf. Click the copy icon next to either one. Each tool exposes its own Share dialog the same way. For details on connecting, including authentication and the built-in df:// protocol, read Tool Calling.
The "Config" snippet follows the mcpServers JSON format that most MCP clients accept, for example Claude Desktop, Cursor, Windsurf, and VS Code. Paste it directly into the client's MCP configuration file to register the toolbox or tool as a remote server.
The "Share MCP server" dialog shows the toolbox's "Server URL" and a ready-to-paste "Config" snippet for MCP clients such as Claude Desktop, Cursor, Windsurf, or VS Code. Click the copy icon next to either one. Each tool exposes its own Share dialog the same way. For details on connecting, including authentication and the built-in df:// protocol, read Tool Calling.
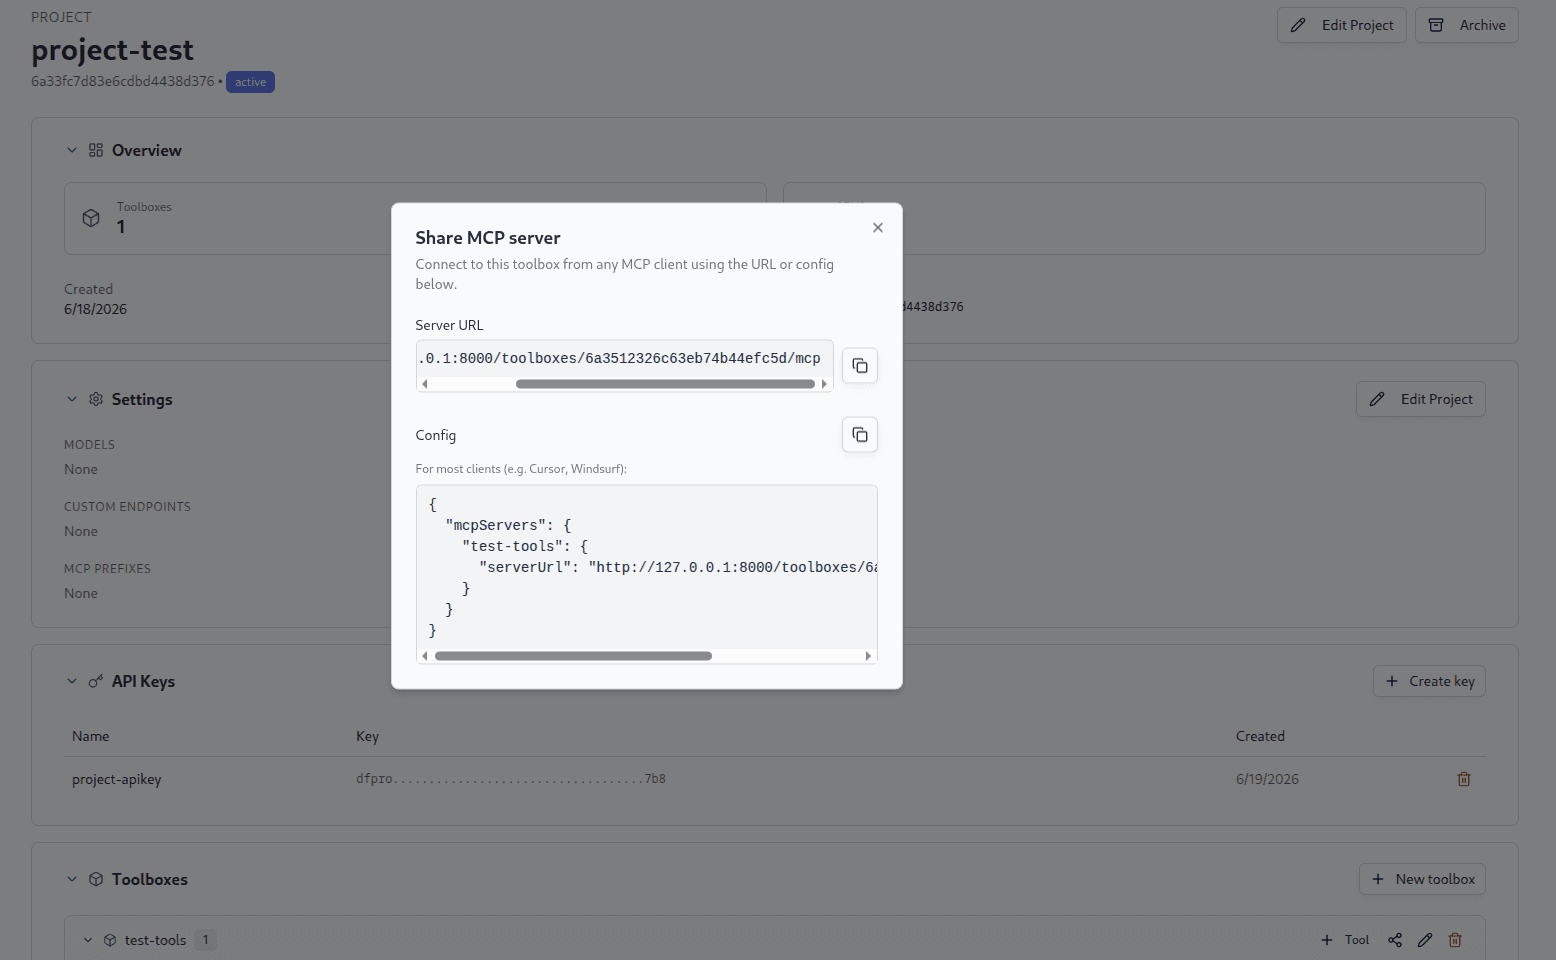
The "Config" snippet follows the mcpServers JSON format that most MCP clients accept. Paste it directly into the client's MCP configuration file to register the toolbox or tool as a remote server.
Adding a Tool
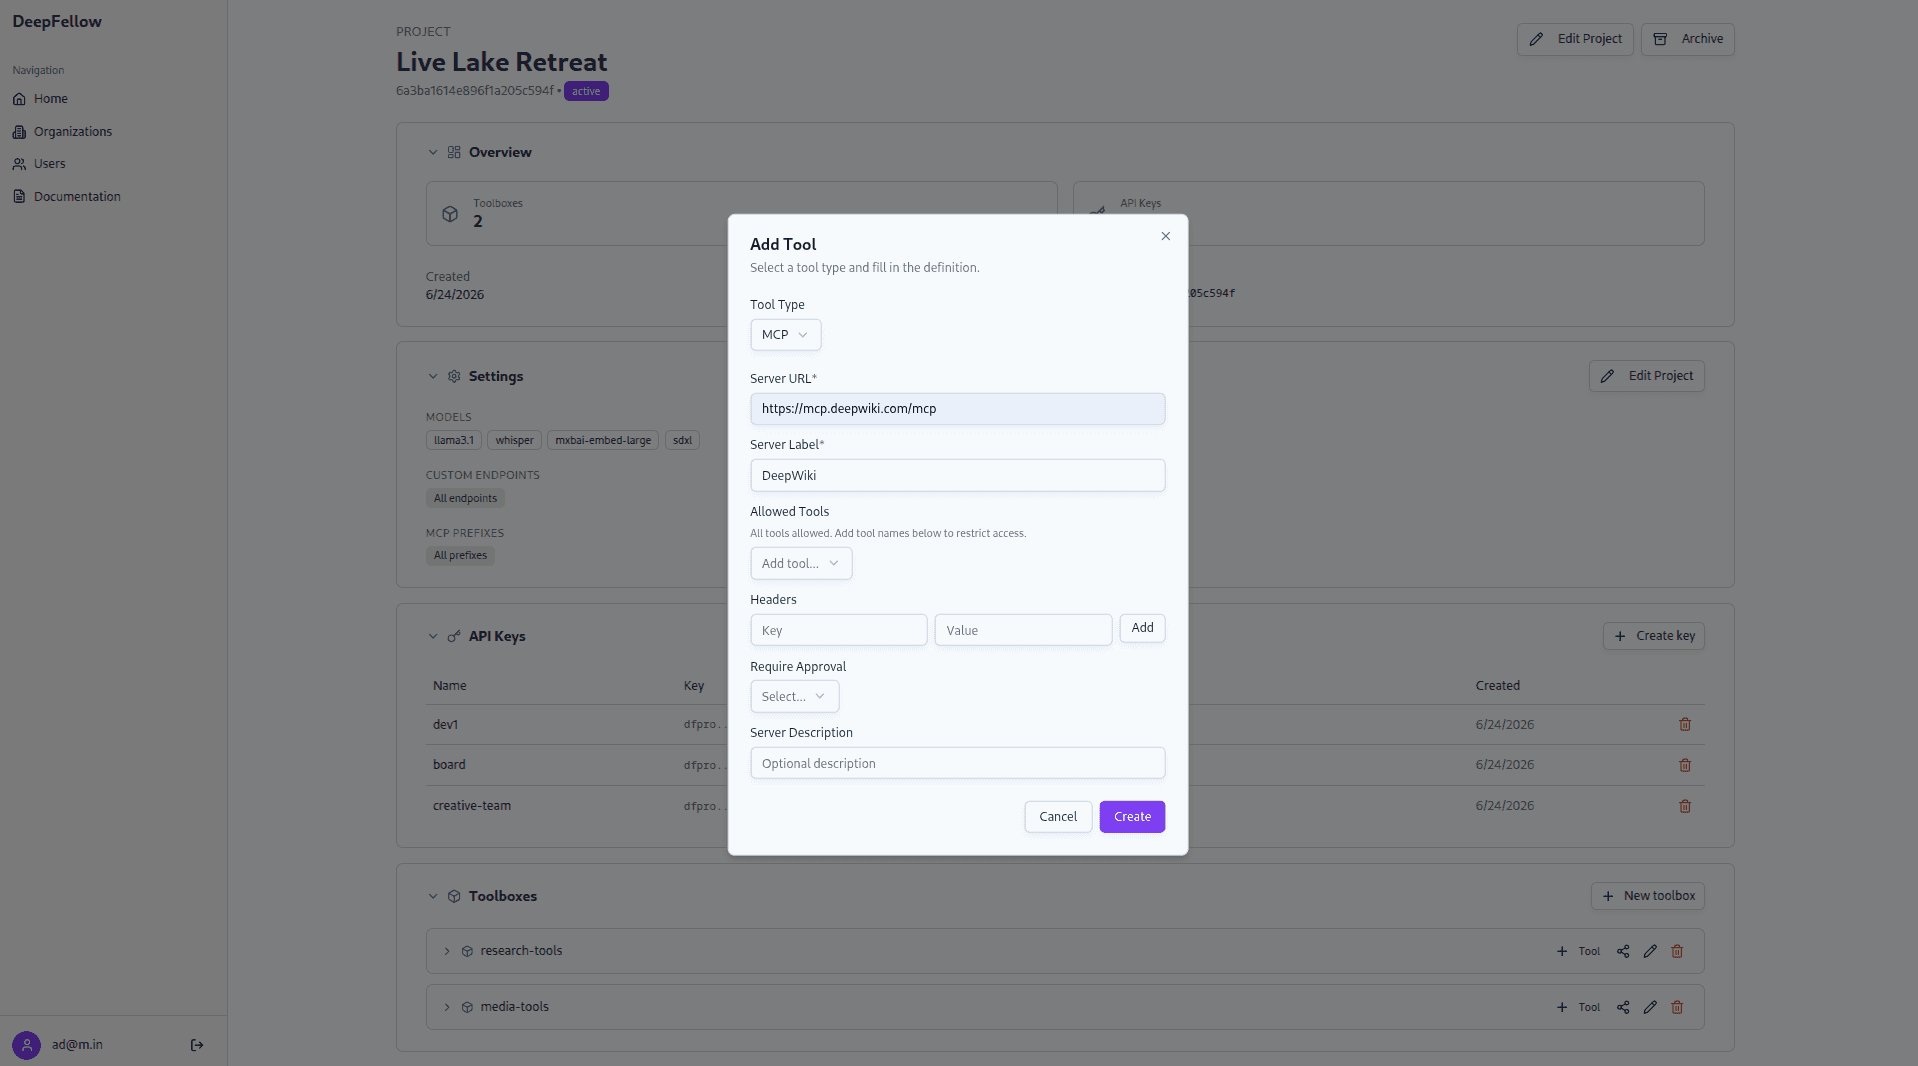
To add a tool, click "+ Tool" on a toolbox row. In the "Add Tool" dialog, select a "Tool Type" and fill in its definition. DeepFellow supports the following tool types:
- External MCP – connects to an external MCP server.
- Infra MCP – uses tools hosted on DeepFellow Infra.
- Image Generation – generates images using DeepFellow Infra.
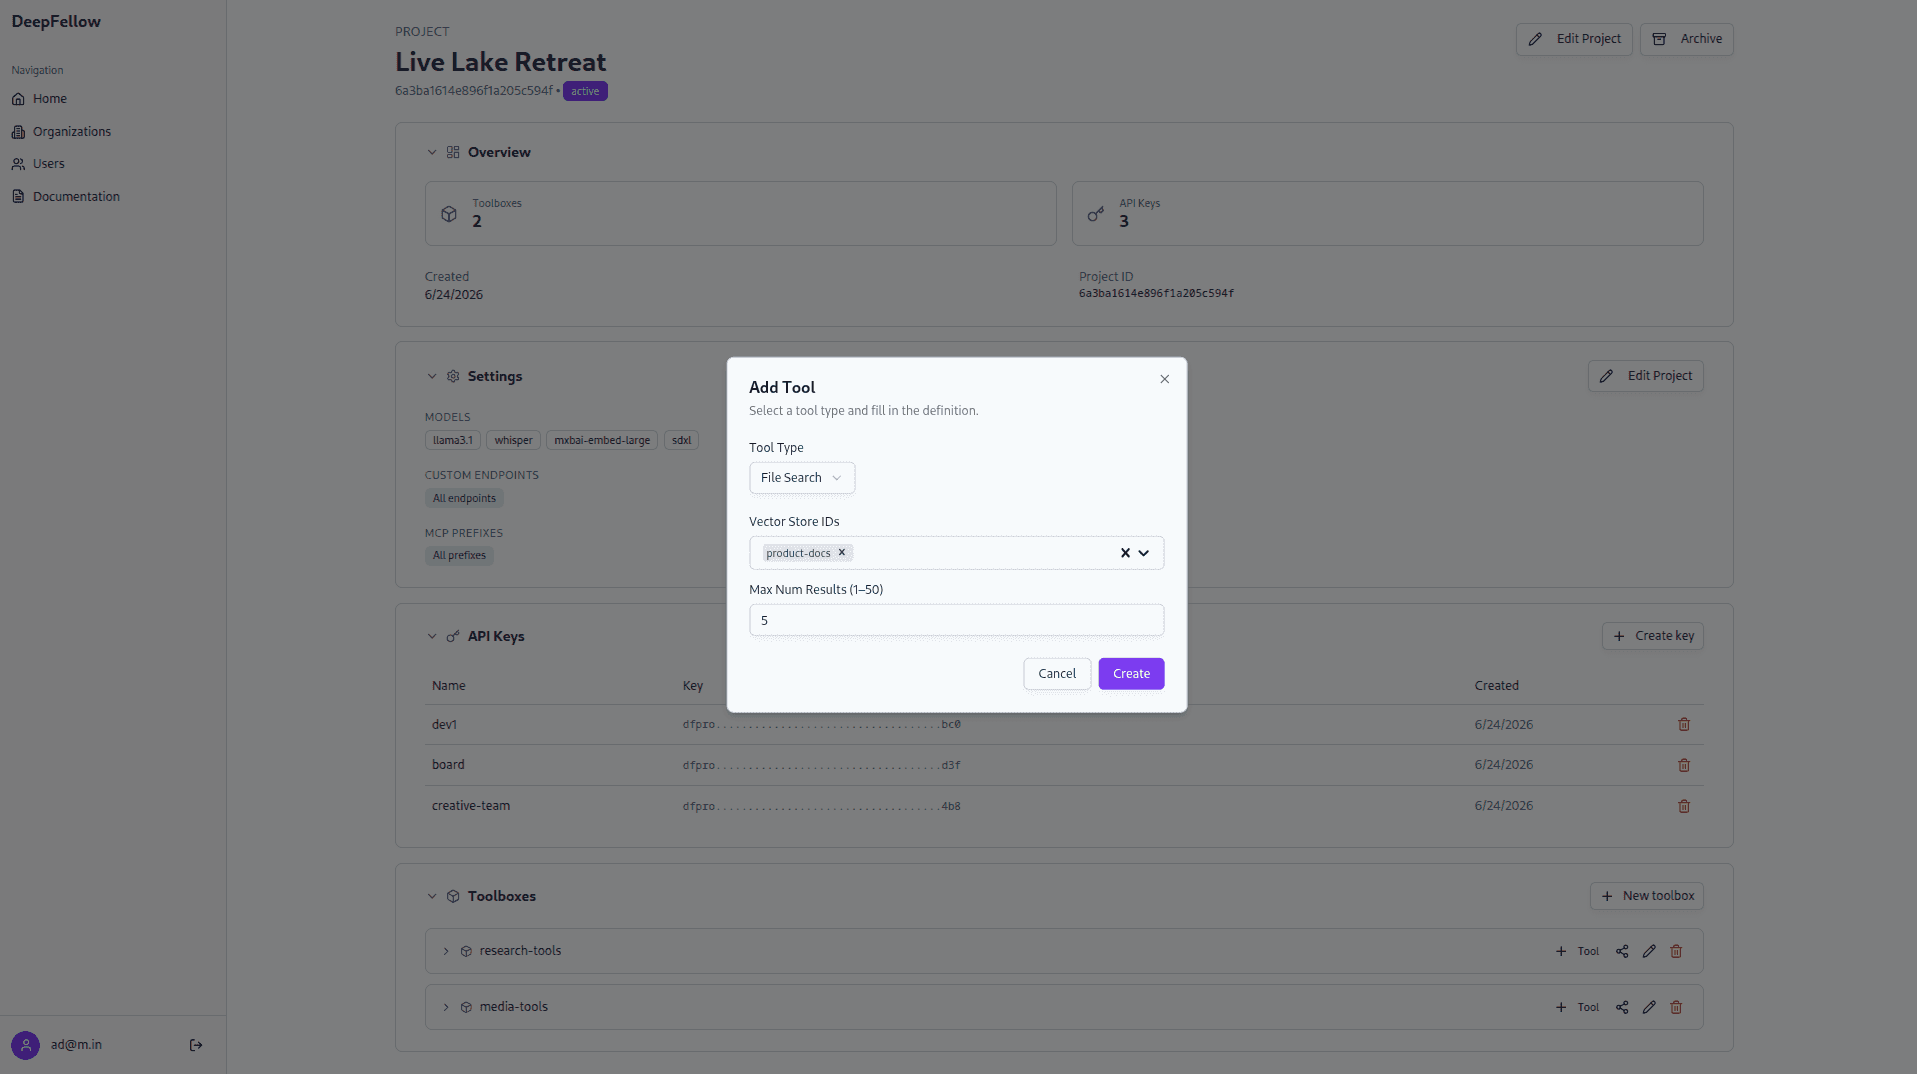
- File Search – searches DeepFellow Server vector stores.
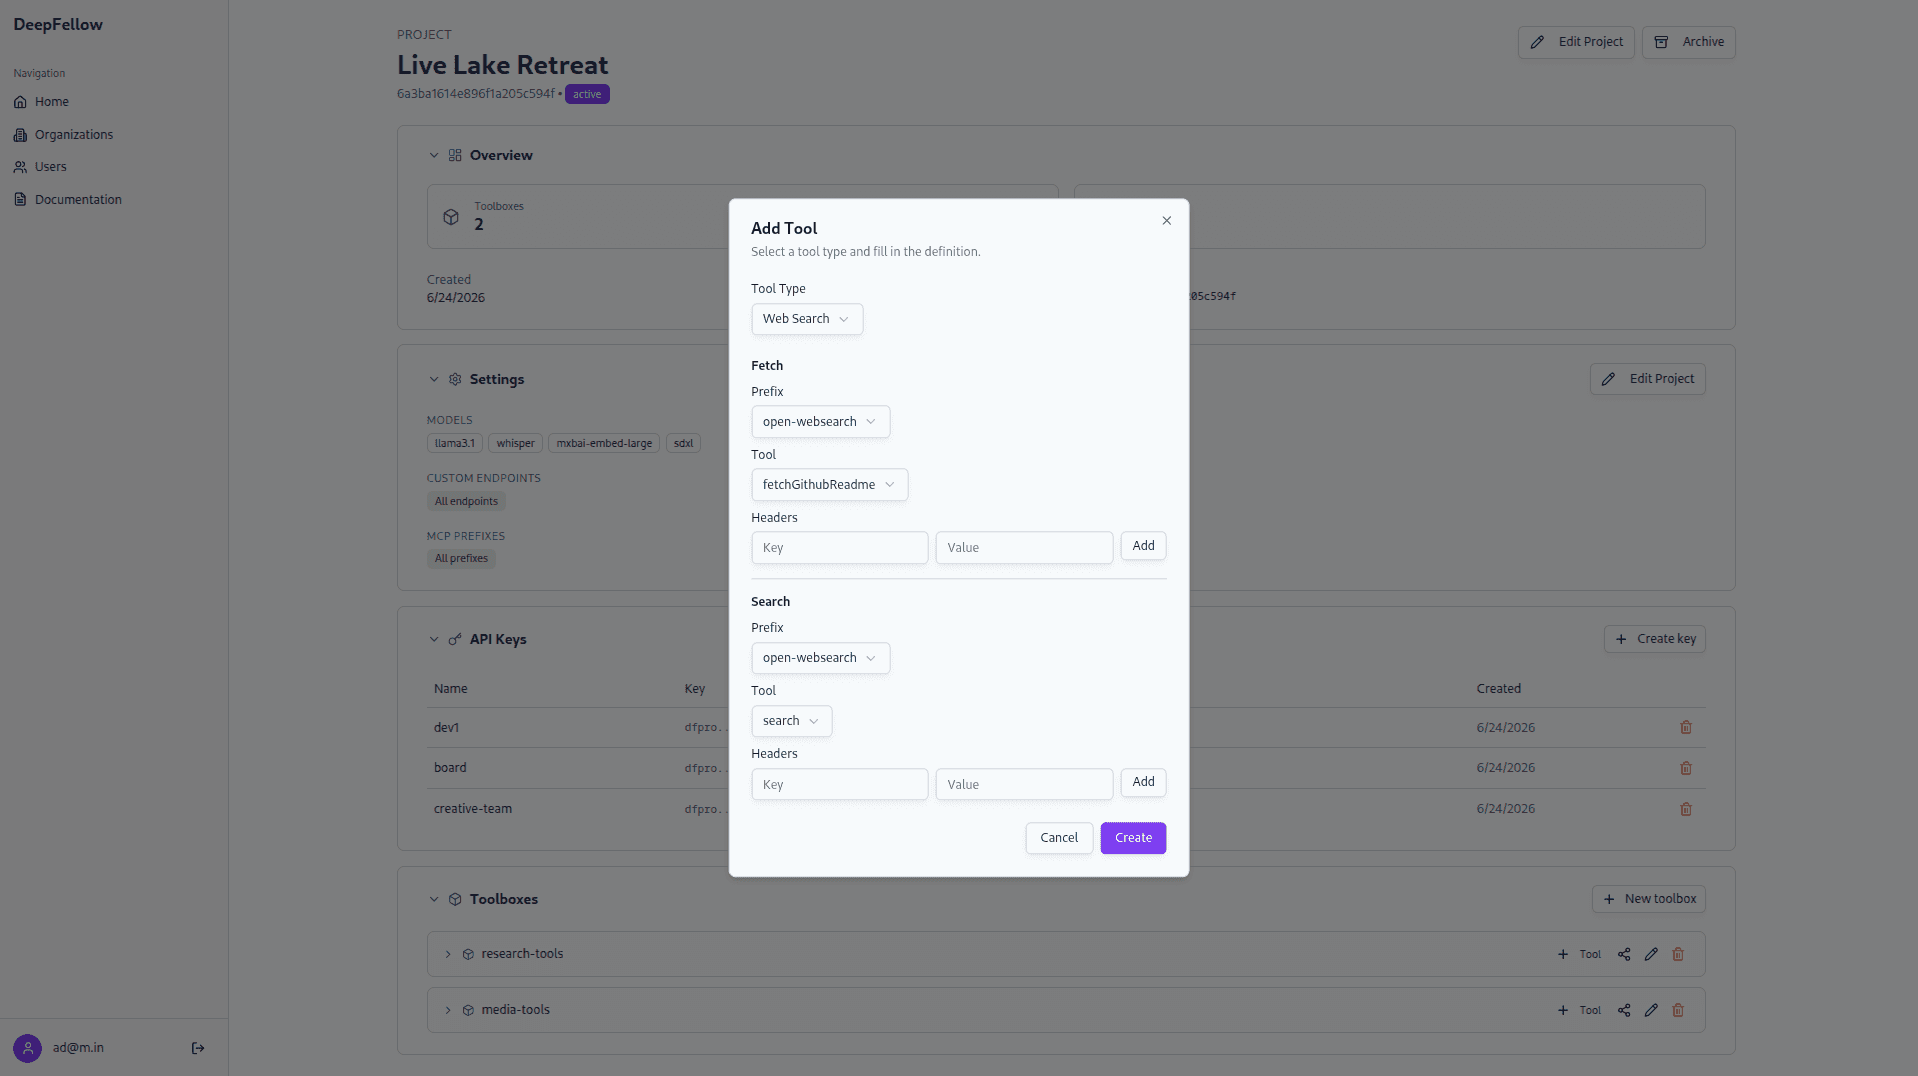
- Web Search – searches web pages and fetches their content.
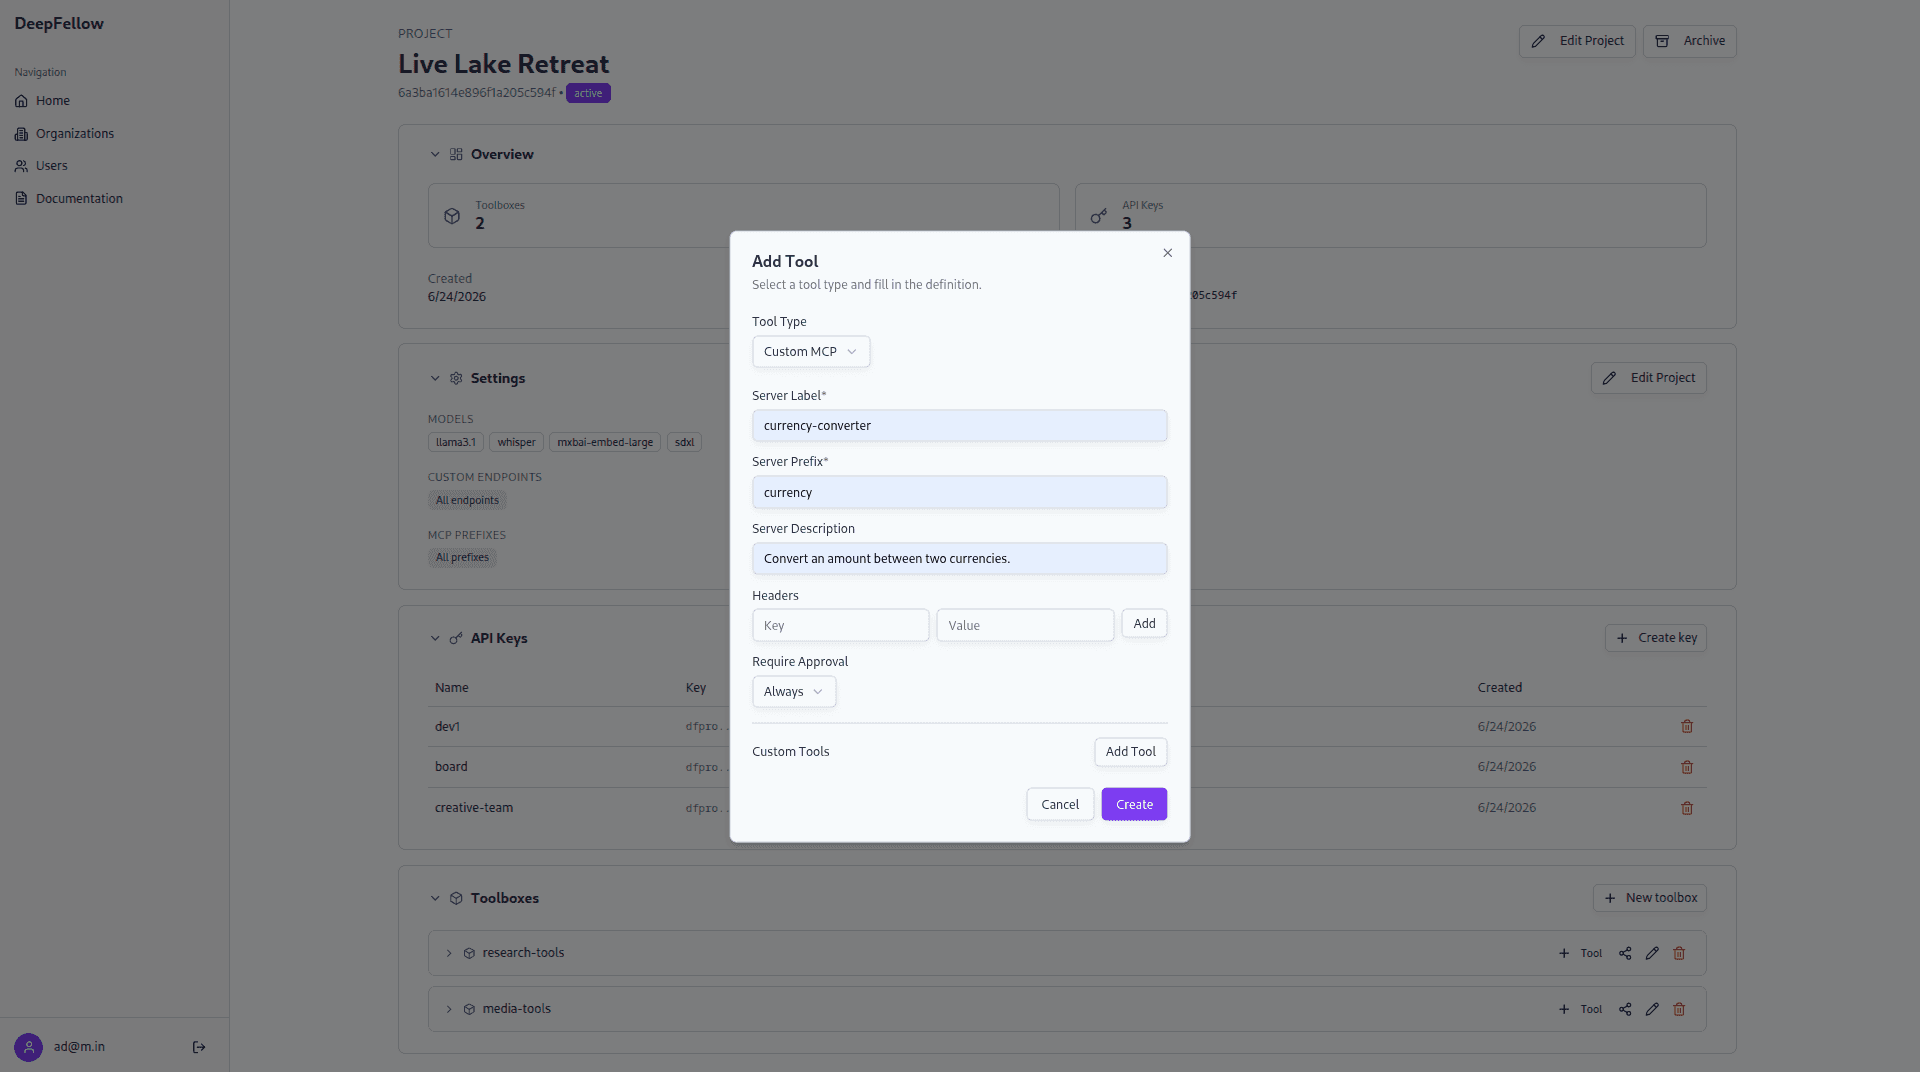
- Custom MCP – wraps an HTTP request to a custom service.
Each form maps to the fields described in Tool Types. Fill in the required fields, marked with an asterisk, and click "Create" to add the tool.
Fields:
- Server URL (required) – URL of the external MCP server.
- Server Label (required) – name of the MCP server, used by the model. DeepFellow fills this in automatically from the server after you enter the "Server URL"; you can override it.
- Allowed Tools – tools the model may use. If empty, all tools are allowed.
- Headers – additional HTTP headers, useful for tool authorization.
- Require Approval – whether tool calls need approval: "Always", "Never", or "Custom".
- Server Description – server description, used by the model.
Selecting "Custom" for Require Approval shows two groups, "Always" and "Never". In each, add the tool names the rule applies to, or enable "Read Only" to apply it to all read-only tools.
See Tool Types for request examples.
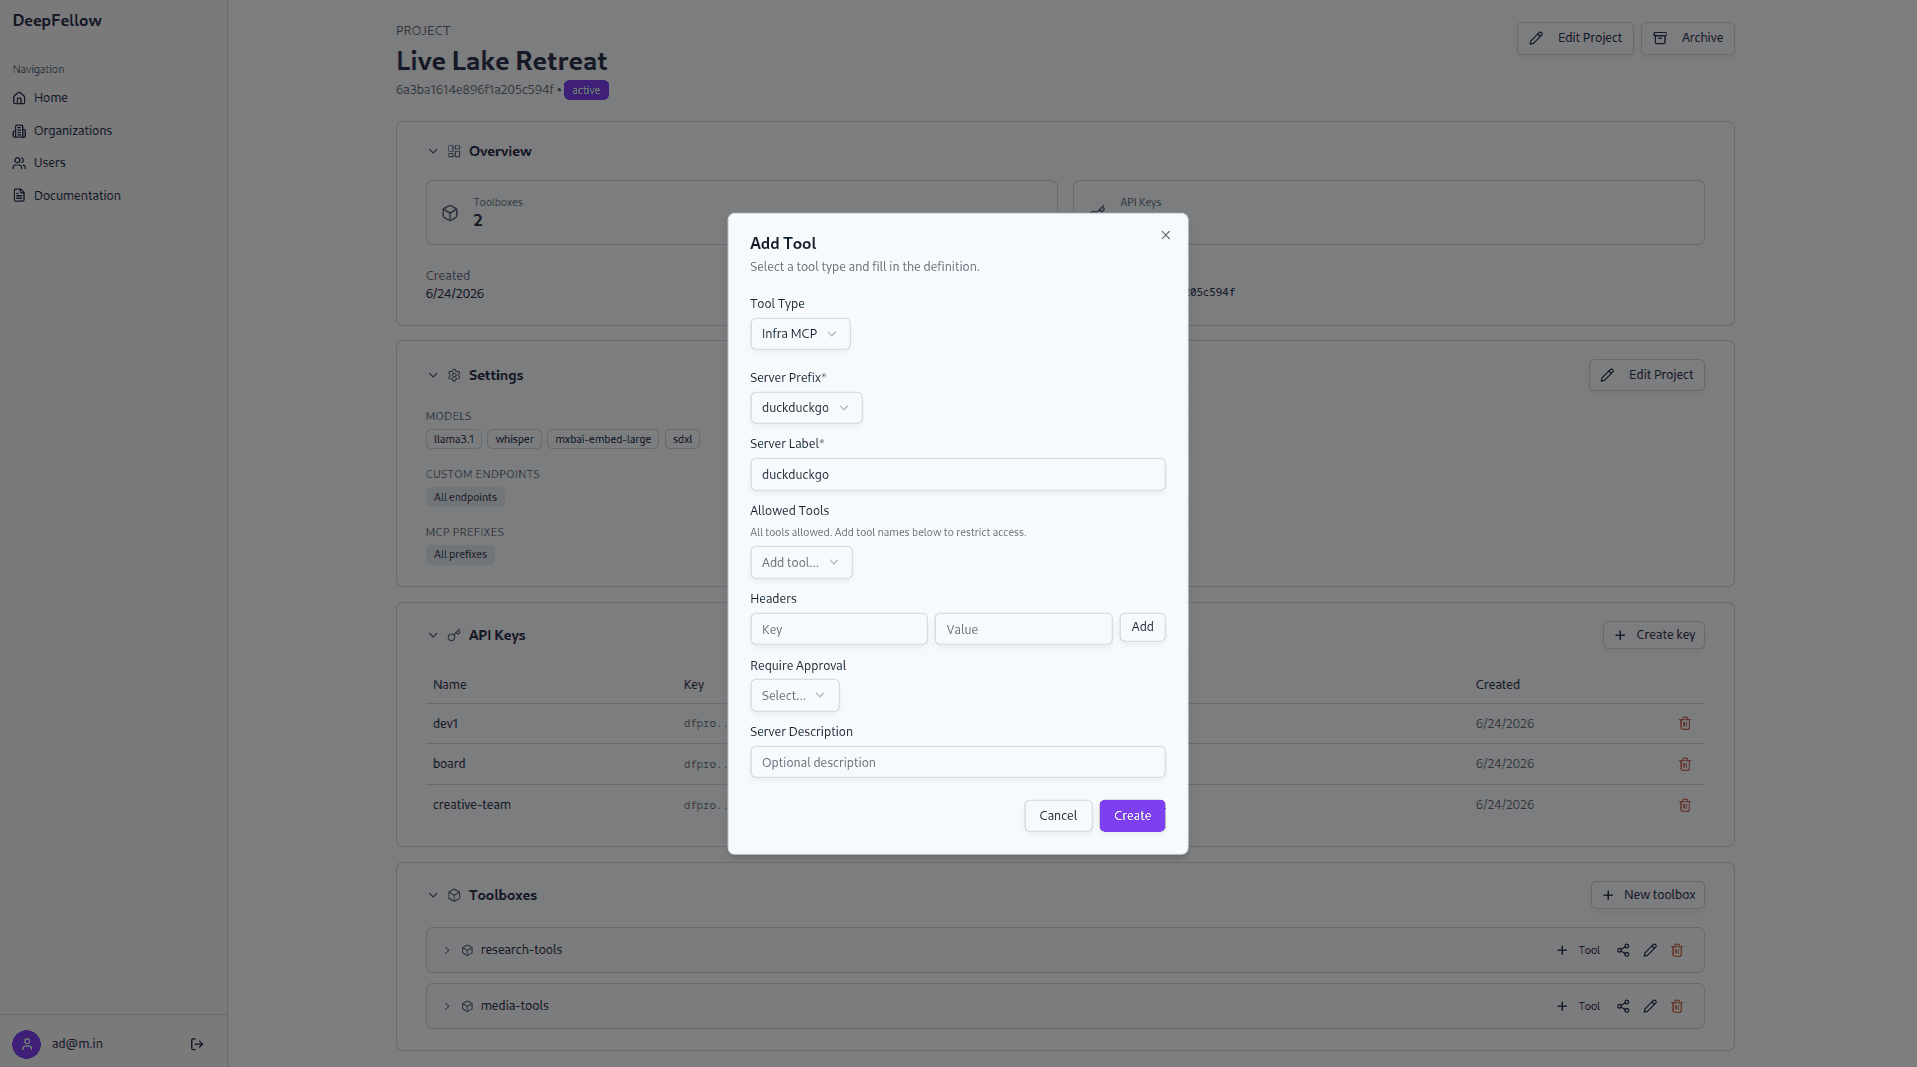
Fields:
- Server Prefix (required) – prefix set up during MCP server installation on DeepFellow Infra.
- Server Label (required) – name of the MCP server, used by the model.
- Server Transport – MCP transport used to connect to the server: "Streamable HTTP" (default) or "SSE".
- Allowed Tools – tools the model may use. If empty, all tools are allowed.
- Headers – additional HTTP headers, useful for tool authorization.
- Require Approval – whether tool calls need approval: "Always", "Never", or "Custom".
- Server Description – server description, used by the model.
Selecting "Custom" for Require Approval shows two groups, "Always" and "Never". In each, add the tool names the rule applies to, or enable "Read Only" to apply it to all read-only tools.
See Tool Types for request examples.
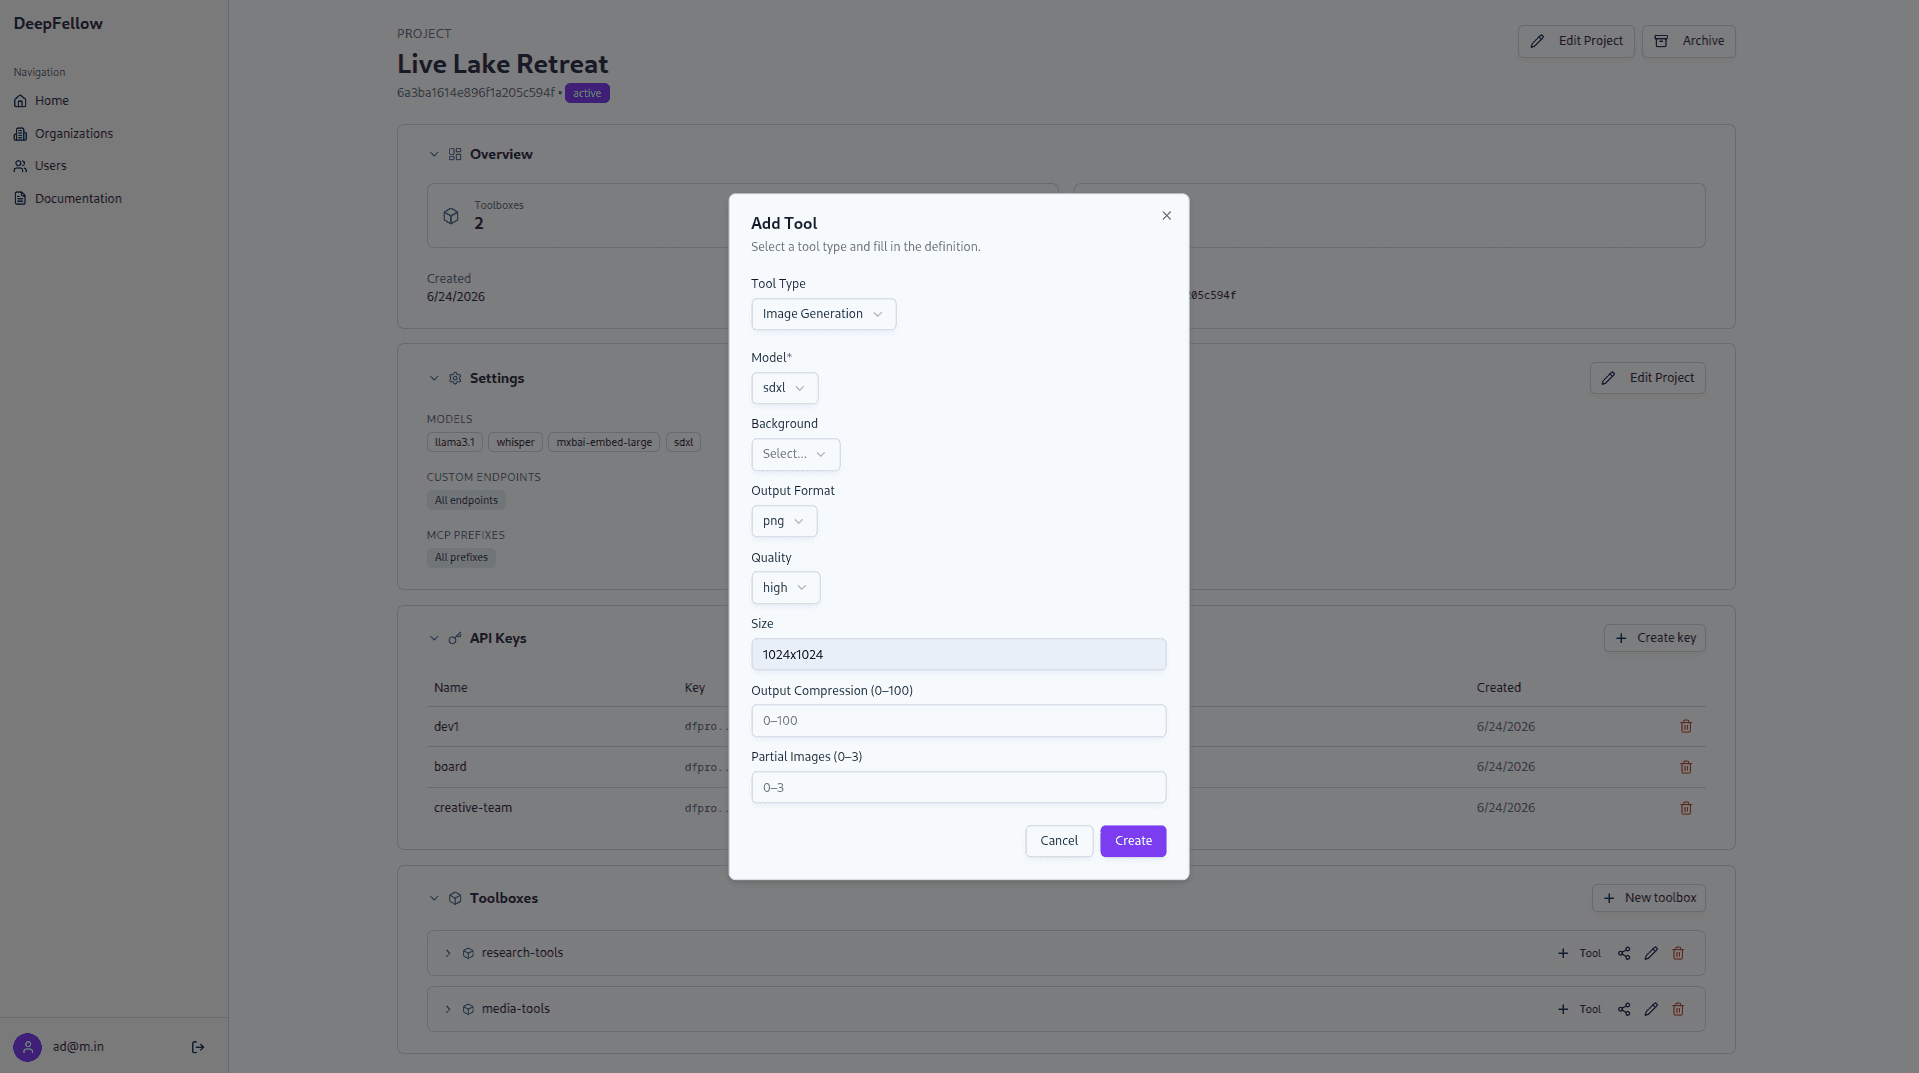
Fields:
- Model (required) – model installed in DeepFellow Infra's stable-diffusion-next service.
- Background – "auto", "transparent", or "opaque".
- Output Format – image format: "png", "jpeg", "webp".
- Quality – image quality: "auto", "low", "medium", "high".
- Size – image size: "width x height", for example "1024x1024".
- Output Compression (0–100) – output compression as a percentage. Lower values reduce file size and quality.
- Partial Images (0–3) – number of partial images to generate in streaming mode.
See Tool Types for the full set of API fields (including API-only options like moderation and input_image_mask) and request examples.
Fields:
- Vector Store IDs (required) – vector stores allowed to be accessed.
- Max Num Results (1–50) – maximum number of returned results.
See Tool Types for request examples.
Configure two operations, Search and Fetch. Each takes:
- Prefix (required) – prefix of the Infra MCP server providing the tool.
- Tool (required) – name of the tool on that server, for example
web_searchorweb_fetch. - Transport – MCP transport used to connect to the server: "Streamable HTTP" (default) or "SSE".
- Headers – additional HTTP headers for this operation.
See Tool Types for request examples.
Fields:
- Server Label (required) – MCP tool name.
- Server Prefix (required) – prefix set up during MCP server installation on DeepFellow Infra.
- Server Description – server description, used by the model.
- Headers – additional HTTP headers, useful for tool authorization.
- Require Approval – whether tool calls need approval: "Always" or "Never".
- Custom Tools – list of tools, each with:
- Name – tool name.
- Title – display name.
- Description – tool description.
- Request – the default request: Method, Path, Query Params, Request Headers, Body.
- Inputs – input fields: Name, Type, Description, Required, To Type ("body", "query", "header", "path"), To Param.
- Outputs – output fields: Name, Type, Description, Required, Content Type ("text", "image", "audio"), From Param, MIME Type, From Base64.
See Tool Types for the full field descriptions and request examples.
Viewing, Editing, and Deleting Tools
The "Toolboxes" section lists each toolbox with the number of tools it contains. Toolboxes are collapsed by default.
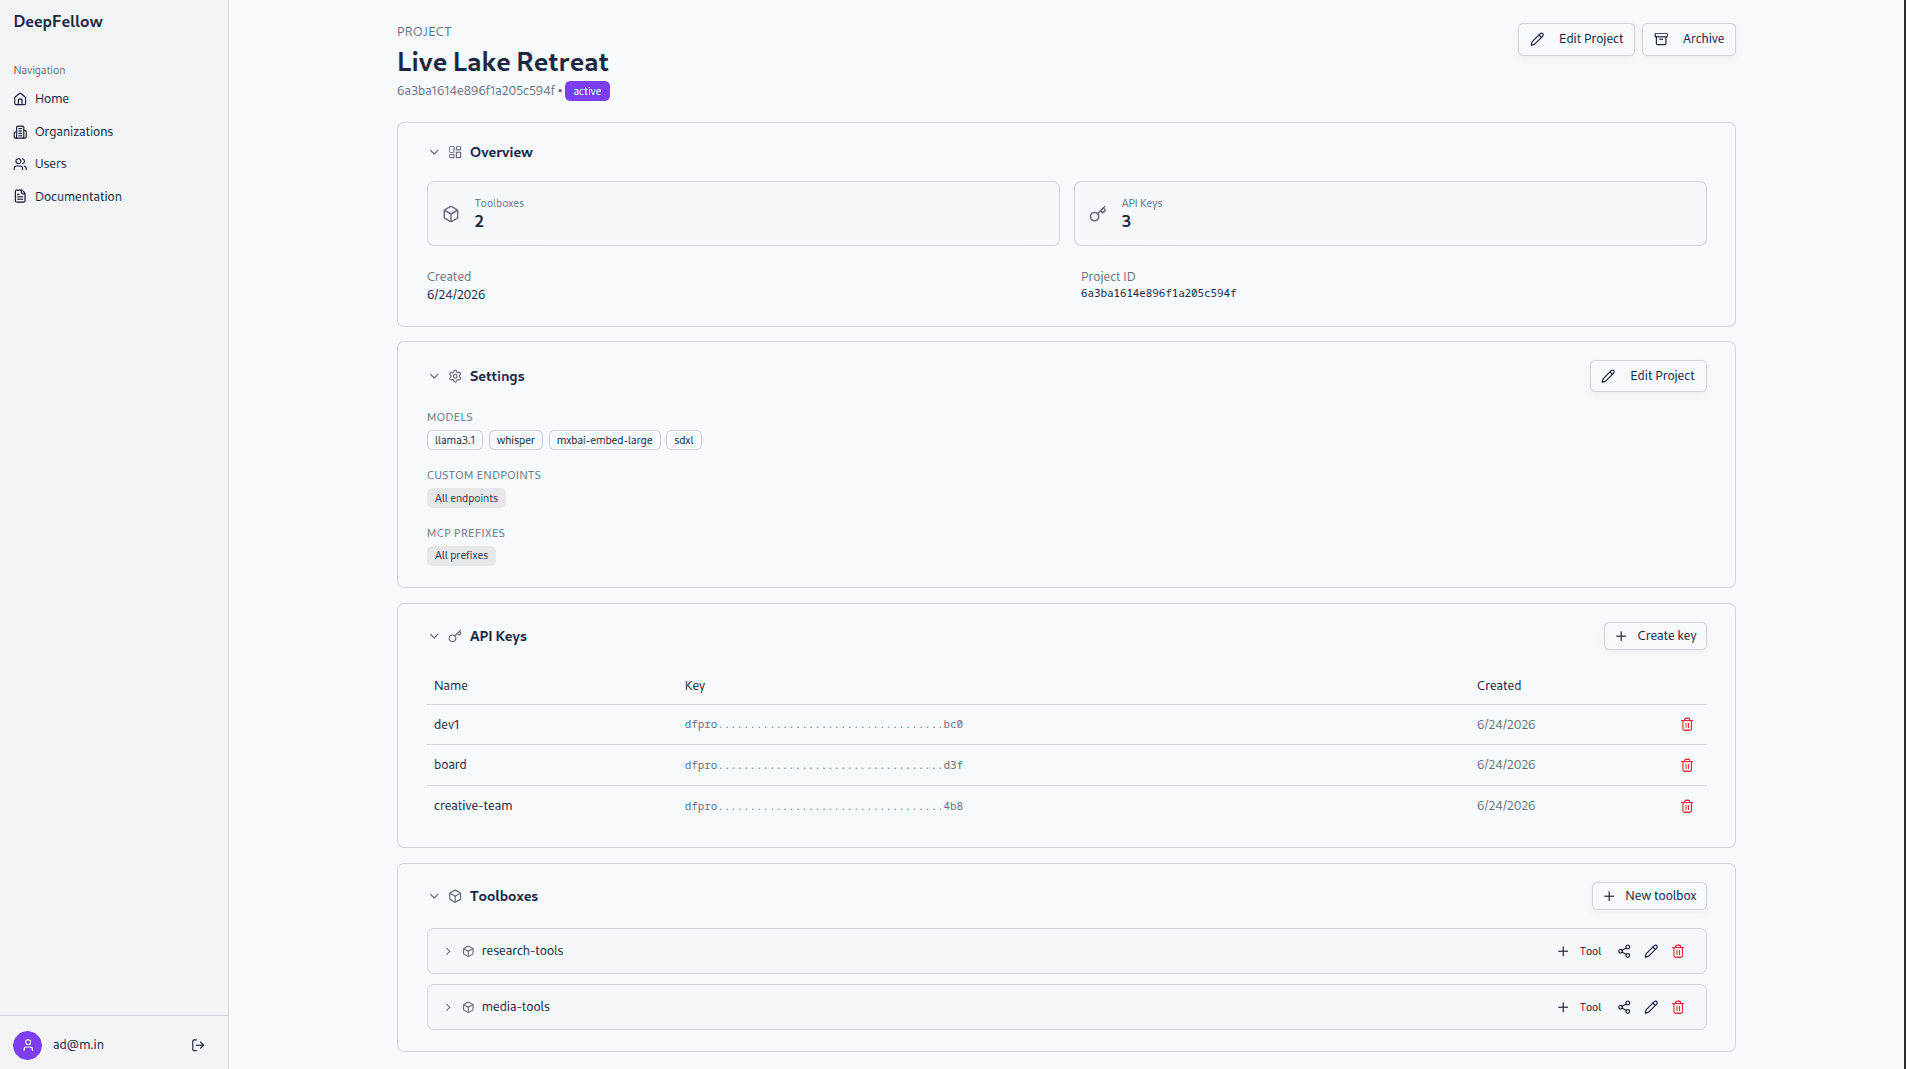
To see a toolbox's tools, click the "Arrow" to expand it. Each tool shows its type and a short summary.
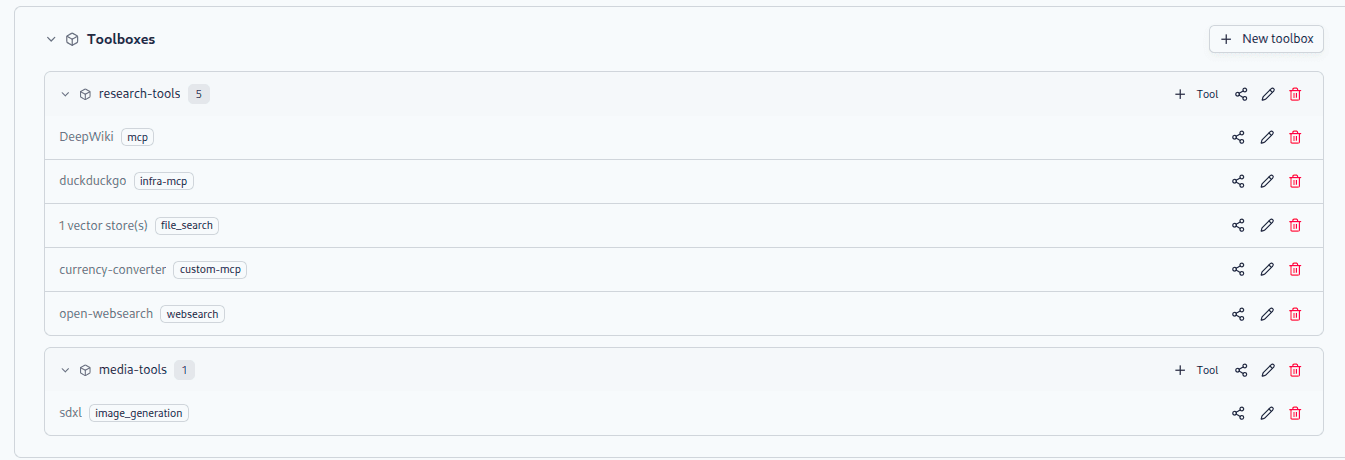
Each tool provides the following actions:
- Share opens the "Share MCP server" dialog for the tool.
- Pencil opens the dialog to edit the tool. Edit the fields and click "Update".
- Trash deletes the tool. Confirm by clicking "Delete".
We use cookies on our website. We use them to ensure proper functioning of the site and, if you agree, for purposes such as analytics, marketing, and targeting ads.