DeepFellow Infra Web Panel
DeepFellow Infra lets you manage your models. To install Infra, follow the Installation Guide.
Accessing Infra Web Panel
Type the following in your terminal:
deepfellow infra infoYou will get output similar to this:
$ deepfellow infra info
💡      Information about DeepFellow Infra:
        NAME: infra
        INFRA_URL: https://df-infra-node-1.com
        INFRA_MESH_URL: wss://df-infra-node-1.com
        INFRA_PORT: 8086
        INFRA_IMAGE: hub.simplito.com/deepfellow/deepfellow-infra:latest
        MESH_KEY: *****
        INFRA_API_KEY: *****
        INFRA_ADMIN_API_KEY: *****
        CONNECT_TO_MESH_URL: undefined
        CONNECT_TO_MESH_KEY: undefined
        INFRA_DOCKER_SUBNET: deepfellow-infra-net
        INFRA_COMPOSE_PREFIX: dfd834zh_
        INFRA_DOCKER_CONFIG: /home/mark/.deepfellow/infra/docker-config.json
        INFRA_STORAGE_DIR: /home/mark/.deepfellow/infra/storage
        METRICS_USERNAME: SDjtoe8Z
        METRICS_PASSWORD: *****
Sensitive values are masked by default. Add the --secret flag to reveal them:
deepfellow infra info --secretHead to the UI at http://localhost:8086.
In the pop-up window enter the value of INFRA_ADMIN_API_KEY. The services window will appear:
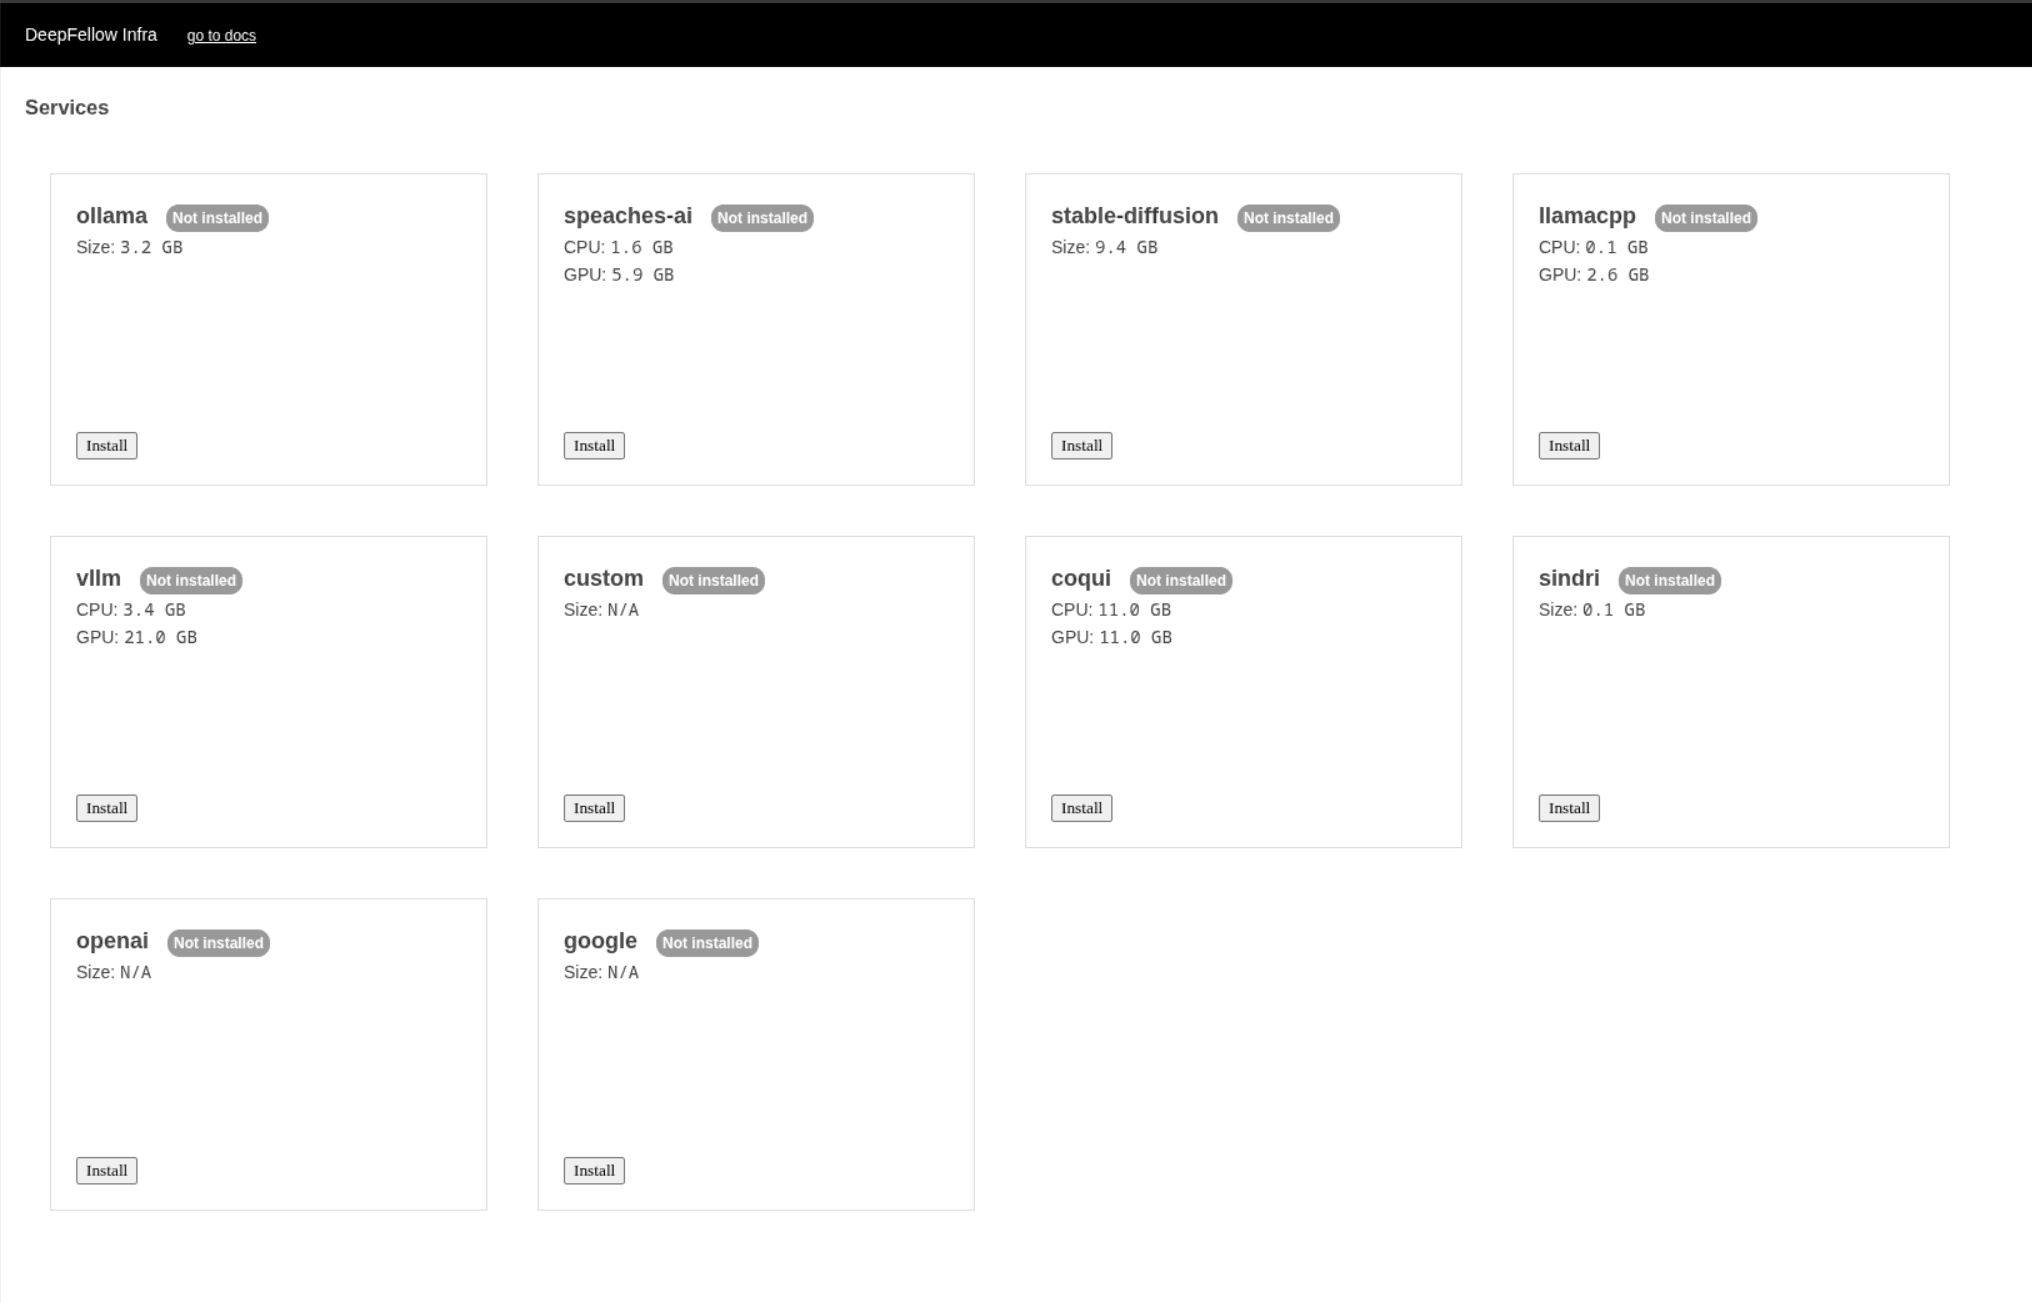
Services
Models are organized under "services". Each service is named after the backend, e.g. "ollama", or after the provider, e.g. "openai". Services group models from the same family.
Choosing Services
Available LLM services – ollama, llamacpp, vllm, and sglang differ in their level of hardware integration, including dependencies on specific CPU instruction sets.
To minimize hardware compatibility issues, consider the following services:
- ollama – Recommended for most users. Automatically adapts to your hardware configuration with minimal setup required.
- llamacpp – Supports models outside the ollama repository and the GGUF model format. May require extra configuration due to a higher chance of hardware compatibility issues.
- vllm – Offers the highest performance but carries the highest risk of hardware-related complications. Recommended for experienced users who are confident in troubleshooting and system configuration.
- sglang – Offers high-performance inference for LLM, embedding, and reranker models. Requires a GPU-capable Docker host; DeepFellow Infra doesn't offer a CPU option for this service (SGLang supports only specified processors)
Recommendation: If you're not sure which service to choose, start with ollama.
Cloud Services
The Services page includes a Cloud services toggle next to Show mesh info that controls whether you can install cloud-based services (claude, google, openai, deepseek, kimi, and ollama-cloud). The toggle is off by default on a new installation. Turning it off will not stop a cloud service that is already running.
Installing Services
To install a particular service, click install. You will be prompted with the window where you can choose service parameters.
Get the required API key before installing each service to use models with our anonymization layer:
- "openai" service - OpenAI API Key
- "google" service - Gemini API Key
- "claude" service - Anthropic API Key
- "ollama-cloud" service - Ollama Cloud API Key
Hardware selection depends on availability:
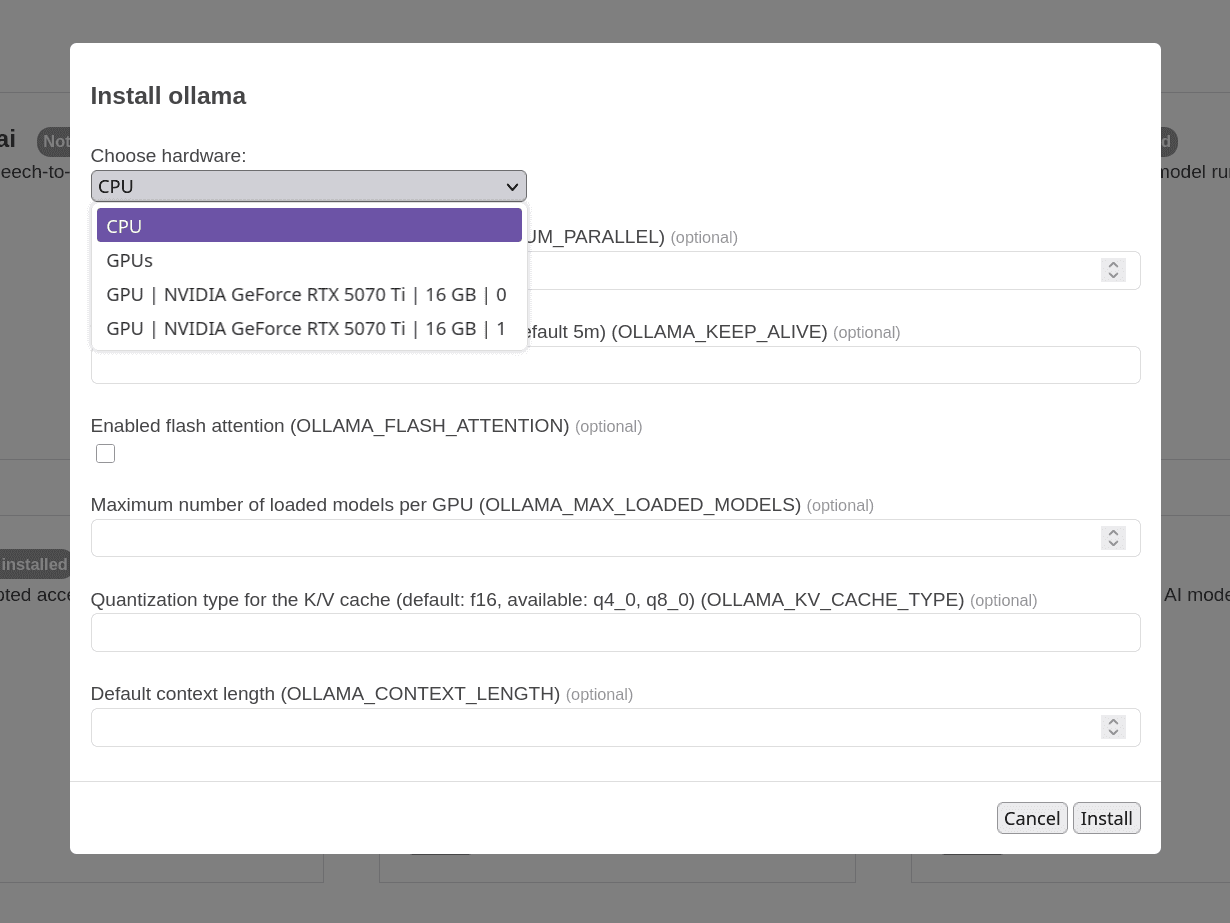
vLLM CPU mode is available only with processors supporting AVX-512 – learn more in vLLM docs. We recommend using 'ollama' or 'llamacpp' services instead, whenever possible. They provide the smoothest experience for now.
SGLang is GPU-only. DeepFellow Infra doesn't offer a CPU option for this service, so install it only on a host with a supported GPU.
Selecting a Docker Image Version
The install and edit dialogs for the ollama, llamacpp, vllm, and sglang services include a Docker image version field. Use it to pin the service to a specific container image tag instead of the default version bundled with DeepFellow.
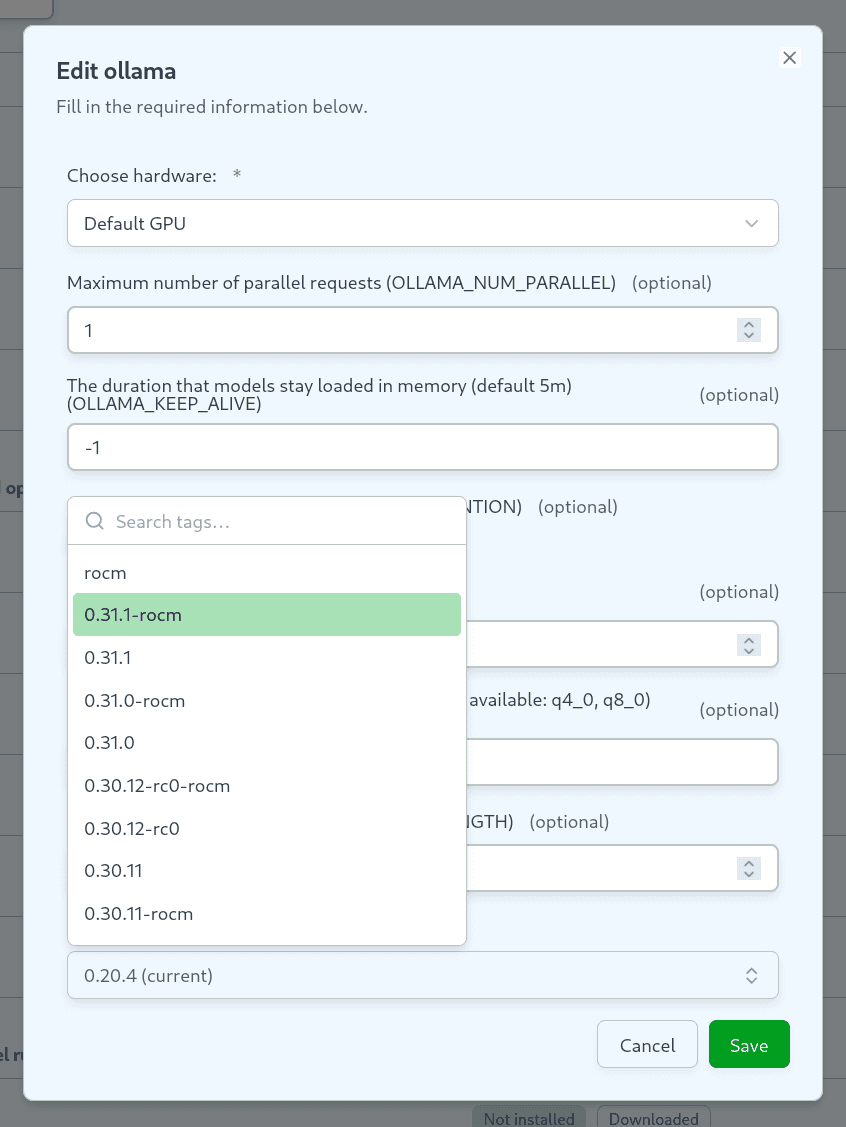
The field shows a searchable dropdown populated with tags fetched from the service's container registry (Docker Hub or GHCR). DeepFellow Infra filters the list to match the hardware variant you selected:
- ollama, vllm – CUDA tags for an NVIDIA GPU, CPU tags for CPU.
- llamacpp – CUDA tags for an NVIDIA GPU, Vulkan tags for an Intel GPU, or CPU tags for CPU.
- vllm – CUDA tags for an NVIDIA GPU, CPU tags for CPU.
- llamacpp – CUDA tags for an NVIDIA GPU, Vulkan tags for an Intel GPU, or CPU tags for CPU.
- sglang – always CUDA tags, since it's GPU-only.
- ollama – all published tags, since one image covers every hardware variant.
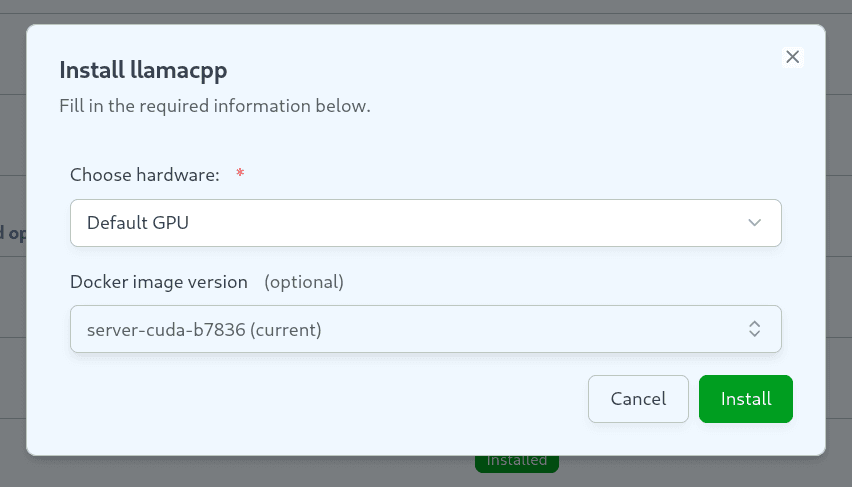
The tag matching the default bundled version carries a "current" label, which keeps it clear which version is in use when you leave the field empty.
When you leave the field collapsed, it shows the tag that is currently selected, labeled "(current)" for the default bundled version:
To pin a version, select a tag from the dropdown, or type one directly. The dropdown looks the same across services:
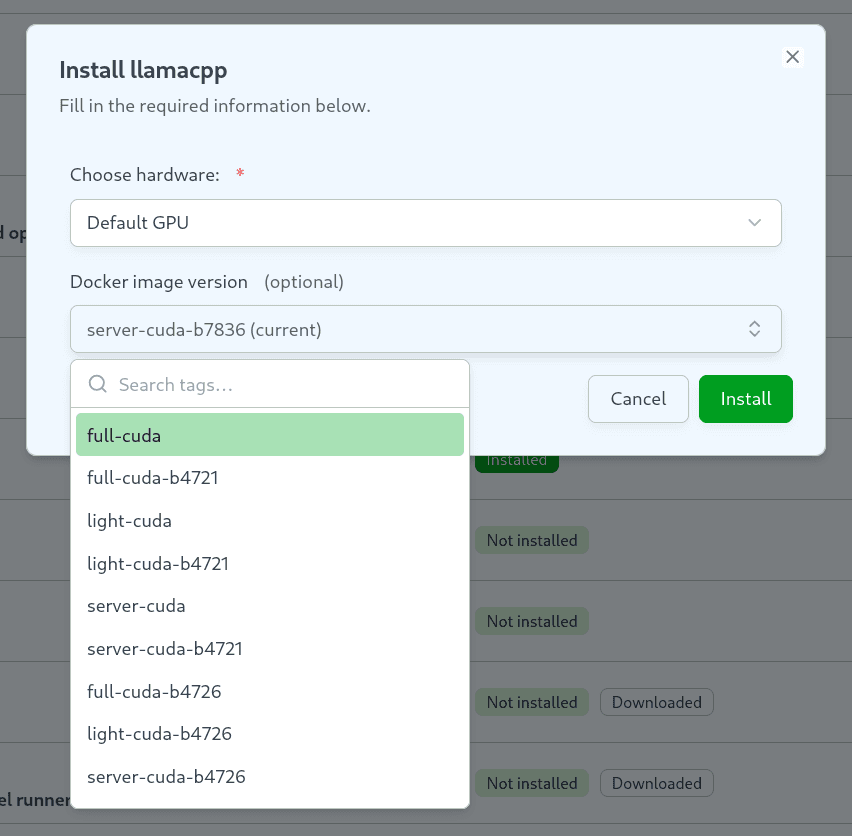
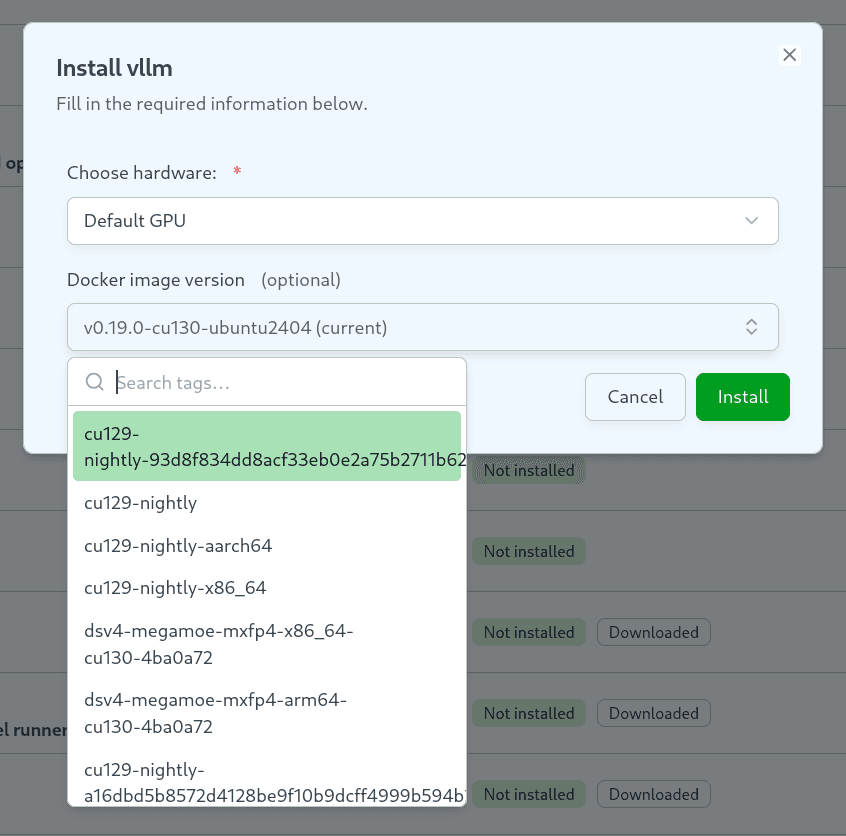
Leave the field empty to use the default version bundled with DeepFellow.
Fetching the tag list requires an internet connection to the service's container registry. If the registry is unreachable, the field falls back to a plain text input, so you can still type a tag manually. To increase Docker Hub rate limits, set DOCKER_HUB_TOKEN in your environment configuration.
The same field also appears when installing individual models backed by their own Docker image, not just services — see Installing Models below.
After the chosen service is installed, it will appear in the grid.
Cancelling an Install or Update
While a service is installing or updating, click Cancel in the actions column to stop it.

For an install, DeepFellow Infra stops the underlying Docker work and returns the service to Not installed. Install it again at any time.
For an update, cancelling may take a moment to settle, since DeepFellow Infra can attempt to automatically revert to the previous configuration in the background. Check the Services list again after a few seconds to confirm the instance's final state.
The Cancel button doesn't appear for cloud services (claude, google, openai, deepseek, kimi, and ollama-cloud), since those install instantly with no Docker work to stop.
To cancel through the API:
curl -X POST "https://<infra-url>/admin/services/<service_id>/cancel" \
  -H "Authorization: Bearer <admin-api-key>"
Uninstalling Services
Simply click "Uninstall" button to uninstall a service. You will have two options to choose:
- Uninstall - uninstalls the service but keeps its associated files, including model files
- Purge - uninstalls the service with its associated files, including model files
Service Instances
Each service supports one or more independent instances and always has a default instance. Installing the service installs that instance. Use additional instances to run the same service with different settings side by side, for example one ollama instance on GPU and another on CPU, or several openai instances that each point to a different OpenAI-compatible endpoint.
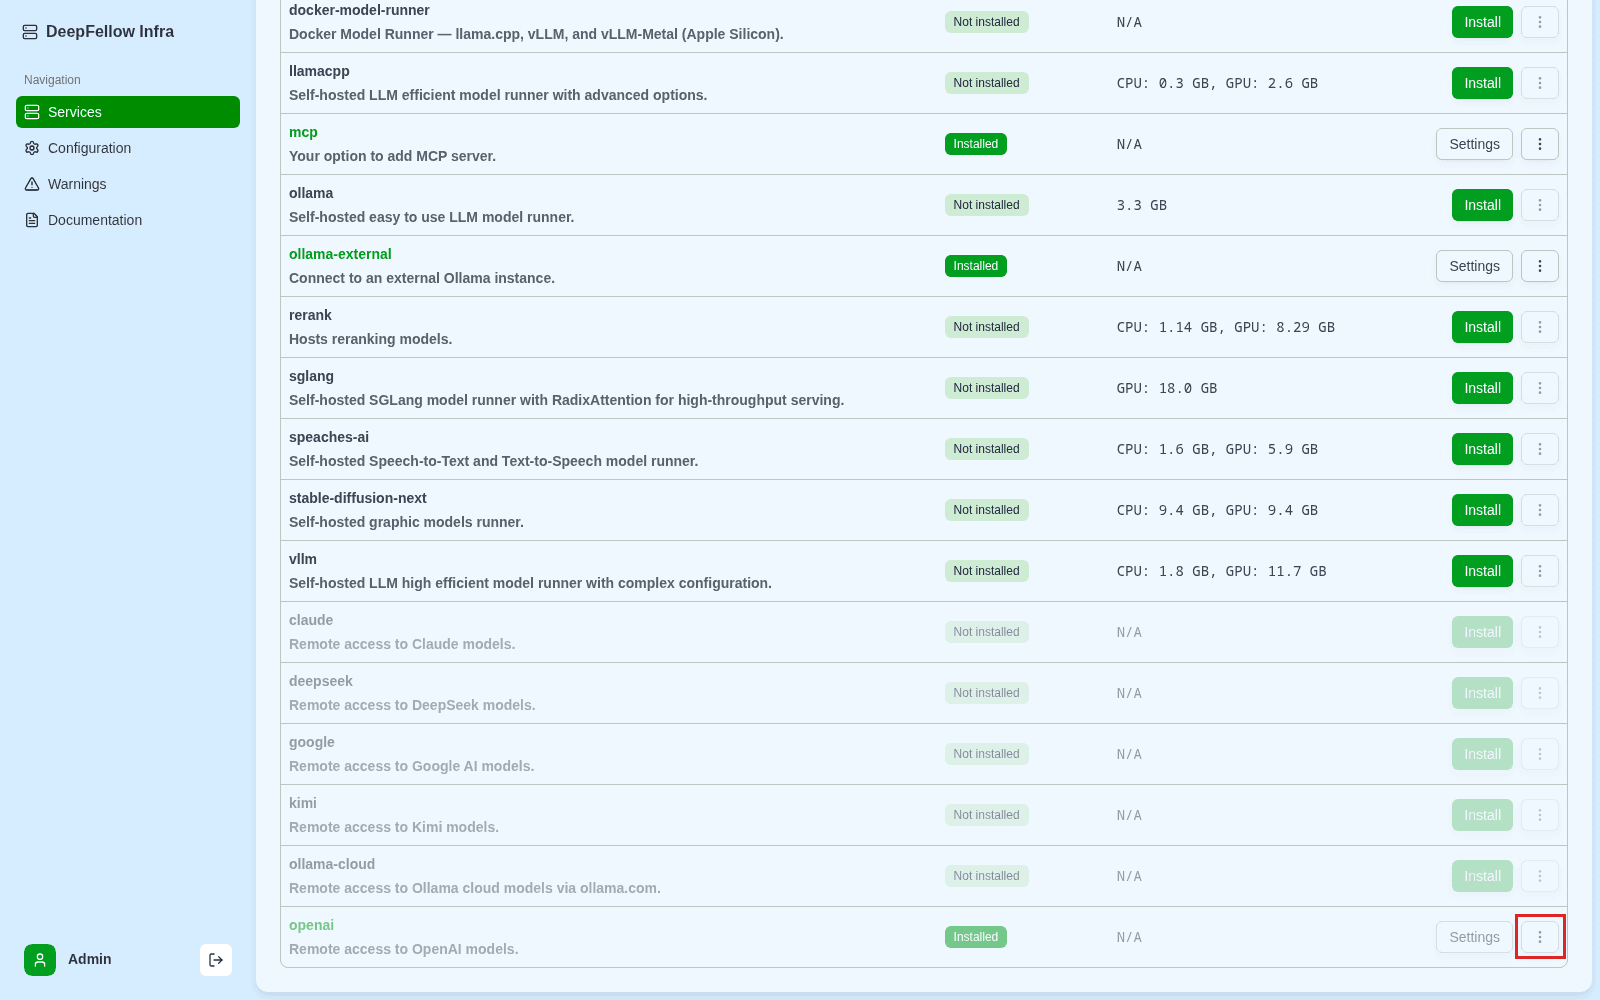
To add an instance to an already installed service:
-
Open the service's ⋮ menu.
-
Click Install another instance.
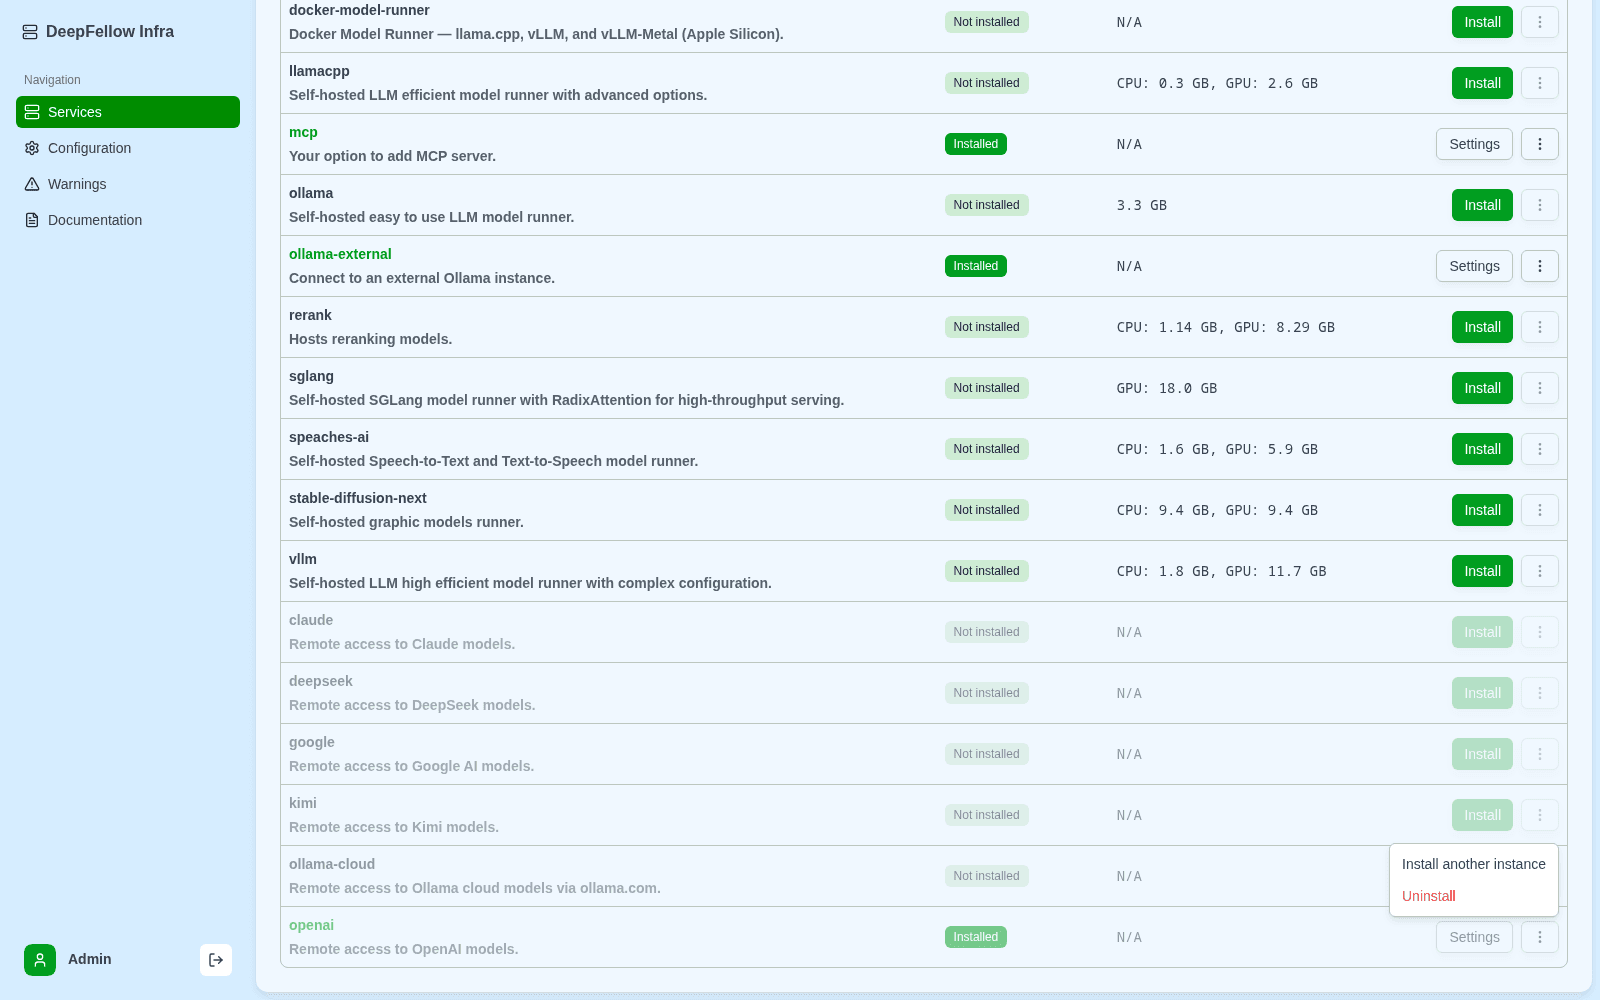
The install dialog adds an Instance ID field above the service's usual settings, pre-filled with a free name such as new or new-1:
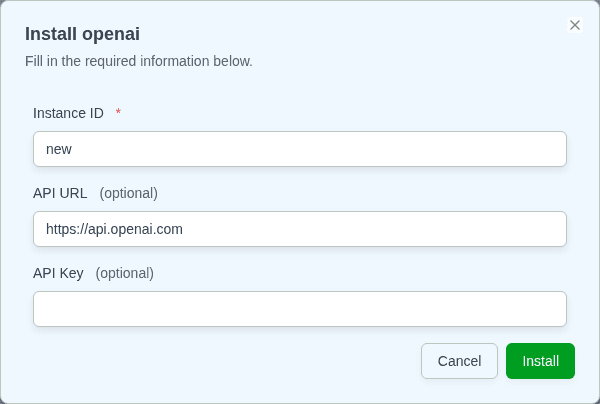
Enter a different ID, for example cpu or gpu2, made up of letters, digits, hyphens, and underscores, up to 64 characters. DeepFellow Infra rejects an ID that's already in use for that service.
Each instance appears as its own row in the Services list. The default instance shows the service name alone, for example ollama. Every other instance shows the service name, a pipe, and the instance ID, for example ollama|cpu:
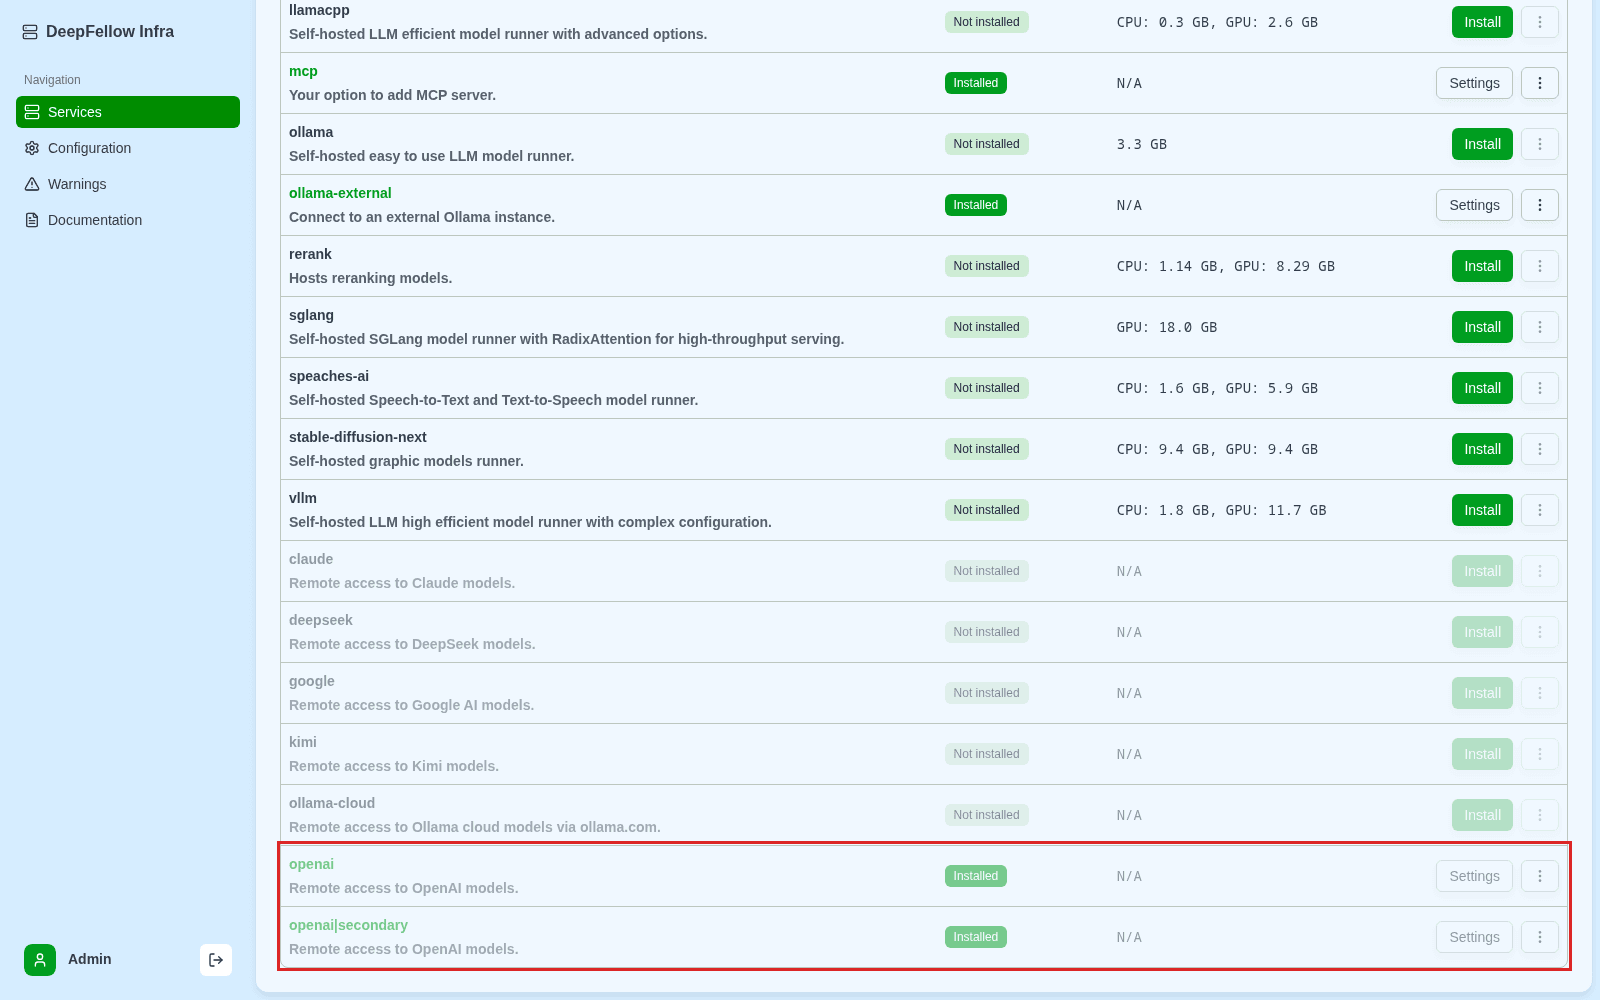
The Install, Uninstall, Settings, and other actions described above apply to a single instance. Pick the row for the instance you want to manage.
Instances of the same service keep their own hardware selection, Docker image version, API URL and key, and installed and custom models. You configure each one independently. They share the service's downloaded model files, so installing a model that's already present in another instance doesn't download it again. DeepFellow Infra reports download progress per instance. Uninstalling or purging one instance never removes a model's files while another instance of the same service still has that model installed.
To create and manage instances through the API, add the instance ID after the service ID, separated by a pipe:
curl -X POST "https://INFRA_URL/admin/services/ollama|cpu" \
  -H "Authorization: Bearer ADMIN_API_KEY" \
  -H "Content-Type: application/json" \
  -d '{"spec": {"hardware": "CPU"}}'
Viewing Service Settings
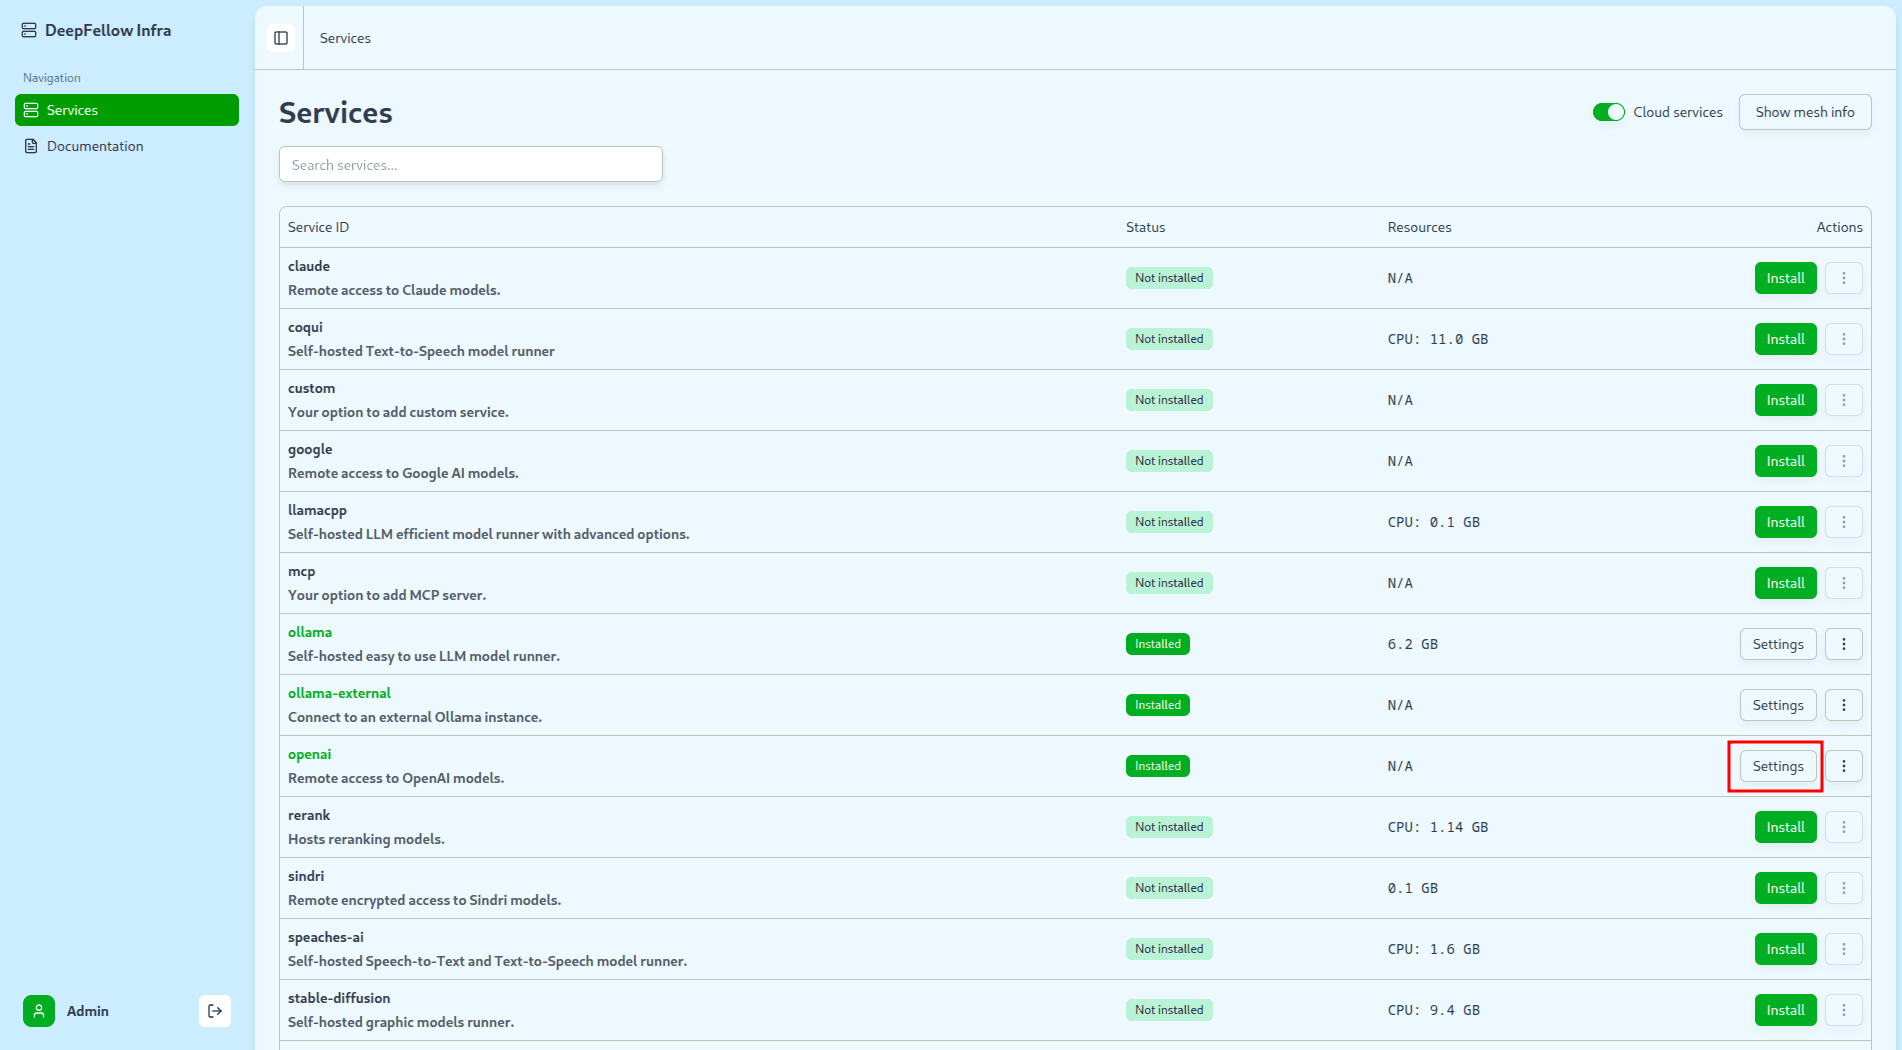
For an installed service, click the Settings button in the actions column to open a read-only view of its configuration, with secret values masked and revealable via an eye icon.
Editing a Service
From the Settings view, click Edit to change the service's configuration, then click Save.
DeepFellow Infra recreates the service's container to apply the new settings. If the recreation fails for any reason, for example an unavailable Docker image or a network error, DeepFellow Infra automatically reinstalls the service with its previous settings and reloads its previously installed models.
If the automatic revert also fails, the service ends up fully uninstalled. In that case, new installation is required.
Check Warnings for details whenever an edit fails.
Models
Installing Models
Click on "Models" button on the desired service. You will see a list of available models:
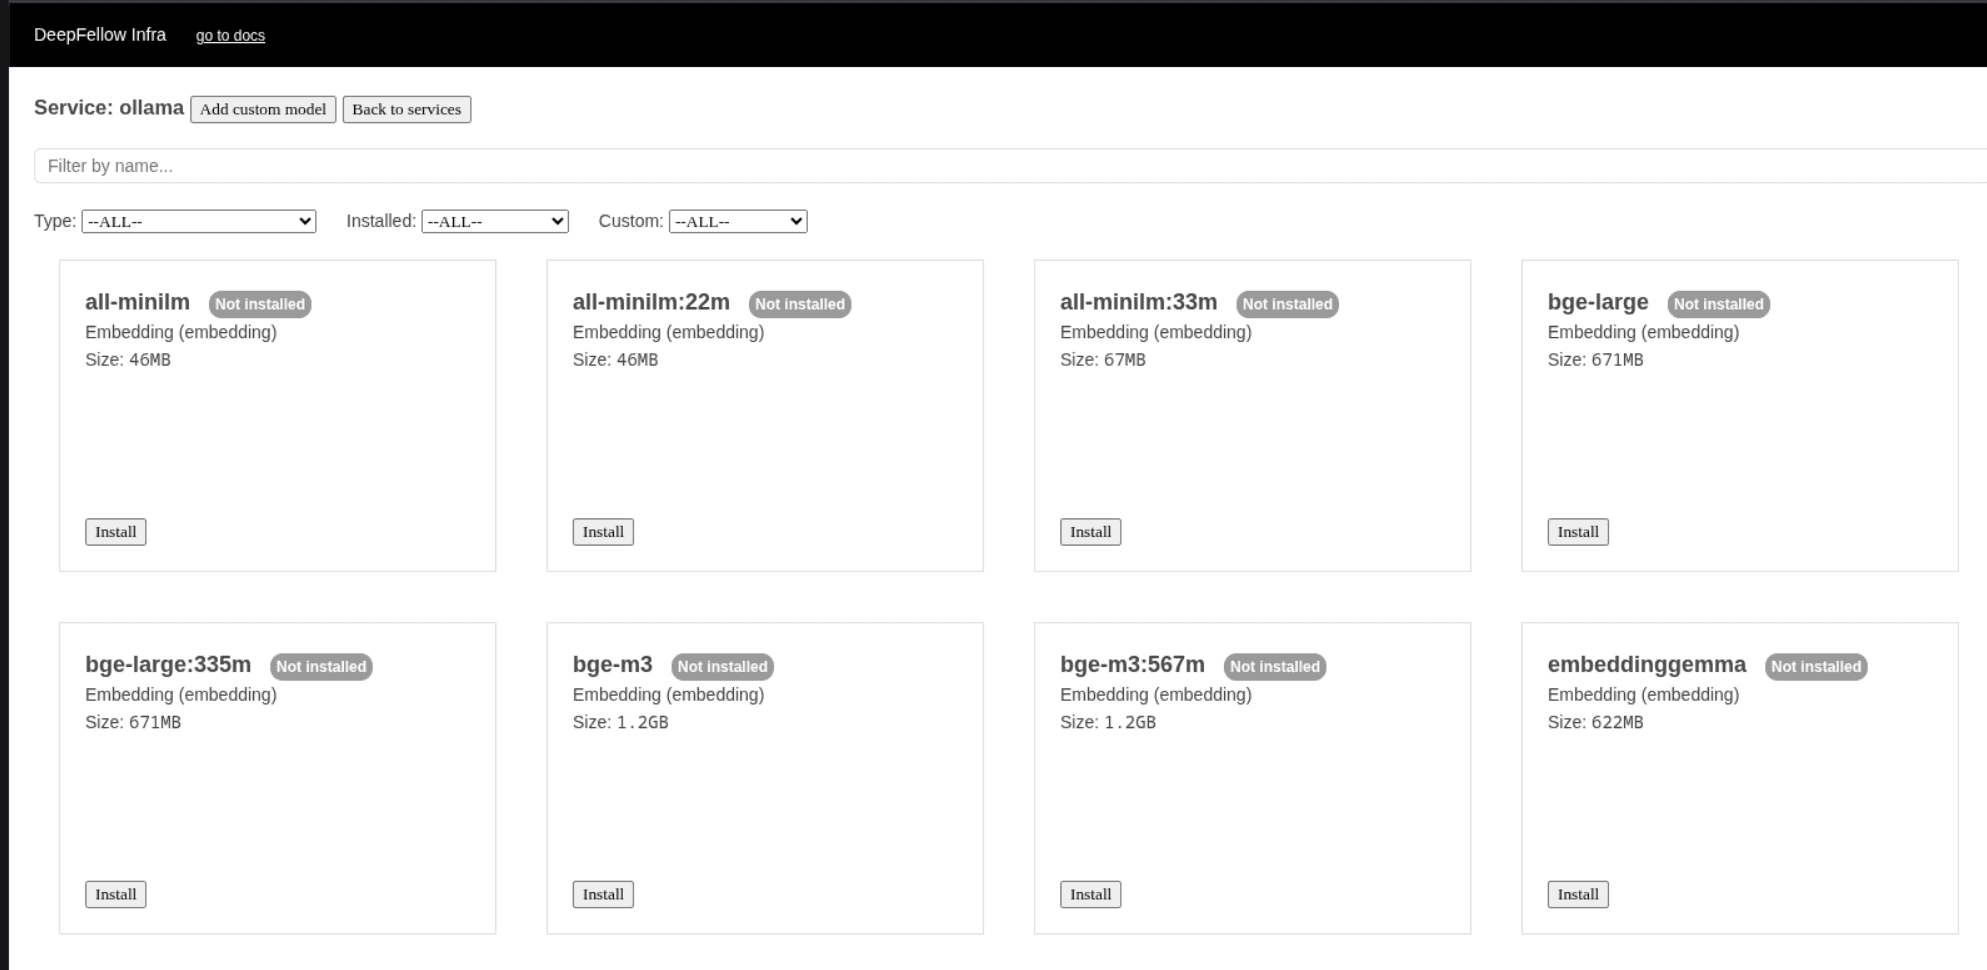
You can filter model list by name, type. You can also show models which are:
- installed / not installed
- custom / not custom
Click on "Install" button to install selected model.
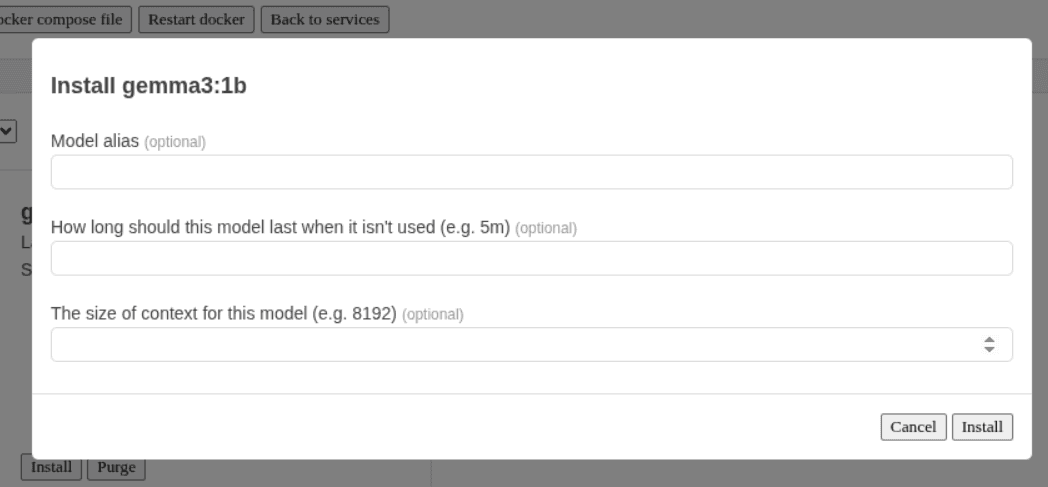
You can set the model alias. You can also decide how much time it can stay inactive before removing it from the graphic card memory. You can also adjust its context length.
For a built-in model backed by its own Docker image, for example doc_chunker, deepfellow-bge-m3, or lemmatizer in the custom service, or open-websearch and brave-search in the mcp service, the install dialog includes the same Docker image version field described in Selecting a Docker Image Version. It doesn't appear for a model whose image is pinned to a fixed digest rather than a floating tag, since there's no version to choose in that case.
After a model is installed, its card shows an estimated memory footprint (RAM (est.) on CPU, VRAM (est.) on GPU). Use it to judge how many models will run on the same machine at once and to avoid out-of-memory failures.
Refreshing the Model List
The model list refreshes automatically in the background. To force an immediate update, click the ↺ Refresh button in the top-right corner of the Models page.
For ollama-external services, the button is labeled ↺ Sync and triggers a full sync with the external Ollama instance. For other service types, it performs a client-side refresh of the model list.
Refreshing the Model Catalog
The llamacpp, vllm, and sglang services ship with a built-in default model catalog. Click "↻ Refresh catalog" on any of these services' Models page to re-crawl HuggingFace for the current top trending, most downloaded, and most liked models, and replace the service's default catalog with the result. This runs without redeploying DeepFellow Infra.
Refreshing the catalog through the API works the same way:
curl -X POST https://<infra-url>/admin/services/<service_id>/catalog/refresh \
  -H "Authorization: Bearer <admin-api-key>"
The response streams progress until the refresh finishes.
Catalog refresh requires the static/ directory inside the DeepFellow Infra container to be writable. llamacpp, vllm, and sglang share a single HuggingFace rate-limit budget, so refreshing one while another is already refreshing waits for the first request to finish.
If a refresh would replace the existing catalog with one that has less than half as many entries, DeepFellow Infra treats the result as degraded, for example due to a HuggingFace rate limit or API change, and keeps the existing catalog instead of overwriting it.
Uninstalling Models
Simply click "Uninstall" button to uninstall a model.
A window will open asking if you want to uninstall the model with its files.
After clicking uninstall, the model will stay downloaded but not installed.
Then, you can click install or purge button.
Clicking purge removes the model completely. It will have to be downloaded again in order to install.
Testing Models
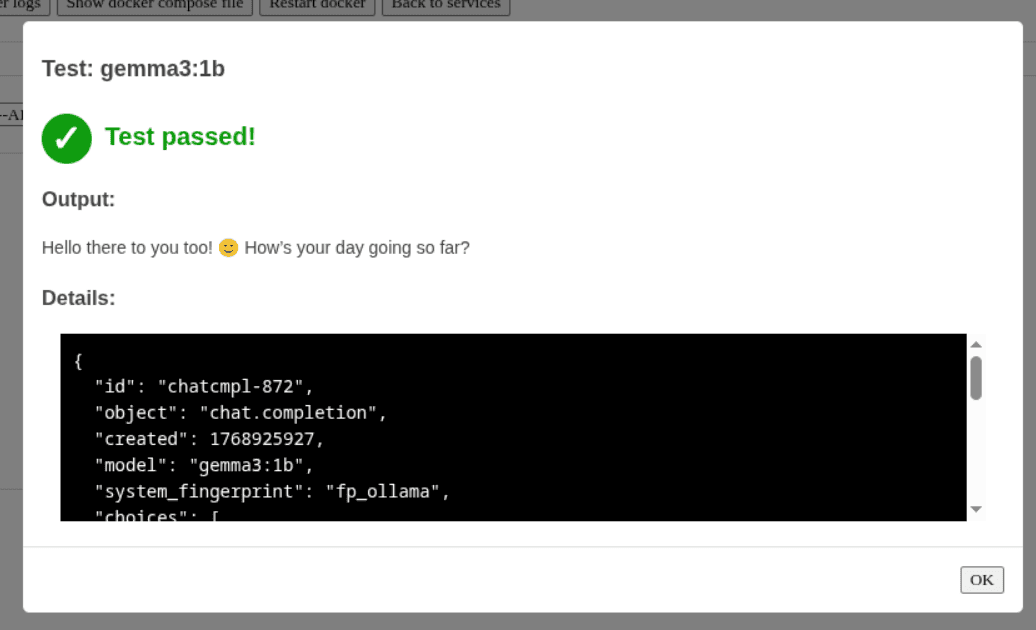
At any time after installing a given model you can test whether it is healthy. To do this click "Test" button on the model card, and you will get the result:
Custom Models
You can install your own custom models. Installed model must adhere to at least one of the criteria below:
- Is present in Ollama library -- use ollama service,
- Any model available in HuggingFace in GGUF format -- use llamacpp service,
- Any model available in HuggingFace supported by vLLM -- use vllm service,
- Any LLM, reranker, or embedding model available in HuggingFace supported by SGLang -- use sglang service,
- Any model from OpenAI/Google -- use openai/google service,
- Any image generation model compatible with stable diffusion (e.g. Civitai, HuggingFace) -- use stable-diffusion-next service,
- Any LoRA compatible with stable diffusion (e.g. Civitai, HuggingFace) -- use stable-diffusion-next service,
- Any docker image -- use custom service.
- Any reranking model -- use rerank service.
- Models hosted on a separate Ollama instance -- use ollama-external service.
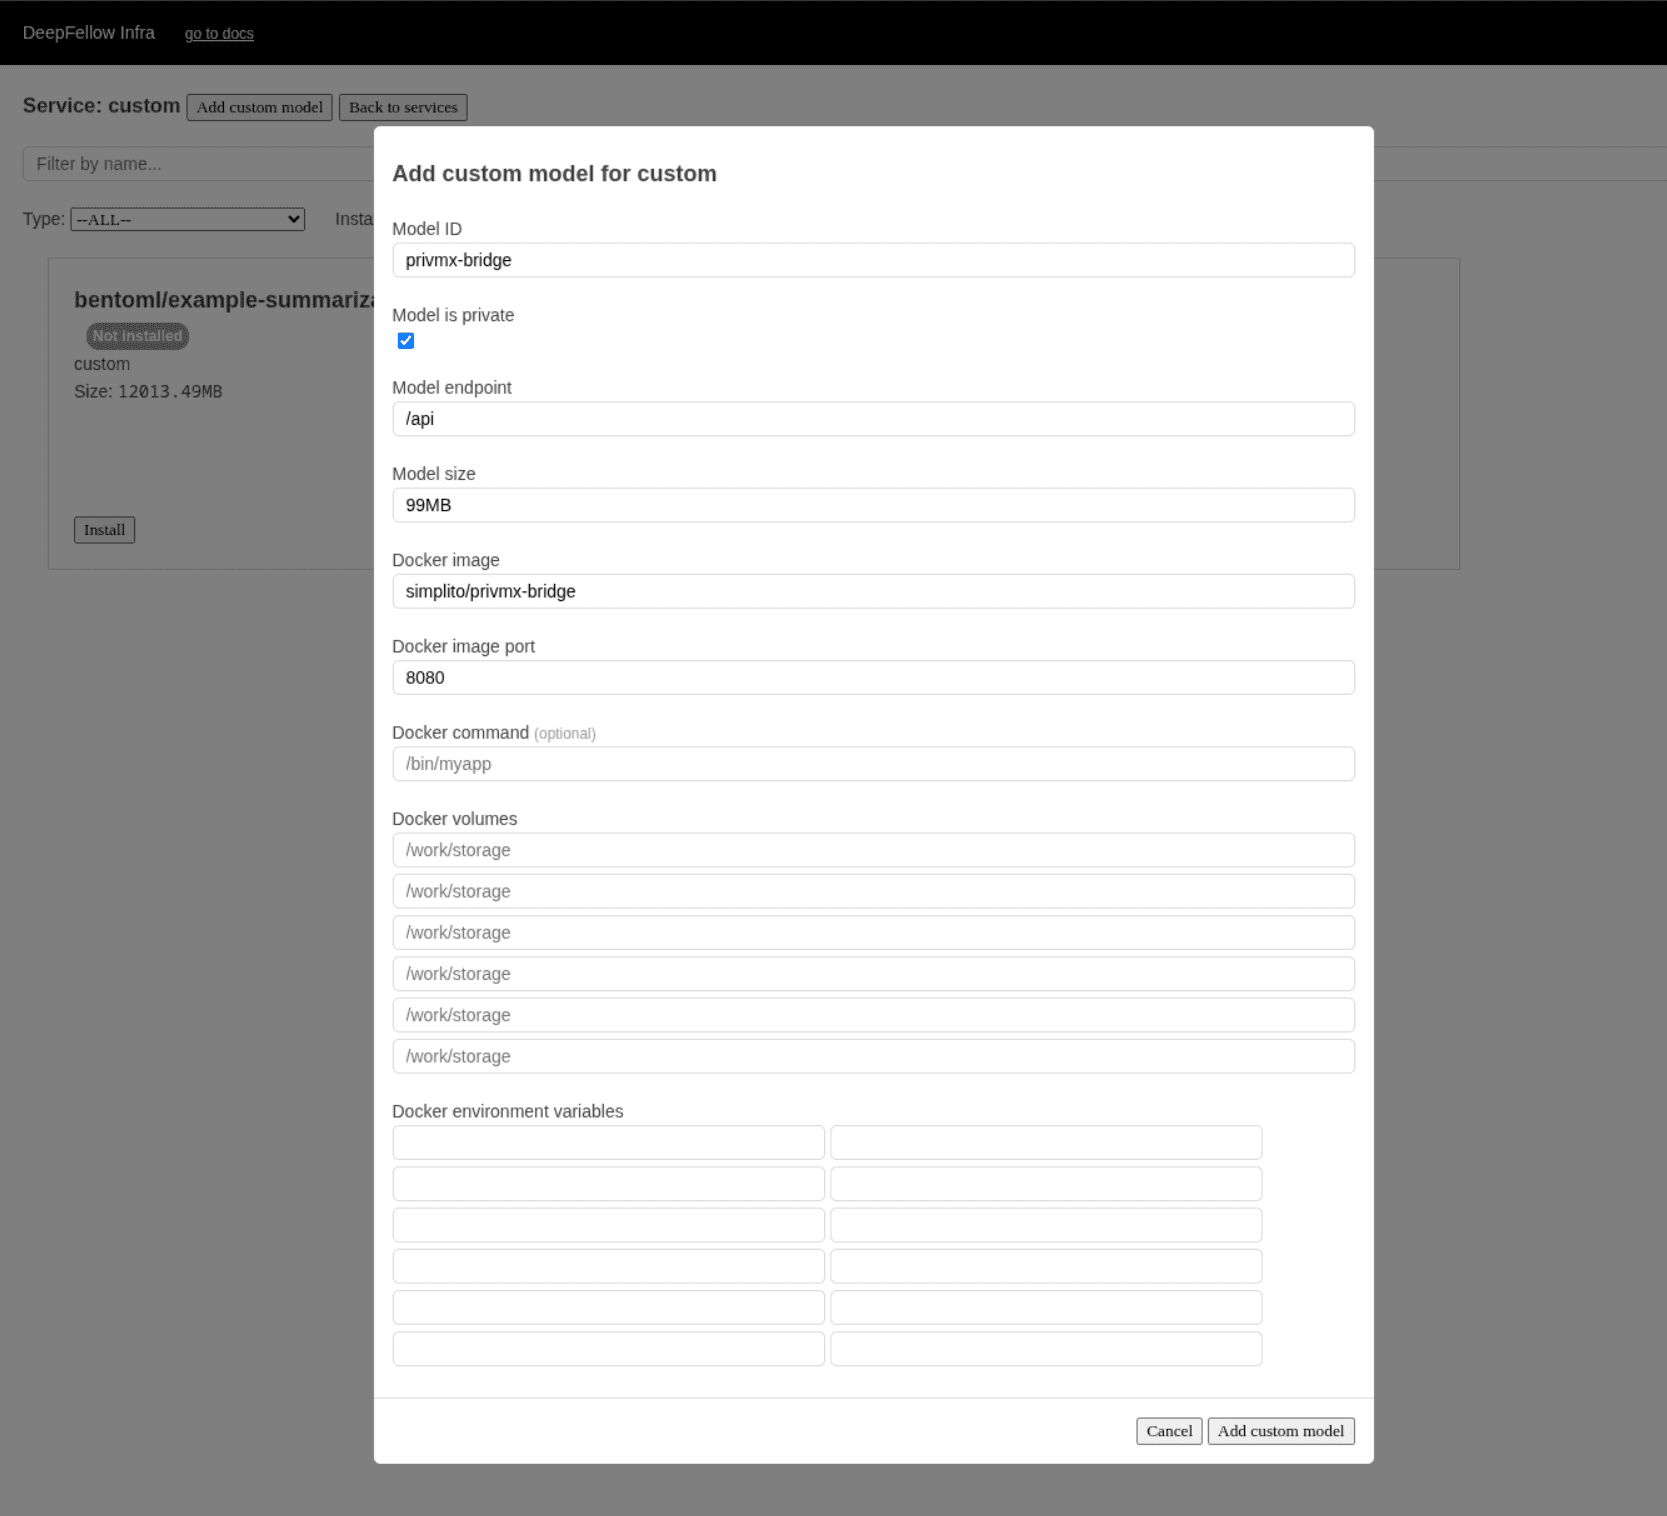
Read Using Custom Models guide to check the details.
Install
The install procedure is similar for all the services. Exception is 'custom' service - read Using Custom Models guide to check the details.
As an example, if you want to add custom model (qwen3-embedding:0.6b -- go to Ollama library) to your 'ollama' service:
- Go to the services view,
- Locate 'ollama' tab and clik 'Install' if not already installed,
- Click "Add custom model" button,
- In the pop-up window enter Model ID
qwen3-embedding:0.6b, - Enter Size
639MB, - Chose
embeddingModel type from the drop-down. New model tab will be shown, - Click "Install" button,
- In the pop-up window add optional parameters and click "Install" to confirm,
- After a while your model will appear in the models list with green label "Installed". Now you can use your model as normal.
Custom models are used exactly the same way as non-custom ones. You use their intentifiers the same way in your inference requests or code.
Uninstall
Removing custom model requires two actions:
- uninstalling model,
- removing custom model tab.
Uninstalling model
- Go to the services view,
- Click "Models" on the tab of the service (e.g. 'ollama') model was installed from,
- Search the model you want to uninstall (e.g.
qwen3-embedding:0.6), - Click "Uninstall" to remove the model.
Removing custom model tab
- Inside the model view search for the custom model name (e.g.
qwen3-embedding:0.6), - Click "Remove custom model".
MCP Servers
DeepFellow can register MCP servers in three ways: running a stdio-based server in Docker via a built-in bridge, proxying a remote MCP endpoint, or using a custom Docker image. All three are configured through a single modal on the mcp service's Models page.
Read the MCP Servers guide for full details.
Configuration
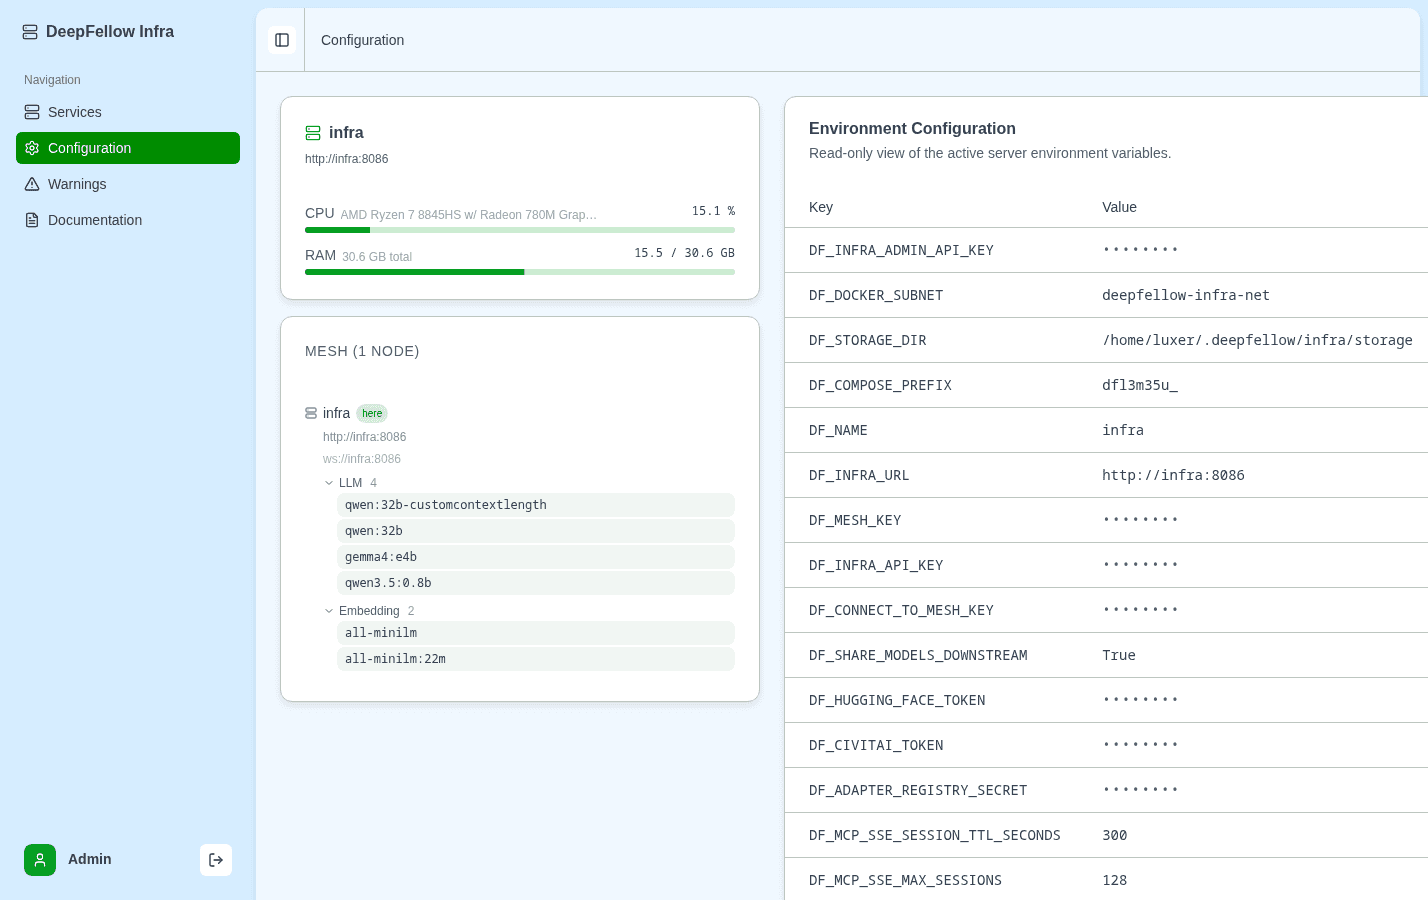
The Configuration page shows this node's live resource usage and lets an admin view and change every infra setting without restarting DeepFellow Infra.
To open it, click the Configuration tab in the Infra Web Panel.
Node Status
The card on the left shows this node's name and URL, and refreshes every few seconds:
- CPU – CPU usage as a percentage, with the CPU model name.
- RAM – used and total RAM, in GB.
- VRAM – used and total VRAM per GPU, in GB. One bar appears per GPU.
If this Infra is part of a Mesh, a Mesh card lists every connected node, including this one, labeled "here". For each node, it shows the node's name, its URL, its WebSocket URL, and the models it exposes, grouped by type (LLM, Embedding, TTS, STT, Image, MCP Servers). Click a group to expand or collapse its model list.
Environment Configuration
Each row shows a setting's key and its current value. Secret values, such as API keys and tokens, are masked by default. Click the eye icon to reveal a secret value, or the clipboard icon to copy it. For what each key means and what it defaults to, read Configuration.
A setting that supports live editing shows a pencil icon. To change its value:
- Click the pencil icon on the setting you want to change.
- Enter the new value. A boolean setting shows a toggle switch instead of a text field.
- Click the checkmark to save the change, or the X to cancel it.
DeepFellow Infra validates the new value, writes it to config.json, and applies it immediately. If the changed setting requires a live side effect, for example reconnecting to a parent Infra in a Mesh, DeepFellow Infra performs that automatically.
A setting without a pencil icon is a bootstrap setting. Bootstrap settings load from .env at startup and require a restart to change. Set them with deepfellow infra env set and restart Infra.
Environment Variables (CLI)
Display DeepFellow Infra's current configuration by running deepfellow infra info on a host that can reach the Infra's admin API. It resolves the address and admin API key from the connection stored locally by infra install or infra connect, or from --url/--api-key. API keys are masked by default. Add --secret to reveal them.
$ deepfellow infra info
💡      Information about DeepFellow Infra:
        NAME: infra
        INFRA_URL: https://infra:8086
        INFRA_MESH_URL: wss://infra:8086
        INFRA_PORT: 8086
        INFRA_IMAGE: github.simplito.com:5050/df/deepfellow-infra:latest
        MESH_KEY: *****
        INFRA_API_KEY: *****
        INFRA_ADMIN_API_KEY: *****
        CONNECT_TO_MESH_URL: undefined
        CONNECT_TO_MESH_KEY: undefined
        INFRA_DOCKER_SUBNET: deepfellow-infra-net
        INFRA_COMPOSE_PREFIX: dfd834zh_
        INFRA_DOCKER_CONFIG: /home/johndoe/.docker/config.json
        INFRA_STORAGE_DIR: /home/johndoe/.deepfellow/infra/storage
        HUGGING_FACE_TOKEN: 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
        CIVITAI_TOKEN: 7fea22cc5605cf498066059415157828
        ADAPTER_REGISTRY_URL: http://localhost:8333
ADAPTER_REGISTRY_SECRET: *****DF_INFRA_URL- URL of this Infra. When this Infra acts as a child in a Mesh, the value must be an address reachable from the parent Infra, not a local hostname.DF_INFRA_MESH_URL- URL for connecting InfrasDF_INFRA_API_KEY- key to authenticate requests from DeepFellow ServerDF_INFRA_ADMIN_API_KEY- key needed to perform administrative tasks on DeepFellow InfraDF_MESH_KEY- key needed by some other host to connect to this Infra and thus extend the MeshDF_CONNECT_TO_MESH_KEY-DF_MESH_KEYvalue of the parent InfraDF_CONNECT_TO_MESH_URL-DF_INFRA_URLvalue of the parent InfraDF_SHARE_MODELS_DOWNSTREAM- whether this Infra exposes its own models, and those of its own ancestors, to a connecting or connected child Infra in the Mesh. On by default. Turning it off only affects what children of this node see; it still shares its own models upward to its parent as usual.
After the initial .env bootstrap, most infra settings, including your keys, mesh connection, and telemetry options, move to config.json inside the Infra container. Edit them from the Infra Web Panel's Configuration page for changes that apply immediately, with no restart required. Only a few bootstrap settings, the admin key, Docker network, container naming, and storage paths, still live in .env and require a restart to change. Configuration lists which kind each setting belongs to.
To inspect the local .env file directly instead, for example before Infra has started, run deepfellow infra env info. Its keys keep the DF_ prefix, unlike infra info. If config.json already exists on the install, it warns you that some of the values shown may be stale, since a dynamic setting changed through the Configuration page or infra config set no longer updates .env:
$ deepfellow infra env info
⚠️      config.json exists on this install — some of these values may be stale if they were migrated to dynamic configuration. Run `deepfellow infra info` for Infra's current runtime configuration.
💡      Information about DeepFellow Infra:
Set env values with the command:
deepfellow infra env set ENV_NAME ENV_VALUEFor example, to set the Docker Compose resource prefix, a bootstrap setting, type:
deepfellow infra env set DF_INFRA_COMPOSE_PREFIX my_infra_Setting an env value updates the .env file, but the running stack keeps using the old value until it restarts. After it updates the file, the command asks whether to restart the stack now:
💡      Updated /home/johndoe/.deepfellow/infra/.env.
❓      Restart the infra now to apply the change? [y/n] (y):
Answer y (the default) to stop and restart the infra stack so the new value takes effect immediately. Answer n to leave the stack running with the old value until your next restart. This prompt appears only when an infra stack is running.
deepfellow infra env set refuses to write a variable that has migrated to dynamic configuration once Infra is already running, since the write would have no effect. It points you to the equivalent infra config set command instead:
$ deepfellow infra env set DF_HUGGING_FACE_TOKEN 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
💀      DF_HUGGING_FACE_TOKEN is dynamic configuration stored in config.json. Writing it to .env has no effect once Infra is running. Use `deepfellow infra config set hugging_face_token=<value>` instead.
Use deepfellow infra config set for a dynamic setting instead, as described in Configuration.
If Infra isn't running, env set can't check whether the variable is dynamic through the admin API. If config.json already exists on the install, it warns you instead of refusing, and still writes to .env:
$ deepfellow infra env set DF_HUGGING_FACE_TOKEN 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
⚠️      Infra isn't running, so I can't check whether this variable is dynamic configuration stored in config.json. config.json already exists on this install, though — if it was migrated there, this write will have no effect once Infra starts. Start Infra and use `deepfellow infra config set` if unsure.
💡      Updated /home/johndoe/.deepfellow/infra/.env.
To unset this variable, type:
deepfellow infra env set DF_INFRA_COMPOSE_PREFIXWarnings
DeepFellow Infra records a warning in the following cases:
- A service fails to load at startup.
- A service listed in the persisted configuration has no matching implementation in the running build, for example, after a downgrade.
- A model fails to load, either at startup or during a manual install from the Infra Web Panel or the API.
- A service instance's edit fails, whether or not DeepFellow Infra could automatically revert it to its previous configuration.
Without these warnings, the failures will appear only in the server logs.
To view them, click the Warnings tab in the Infra Web Panel. Each row shows when the warning occurred, the affected service, instance and model, and a message describing the failure.
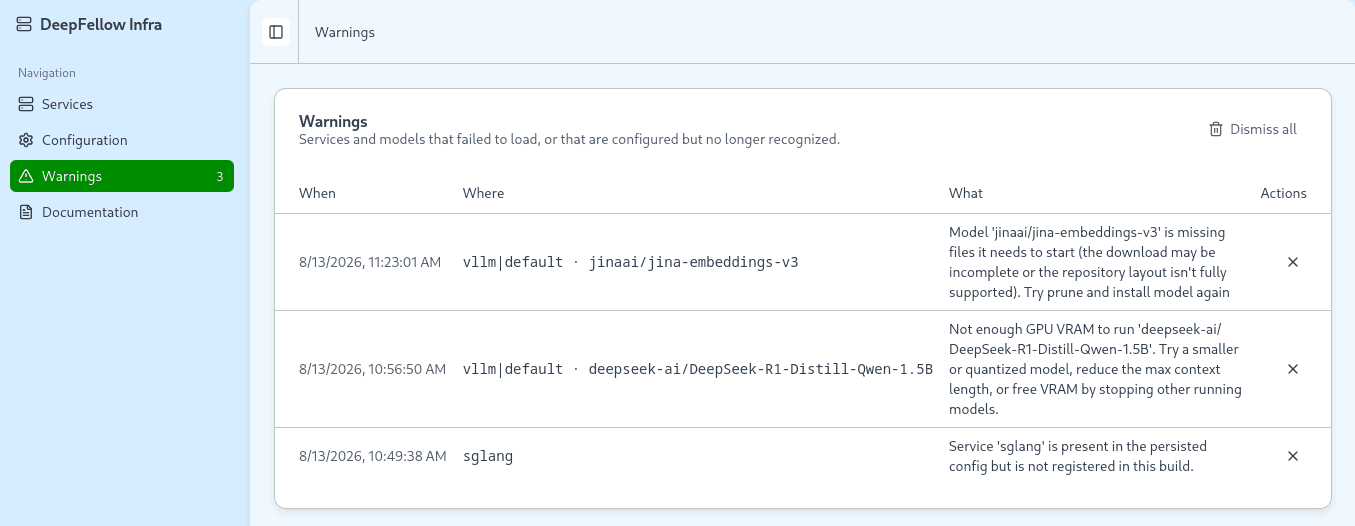
Warnings persist across an Infra restart, so a failure stays visible until it's resolved. DeepFellow Infra clears a warning automatically once the affected service or model loads successfully again. Click the X button on a row to dismiss a warning manually.
You can also list and dismiss warnings through the API: GET /admin/warnings and DELETE /admin/warnings/{id}.
API Documentation
To access the DeepFellow Infra API documentation, click the "Go to Docs" button in the upper left corner.
Version Endpoint
To check which Infra version is running, call the authenticated GET /info endpoint with the Infra API key (DF_INFRA_API_KEY):
curl -H "Authorization: Bearer <var>DF_INFRA_API_KEY</var>" http://localhost:8086/infoThe response contains the running version:
{ "version": "0.33.0" }For more information, see Observability.
Next steps
You can head to the tutorials related to using specific services listed here:
- speaches-ai:
- text-to-speech - turn text into audio
- speech-to-text - transcribe speech into text
- translation - translate speech to text in English
- Use OpenAI via DeepFellow - get OpenAI API Key to use OpenAI models with our anonymization layer
- Use Google AI via DeepFellow - get Gemini API Key to use Google models with our anonymization layer
- Use Anthropic via DeepFellow - get Anthropic API Key to use Claude models with our anonymization layer
- Use Ollama Cloud via DeepFellow - get Ollama Cloud API Key to use Ollama Cloud models with our anonymization layer
We use cookies on our website. We use them to ensure proper functioning of the site and, if you agree, for purposes such as analytics, marketing, and targeting ads.