MCP Servers
Add user-defined MCP servers to DeepFellow — via a stdio bridge, a remote proxy, or a custom Docker image.
DeepFellow can run and proxy MCP servers directly from the Infra Web Panel. Three connection types are supported:
- Command — run a stdio-based server in an isolated Docker container with a built-in bridge.
- Remote URL — register a remote MCP server as a proxy endpoint.
- Custom Image — run a server from a Docker image you provide.
All three types are added through the same modal and registered as endpoints at
https://{DEEPFELLOW_HOST}/mcp/{PREFIX}/.
with available working endpoints on:
-
for Streamable HTTP endpoint
https://{DEEPFELLOW_HOST}/mcp/{PREFIX}/mcp. -
for SSE endpoints
GET
https://{DEEPFELLOW_HOST}/mcp/{PREFIX}/sse. POSThttps://{DEEPFELLOW_HOST}/mcp/{PREFIX}/sse?sessionId=<id>.DeepFellow rewrites the upstream
endpointevent so the client posts back to this same path; thesessionIdvalue comes from that event.
Add an MCP Server
Open the mcp service in the Infra Web Panel, click Models, then click Add MCP Server.
Auto Import
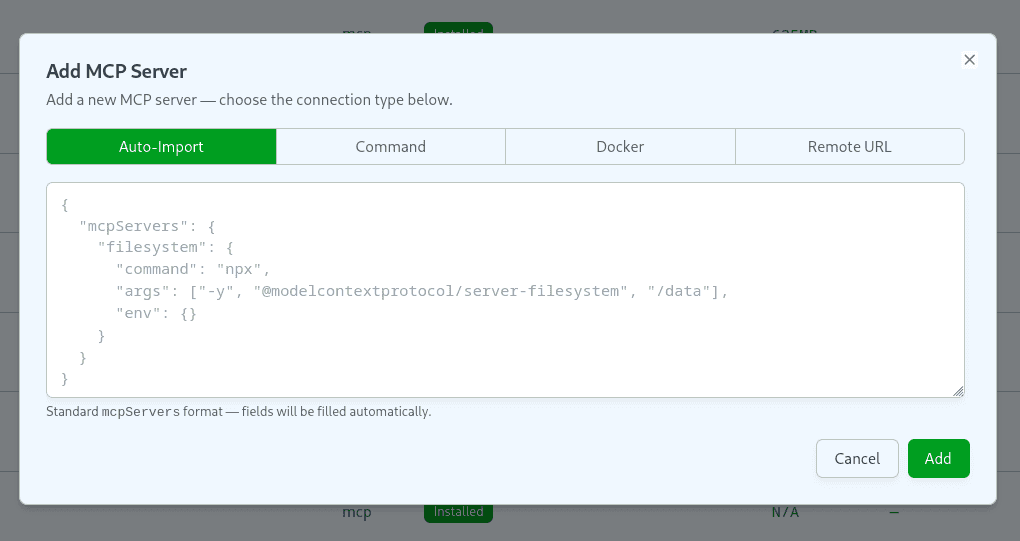
The fastest way to add a Command or Remote URL server is Auto Import. Paste a standard mcpServers JSON config and DeepFellow fills in the form automatically.
- Click Add MCP Server, then choose Auto import.
- Paste a
mcpServersJSON config from Claude Desktop, Cursor, or a similar client. - DeepFellow parses the config, selects the correct connection type, and pre-fills all fields.
Supported config formats:
- Standard
command+args+envfields — switches to Command mode. docker runcommand — switches to Custom Image mode, extracting the image, the inner command, and any-v/--mountvolumes as bind mounts.cmd /cWindows wrapper — stripped automatically.- Proxy config (with a
serverUrlorurlfield) — switches to Remote URL mode automatically.
Node.js (npx)
{
  "mcpServers": {
    "filesystem": {
      "command": "npx",
      "args": ["-y", "@modelcontextprotocol/server-filesystem", "/data"]
    }
  }
}
Python (uvx)
{
  "mcpServers": {
    "semgrep": {
      "command": "uvx",
      "args": ["mcp-server-time"]
    }
  }
}
Remote MCP (Streamable HTTP)
{
  "mcpServers": {
    "deepwiki": {
      "serverUrl": "https://mcp.deepwiki.com/mcp"
    }
  }
}
Command (stdio Bridge)
Use this type for MCP servers distributed as npx or uvx packages — the most common public MCP servers.
DeepFellow builds a Docker image that wraps the server process in a stdio-to-HTTP bridge:
- Node.js servers use
supergateway. - Python servers use
mcp-proxy.
Runtime Variants
| Variant | Language | Chromium |
|---|---|---|
node-headless | Node.js | No |
node-headed | Node.js | Yes |
python-headless | Python | No |
python-headed | Python | Yes |
Use a *-headed variant for servers that require a browser (Playwright, Puppeteer). DeepFellow auto-detects the variant from the launch command binary. Override it manually if the detection is wrong.
Manual Setup
-
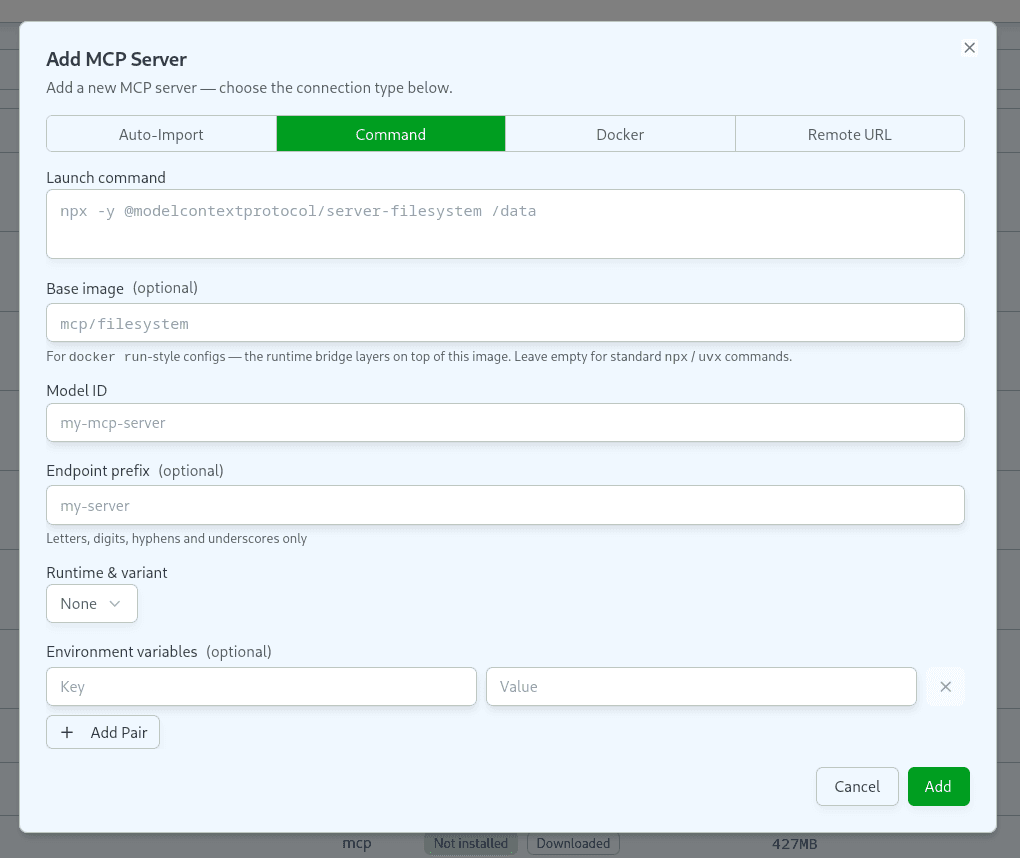
Select Command → Manual.
-
Fill in the fields:
- Launch command — the stdio command to run inside the container. For example:
npx -y @modelcontextprotocol/server-filesystem /data uvx mcp-server-git --repository /repo - Base image (optional) — override the default base image. Leave empty for standard
npxoruvxcommands. - Python version (optional) — for Python variants, overrides the interpreter version in the base image. Defaults to Python 3.13. Ignored if Base image is set.
- Node version (optional) — for Node.js variants, overrides the interpreter version in the base image. Defaults to Node 22 LTS. Ignored if Base image is set.
- Model ID — unique identifier for this server.
- Endpoint prefix (optional) — path segment for the registered endpoint; defaults to Model ID.
- Variant — auto-detected; override if needed.
- Environment variables (optional).
- Launch command — the stdio command to run inside the container. For example:
-
Click Add. The server appears in the model list.
-
Click Install. DeepFellow builds the Docker image and streams the build log in real time.
Custom Image
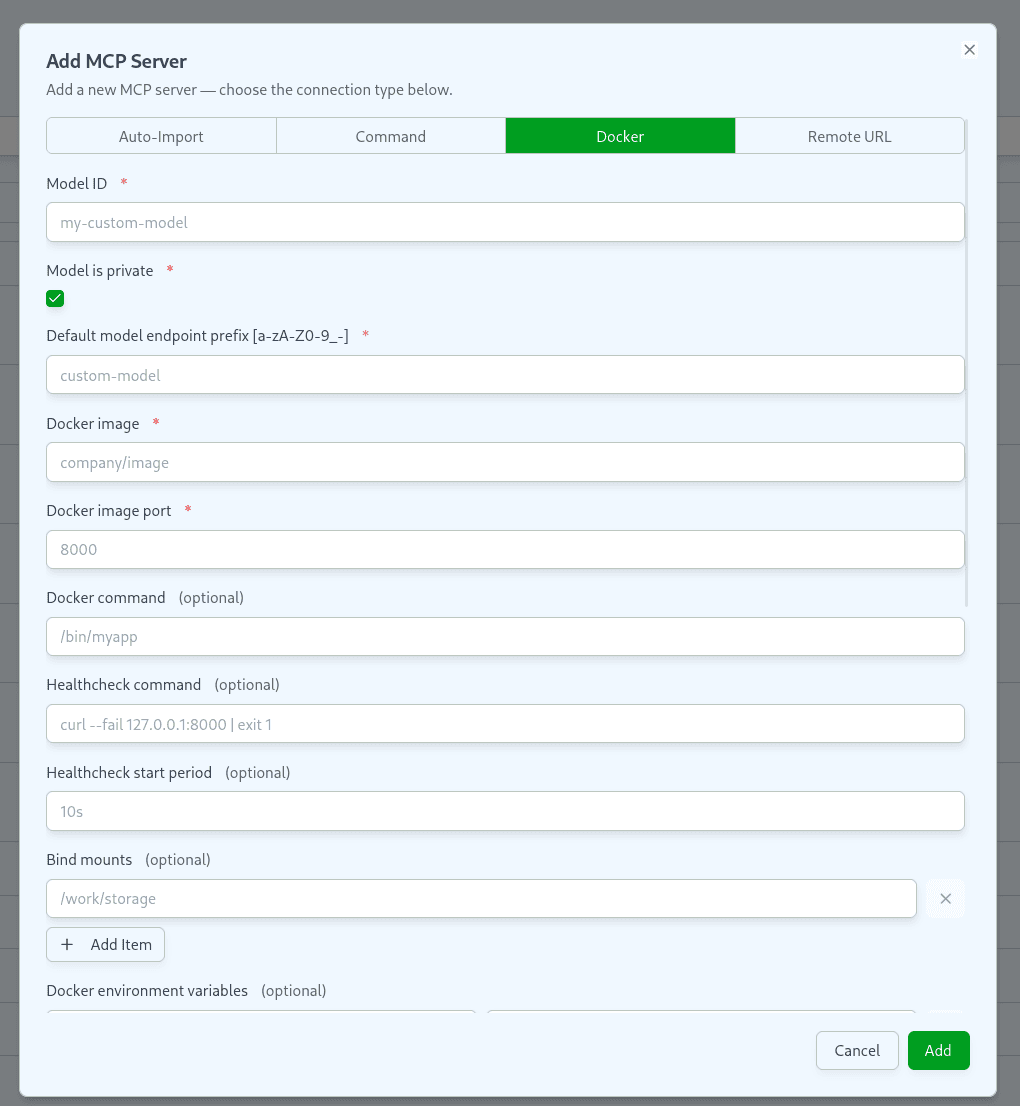
Use this type for MCP servers packaged as a Docker image.
- Select Custom Image.
- Fill in the image spec fields. Optionally add bind mounts.
- Click Add, then Install.
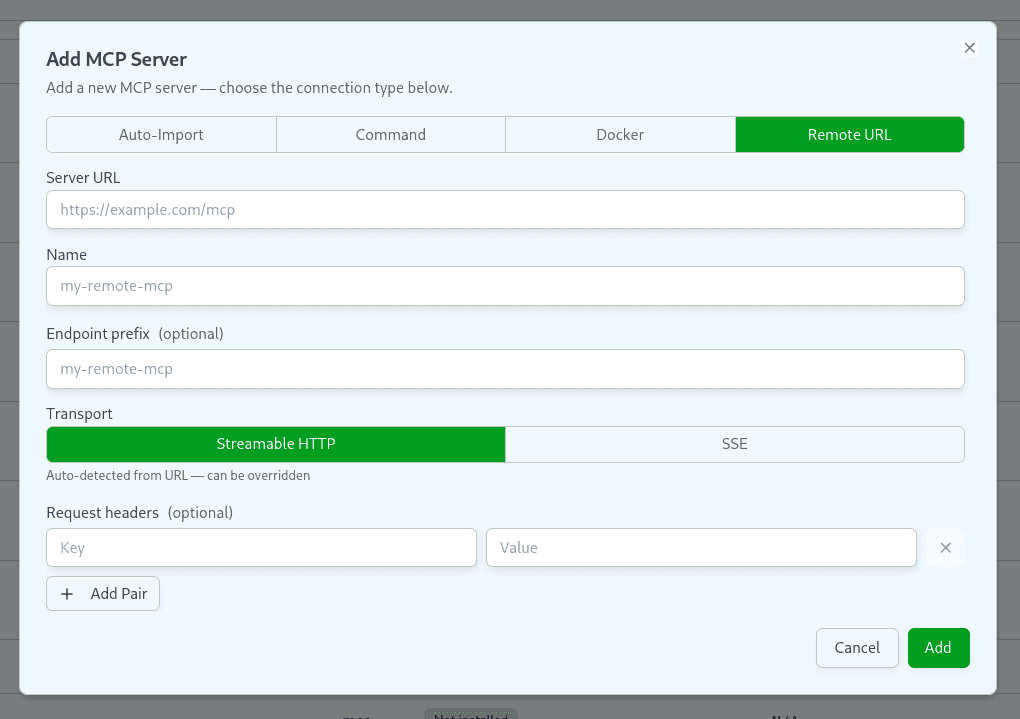
Remote URL (Proxy)
Use this type to expose a remote MCP server through DeepFellow without running it locally.
-
Select Remote URL.
-
Fill in the fields:
- Server URL — the upstream MCP endpoint URL.
- Name — display name.
- Endpoint prefix (optional).
- Transport — Streamable HTTP or SSE (auto-detected from the URL path; override if needed).
- Request headers (optional) — forwarded to the upstream on every request.
-
Click Add. No Docker image is built. DeepFellow registers a proxy route immediately.
For SSE transport, the proxy rewrites endpoint event URLs so all client traffic routes through DeepFellow. The upstream URL is never exposed to the client.
OAuth for Remote MCP Servers
Some remote MCP servers require OAuth 2.1 authorization before they accept requests. DeepFellow implements the relevant subset of the MCP Authorization spec: protected-resource discovery (RFC 9728), authorization-server metadata discovery (RFC 8414), dynamic client registration (RFC 7591), and the PKCE authorization-code flow.
This flow authenticates DeepFellow Infra to the remote MCP server's own authorization server. It is unrelated to DF_INFRA_ADMIN_API_KEY or any other credential DeepFellow uses to protect its own API, described in Authorization.
Note Before starting an OAuth flow, set the Infra URL (
DF_INFRA_URL) in Settings to this Infra's externally reachable address. DeepFellow needs it to build the OAuth callback URL,https://{DEEPFELLOW_HOST}/mcp-oauth/callback, which the authorization server redirects the admin's browser back to.
Automatic Detection
You never have to pre-declare that a remote MCP server needs OAuth. DeepFellow detects the requirement from an HTTP 401 response, either right after you install a Remote URL server or from a later health check, and automatically:
- Runs protected-resource and authorization-server discovery against the server's URL.
- Enables OAuth for the model and stores the discovered
authorization_endpointandtoken_endpoint. - Marks the server's status as requiring authorization.
If the 401 happens right after installing, DeepFellow prompts immediately:
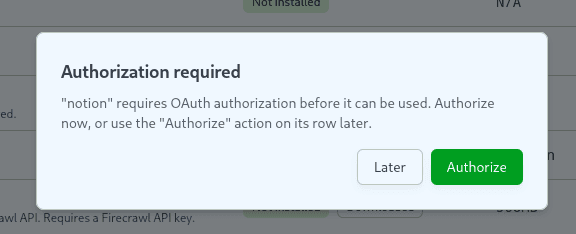
Choose Authorize to start the flow right away, or Later to do it from the server's card.
Authorize a Server Manually
Use the ⋮ menu's Authorize action instead of the install-time prompt when:
- You dismissed that prompt with Later and the card now shows the
OAuth: not authorizedbadge. - You want to re-authorize with a different account on the remote server.
-
Open the ⋮ menu on the server's card and click Authorize. DeepFellow discovers the authorization server if it hasn't already, registers a dynamic OAuth client if no
client_idis configured, and opens the authorization URL in a new browser tab.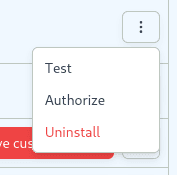
-
Sign in to the remote server's authorization page and approve access. Signing in with a different account than a previous authorization replaces the stored access and refresh tokens.
-
Wait for the redirect back to DeepFellow's callback page, which confirms the result and can be closed. DeepFellow exchanges the authorization code for an access token and, when the server issues one, a refresh token.
The card's OAuth badge reflects the current state, regardless of how authorization was triggered:
| Badge | Meaning |
|---|---|
OAuth: not authorized | OAuth is enabled but no authorization attempt has completed. |
OAuth: pending | An authorization flow is in progress. |
OAuth: authorized | A valid access token is stored. |
OAuth: expired | The access token expired and could not be refreshed automatically. |
OAuth: error | The last authorization or token request failed; see the error message on the card. |

Once authorized, DeepFellow attaches the access token as a Bearer header on every proxied request and refreshes it in the background before it expires. If a request still comes back 401, DeepFellow refreshes the token once and retries.
Manual Client Registration
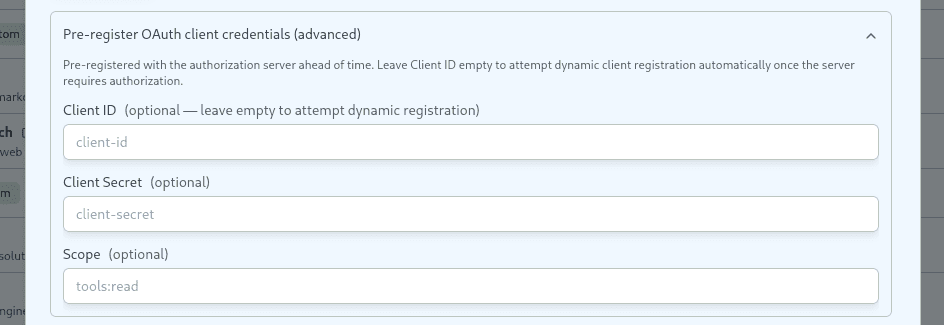
If a remote server does not support dynamic client registration, expand Pre-register OAuth client credentials (advanced) while adding or editing a Remote URL server and fill in:
- Client ID — required if the server has no dynamic client registration endpoint.
- Client Secret (optional) — for confidential clients.
- Scope (optional) — space-separated OAuth scopes to request.
Leave Client ID empty to let DeepFellow attempt dynamic client registration automatically once the server requires authorization.
Note A Remote URL server cannot be edited or uninstalled while an OAuth authorization is pending. Wait for the flow to complete or expire (10 minutes) first.
From the CLI
Add, install, list, uninstall, and remove Command, Remote URL, and Custom Image MCP servers from deepfellow, without opening the Infra Web Panel:
deepfellow infra mcp add my-search --config ./chrome-devtools-mcp.json
deepfellow infra mcp install my-search
deepfellow infra mcp list
deepfellow infra mcp uninstall my-search
deepfellow infra mcp remove my-search
deepfellow infra mcp add accepts the same mcpServers JSON config as Auto Import, from a file (--config) or piped in on stdin, and only registers the server's configuration. Run deepfellow infra mcp install afterward to actually start it. deepfellow infra mcp uninstall stops a running instance, built-in or custom, without deleting a custom server's registration; deepfellow infra mcp remove deletes a custom server's registration entirely and only works on servers added via mcp add. See the CLI reference for the full option list.
OAuth authorization for Remote URL servers is only available from the Infra Web Panel.
Edit, Duplicate, and Uninstall
Open the ⋮ menu on an installed server's card and click Edit Settings to change its configuration: the endpoint prefix, environment variables, request headers, the Docker image, or any other install-time option. DeepFellow uninstalls the running server, applies the new settings, and reinstalls it automatically, for all three connection types.
- The Model ID cannot be changed from the Edit dialog. To register the server under a different ID, use Duplicate instead.
- If the endpoint prefix you enter is already used by another installed server, DeepFellow rejects the edit before uninstalling anything.
- Saving an edit with no changes closes the dialog without uninstalling and reinstalling the server.
To create an independent copy of a server instead of changing the original, select Save as a new service in the Edit dialog before saving. DeepFellow installs the copy immediately, under the ID and prefix you provide, with the same settings as the original.
To remove a server, click Uninstall:
- Uninstall — stops and removes the container but keeps the built image for a faster reinstall.
- Purge — removes the container, the image, and the generated
Dockerfile.
We use cookies on our website. We use them to ensure proper functioning of the site and, if you agree, for purposes such as analytics, marketing, and targeting ads.